hey, does anyone know a good workflow for making wings (like you’d see on a dragon) out of Zspheres?
I’d personally use Zspheres/Zsketching to make the skeletal frame, then use the topology tools to quick retopo with the membrane in between. You could make them with Zspheres, but it would be more work for inferior results.
All due respect, how would that work, Scott? Topo tools need a reference mesh. If you only have the skeletal frame built, then there is no reference mesh to retopologize.
Perhaps I misunderstood your meaning.
I would use a box primitive. Go in it’s deformations and make it thin, then just reshape it to fit your skeletal frame using a combination of Transpose and the move brush.
i don’t have 3.5 yet do you know how to do it with ZSpheres I?
The skeletal frame are points of reference. The membrane stretches between them. Once youve built the frame work, its a simple matter to draw a line between two points in space. You dont need a membrane already in place to draw topology on top of…you simply draw it between the anchor points.
Draw a a plane between the skeletal “fingers” of the wing. Then add a split down the center, and use the move tool to pull it out a little in space to give a bit of curvature. Repeat on the other side, since you want a bit of thickness to the membrane.
Complete your mesh. Subdivide.
If you don’t want to retopo your entire mesh yet, just build the frame with Zspheres. Then simply draw out the membrane plane from point to point on the skeletal fingers of the wings, add a bit of thickness in the retopo menu, and insert that mesh into the other, or append it as a subtool. If you do the former, you can sculpt them both at the same time. At Low subD levels it will be easy to pull the point into place exactly as you want.
Then you have a complete mesh you can use as a reference to retopo later.
Don’t get me wrong. You can do it with Zspheres. But it will take trial and error, and produce inferior results to just taking the direct approach.
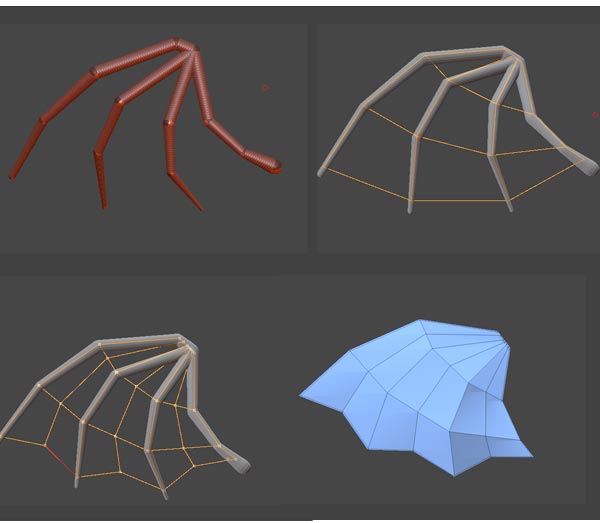
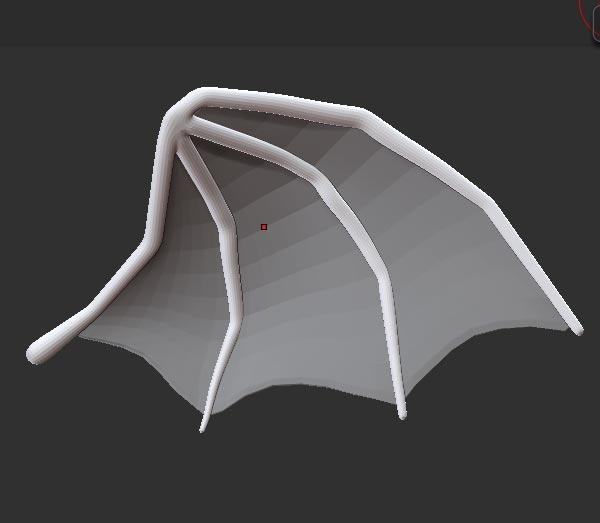
Normally I wouldnt do this, but Dustin challenged me, so as an afterthought, you get an illustrated example. 
[attach=158784]wingEx.jpg[/attach]
[attach=158785]wingex2.jpg[/attach]
I only spent a couple minutes doing this in ZB…spent much more time editing the screens in pshop and typing this out, so it’s not pretty. 
But once you have your wing framework built, you have all the landmarks you need for the topology. Draw the topo out over the mesh framework, “connecting the dots” as it were. I then split the polys again, you add a bit over curvature at this level, but that isnt strictly necessary, you can do that post subD. If you do do this, and you are picky, you might want to put in a couple more horizontal lines so your polys are more “square” shaped for superior sculpting.
In the topolgy menu , add a bit of thickness, then make the adaptive skin. Keep the SuB D level low, so it will be easy to move the points around.
Append the skin as a subtool to the main wing body. At the lowest level of SubD, use the move brush to do any tweaking, and pull the points within the wing frame if need be.
If you’d like to be able to sculpt the wing frame and the membrane simultaneously, make sure the wing and the membrane have the same number of sub D levels, and clone the membrane subtool. Then use the insert mesh command (with both tools at max subd) with the cloned subtool (this is 3.1 thinking, it had a quirk when you used this command that wouldn’t insert the mesh at the correct position/scale, and the work around was to append it as a subtool first, then clone and insert that…the process for this may be different now.)
You could also just retopo the entire body, and draw in the membranes during that process so it comes out as one piece, but that’s a bit more work. A bit more work that will produce a far superior mesh however.
Attachments


Thank you Bingo_Jackson:)
One feature that was not yet mentioned is that in 3.5 the quality of “Make 3D” from alpha is much improved. It will produce evenly distributed polygons with smooth borders.
Try this…
1. Launch ZBrush, you should see the startup PolySphere in edit mode.
2. Select Alpha 19 in the alpha palette.
3. Press Make 3D in the alpha palette.
This will produce a clean mesh from the selected alpha. To make a ‘wing’ alpha, you may either draw it in ZBrush by using the 2.5D brushes, or import any alpha that was created elsewhere.
If you need exact control over the topology of the mesh, use the method described by Bingo_Jackson.
If you simply want a ‘wing’ surface to sculpt on, you may use the quick 3D-mesh-from-alpha method.
Well, he’s only got 3.1, but I’m running off to check the new “make 3d” functionality 
I did not see that,thanks:)
wow thanks you guys that’s a lot more info that i thought i’d get, i’ll look into both of these.
This seems likely the place I should ask this question, if not feel free to tell me it got moved and where to…lol.
ok, what happened to the one where you could make a line of tiny zpheres and if you joined them together it would make a skin? I watched a video by pix, I think and then made some on my own to try it…worked great! I am now in zb3.5r2. Can’t find anything like this. And it doesn’t help that I don’t know the name of what I am looking for to do searches!
If anyone could help, It would greatly be appreciated!
wenna
wenna, it’s called retopo, or retopologization…or however the hell that is spelled.
or topology will bring up stuff if you search it as well.
there used to be a way to make a membrane between the zspheres using magnet spheres, look for pixolators dragon.
yeah space this is still possible but only with classic skinning mode. the new algorithm does not seem to to support it or negative zspheres either but least it gives us another option depending on how we work… but the algorithms have been greatly improved in the ability to to capture the existing form which is good… now we wait yet again and hope zbrush 4 will be able to finally combine and seal open chains and merge the existing link…
based out in modo. enjoy.
Thanks so much for the info goast!
wenna