ZBrushCentral

UV Master - Rotate UV Islands

Hello,
I am a graphic design student and I am trying to get used to zBrush. I was using student edition of MudBox and now trying out zBrush. I have sculpted a pant from DynaMesh and I want to UV them the way I want for the tiles to be in correct position. So far I have painted the seams for UV Master but zBrush automatically shapes the islands, so the diagonal textures go in different directions. Here is my question, is there a way I can rotate UV islands within zBrush? Since my lowest subdivision level is 88K right now, it is really hard to UV them for my PC.

I may export the UV Mastered 3d model to rotate islands and reimport to bake details or paste UV’s but I think there might be a better and faster solution where I couldn’t find out…

Thanks so much for your time!
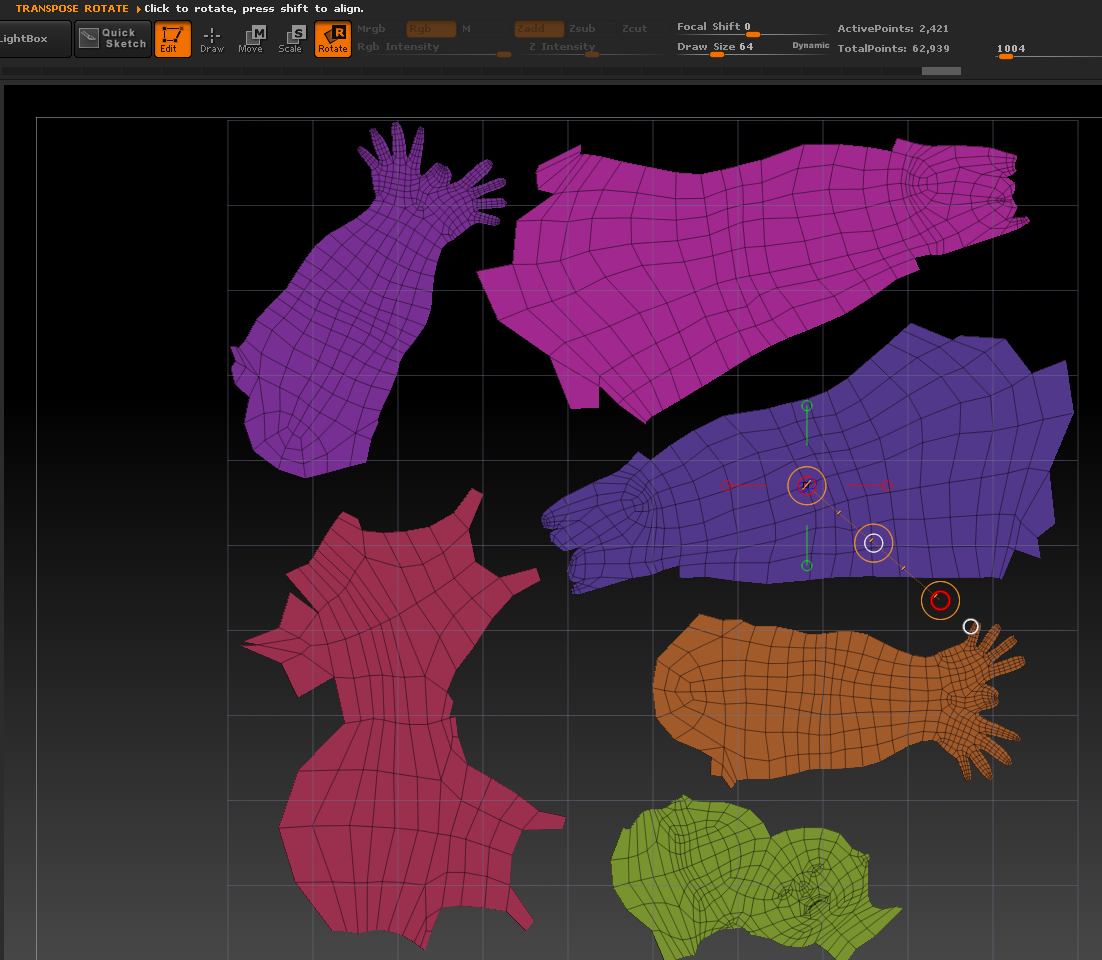
Yes, you can do it using the UV Master ‘Flatten’ feature:

  1. You need to be working on a clone of your model, or it can’t have subdivision levels.
  2. Press ZPlugin>UV Master>Flatten to flatten the UVs.
  3. If you’ve used polygroups for the UV islands then you can use use the Mask By Polygroups feature. Set the Brush>Auto Masking>Mask By Polygroups slider to 100. Otherwise you’ll have to use masking. Use the Mask Lasso to mask the island you want to rotate then Ctrl+click the background to invert the mask.
  4. Now you can use the Rotate, Scale and Move mode Transpose line to arrange the islands how you want.
  5. When you’ve finished, press ZPlugin>UV Master>UnFlatten.

Note: keep the islands evenly distributed in the grid. You cannot reduce the scale of them all and (for example) move everything to one corner - UV Master will automatically scale to best fit the grid.

Attachments

Flatten.jpg

Hi Marcus,

Thanks so much for your reply, I am now able to use UV Master plugin the way I want!

Cheers,
Can