Prof,
Most ZBrush users travel the same path you’re now on trying to understand the AUV and GUV Tiled system of mapping.
To make UV mapping experimentation a little easier I wrote a little plugin called MapIt. You can find the most recent version, MapIt 1.4, >>> HERE <<< . MapIt lets you PLAY with various mapping options and orientations, as well as create repeating textures and alphas which can be very useful.
The central thing to understand about UVTile mapping applied in ZBrush is that you CANNOT take a pre-existing map (checkerboard for example) and apply it to your model via any of the AUVTile or the GUVTile formats.
As Ken points out in his introductory UV .PDF file, the UVTile layout for a texture is a point of departure not a point of arrival. For each quad polygon on the model it lays down a square (or tile) on the texture map. The order of the tiles is constructed on-the-fly, by the mapping routine.
Originally UVTiles were uniform squares placed in a grid. Each tile independent of its neighbors.
With AUVTiles, the size of each tile varies depending on the dimensions of the polygon it is matched to, a smart way to minimize stretching of pixels. For efficiency, tiles of SIMILAR SIZE are grouped together (this makes the relative layout seem even more discontiguous.)
With GUVTiles, the mapping routine tries to GROUP CONTIGUOUS TILES as much as possible, based in part on subgroups but the UVTile group distribution is still very discontiguous.
Finally, it should be obvious that UVTiling is specifically designed to let the user:
Create an orderly layout of 2D tiles on a BLANK TEXTURE that match up with the quad polygons of the 3d model, and only then…
Build the final texture by PAINTING DIRECTLY onto the 3d model.
Note that you can use Projection Master to lay down other texture maps onto PARTS of the 3d model. When the model is “picked up” again, those modified pixels in each quad polygon are separated and placed, via the mapping routine, onto the UVTile layout.
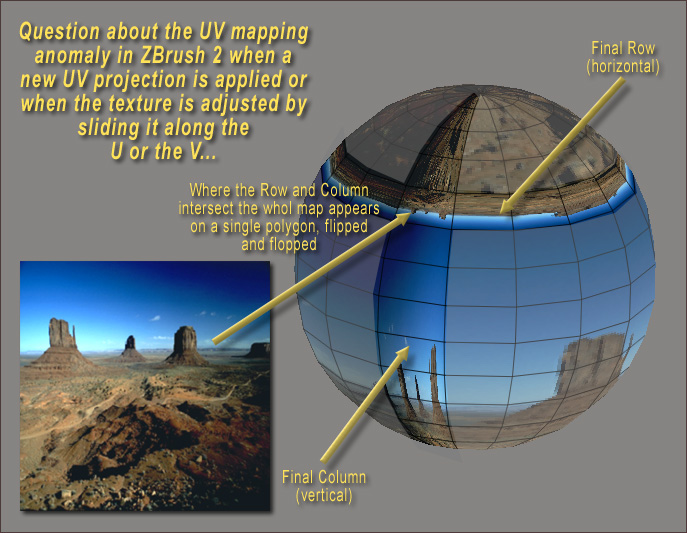
THE SEAM
A separate issue that I’ve found frustrating is the emergence of the seam when applying UVC, UVS mapping. In MapIt, the seam becomes very obvious when sliding the texture along U or V.
What causes the seam? As far as I can tell, it’s caused by the way ZBrush interprets the UV values. Normally, U and V rectangles are defined by decimal values that fall between 0 and 1. (U=0 and V=0 at the upper left corner of the map.) All rectangles along the left side of the map, will have a U value of 0. Likewise, across the top of the map rectangles will have a V value of zero.
Now, to CLOSE the edge along the right and the bottom of the texture map, U and V values will ALSO have to be 0. As far as I can figure out, this is what causes the problem. Rather than just taking the last row or column of rectangles along the right or bottom edge, the mapping routine applies the texture from an entire row or column (backwards of course) to the appropriate quad polygon on the model. Look closely at the contents of the errant seams and you will see the entire map is crammed into that strip.
In the attachment I try to show how this works on a low-res sphere.
I’m not sure if there is an answer to this anomaly. I’ve been unable to force any work around, so when I can, I just hide the seam or work at a resolution where the seam problem is not too noticable.
Sven
ps. And then there’s >>> THIS <<<
Attachments

 (import or use native primitives or zspheres, etc).