Hi. This is my third model using Zbrush 2 (I have a Mac). It’s supposed to be one of the Skeksis from the movie Dark Crystal. Comments and criticisms are very welcome. Thanks.

Attachments

Hi. This is my third model using Zbrush 2 (I have a Mac). It’s supposed to be one of the Skeksis from the movie Dark Crystal. Comments and criticisms are very welcome. Thanks.
its looking good mate. the one thing though that immediately jumps out at me, and i think when fixed will increase the look of this model tremendously is the eye. because it is a part of the overall sculpt, when you came to polypainting, the colour from the eye bleeds into the surrounding colour. i suggest take something like the inflate tool, hit alt and knock the sockets back a little way, append a sphere, position it in the socket, mirror it and then build up a little bit of an eyelid over the sphere (very easy to do with some masking, the move tool and then the smooth tool)
maybe also define the line a little where the beak meets the skin (lazy mouse, standard brush and alpha 01 are great for this sort of thing)
good luck with the rest of the modelling man, off to a good start.
Adam
Thanks for taking the time to reply and for the tips. I agree the eye needs a lot of work, I’m still trying to work out how to use a sphere to deform it in projection master. Here’s a work in progress on the upper body. 
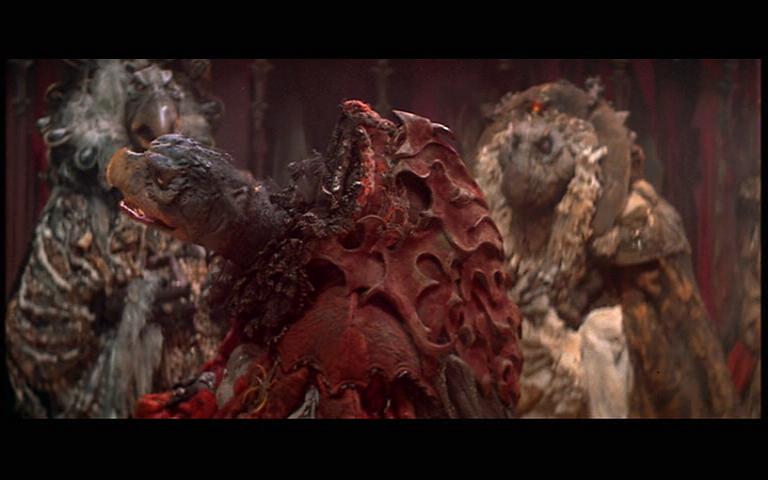
Wow good start. I love Chamberlain the best out of all of the Skeksis. Yeah Die hard Dark Crystal fan lol, I am just a big kid. Have seen quite a few Mystics but no Skeksis, therefore I was thinking of making him as well but I know I won’t come close to it as you have. I agree with mradamw about the eye, it also needs to be bigger, but not on the beak I liked it better in the first kinda colored one. I have lot’s of pics of this guy… Here’s one if you don’t have it, hopes it helps. Can’t wait to see this guy finished. Keep up the good work.
p.s. if ya need some more pics just let me know I have so many…too many they are taking over my comp like tribbles. HHHHmmmmmm…

Ye man, since its a good start I’ll just say for the love of Brian Froud try tightening up edges and introducing some angularities instead or a repetition of blob like forms…but ye, keep on…
-J
Seavannah: Thanks so much for the photo, I can see where I’m going wrong now. Think I will start the head over from scratch. If you have anymore photos that would be much appreciated, especially of the head and the mantle/collar around the neck. Thanks again.
Josh: Yeah, the mantle is a bit blobby, couldn’t really find any decent reference pics for it. Thanks for taking the time to comment.
Resculpted the head using better reference this time. Eye still causing problems, very jaggy, maybe no enough resolution in area?


looking much better already 
i see you said you were “I’m still trying to work out how to use a sphere to deform it in projection master”.
you dont need to do this, there is a much simpler way of getting a good eye socket shape. i guess i didnt explain it too clearly in my last post (sorry!)
so here goes. smooth over where the eye is now, you can then select the Inflat (or standard brush) tool, select say the 01Alpha, and then using ZSub, carve your eye socket into the head, smoothing as you go. then just Append a standard sphere to the model, you will need to move it around and scale it using the Move, Scale buttons at the top to get it into the socket. when you are happy with its position, clone the sphere (in the Subtools menu) and then Append the cloned version, it will appear in the exact same place as the original sphere (dont worry about this), go down to the Deformations pallette and hit the button that says Mirror. this will use the axis of your model to mirror the position of the new sphere from the old one). and there you have two nice new eyeballs if you want to add eyelids, just use the Standard or Clay Tubes brush and build up the top and bottom of the eyes.
i hope this helps you. good luck mate
Thanks for taking the time to explain the eye process, unfortunately I only have Zbrush 2 (Mac user here, come on still waiting Pixologic) and can’t use sub tools, clay brush etc. Will try this out once they release the upgrade for the Mac.
Think I leave this and try again when Zbrush 3 is released for the mac. Here’s a final touch up in Photoshop. Thanks to everyone who took the time to comment, they were much appreciated!

Hey Great remake. Glad the pic helped here are a few more for when you are ready.
[attach=92915&thumb=1]dc_skezis80.JPG[/attach] [attach=92916&thumb=1]dc_skezis113.JPG[/attach] [attach=92917&thumb=1]dc_skezis250.JPG[/attach] [attach=92918&thumb=1]dc_skezis284.JPG[/attach]
Hope these help and hope to see him finished one day.