ZBrushCentral

multiple high rez texture maps to one low rez model

Ok, I am stuck on this one stage of making a game ready model.

Here is where I am at so far:

I have a high rez character with mulitple parts in Zbrush. I make a single low rez cage in a 3D app which encompasses all the seperate parts. I use Xnormal to extract one normal map from the multiple parts and map that to my low rez cage. Now my low rez model looks like my high rez Zbrush sculpt. Cool.

But, how do you extract one texture map from multiple high rez objects???

Can I do this in Zbrush? Or, do I do this back in Max, or Maya?

Help please.

Thanks,

Matt
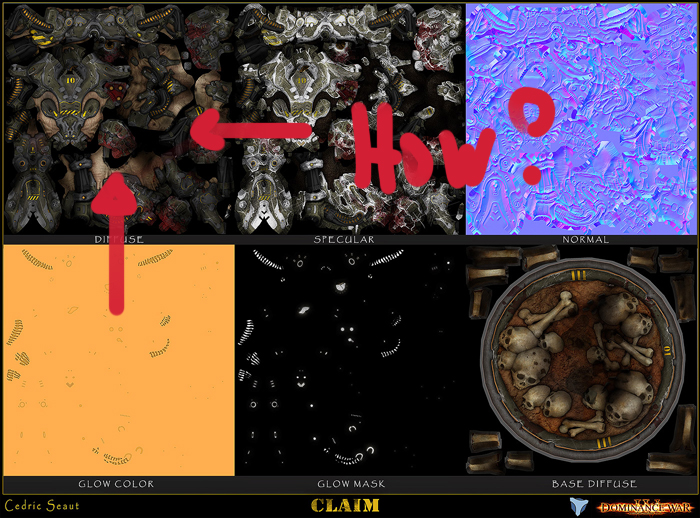
Ok - lots of reads, no replies. I have attached an image to this post from one of Cedric Seauts models to make things more clear.

How did he convert multiple texture maps from multiple objects, into one map.

Anyone who understands this part of the modeling and texturing process, your input would be really appreciated.

Thanks,

Matt

Attachments

Claim_maps.jpg

Cedric does his work in PS I believe. But what you’re trying to do…I think anyway.

Are you asking how to get a spec map and a glow map?

I think you’re asking how do I get the textures from the object I made in Zbrush (multiple hires polypaint textures) onto the lowres? At least I think that’s what you’re asking. Anyway, any application that can bake textures can do this.

I just did up some vids on doing this in Xnormal actually.

http://www.youtube.com/watch?v=YYMPO_5ThKQ
http://www.youtube.com/watch?v=Iq487iSCYGA

Thanks dude that is exactly what I am looking for - I did not realize that Xnormal could do stuff like diffuse, I thought it was mainly for normal and occlusion maps.

I also figued out this afternoon that you can create shaders with multiple maps and apply those maps to different areas of your mesh. Once you have them mapped correctly, you can than bake the multi-mapped shader onto the low rez mesh and it creates a single map. But your Xnormal method is much easier and faster.

Thanks alot!!

Matt

OK, well, I’ll tell you my work flow in 3ds max, but it’s the same anywhere.

  1. make sculpt in ZBrush composed of many subtools.
  2. export all subtools to seperate obj files, aptly named
  3. Cut UVs for each subtool using favorite UV editor (Headus)
  4. Import all the obj files into 3ds max.
  5. combine all the imported objects into one single polygon object. This combines the UVs as well, but preserves their layout so that the shells will overlap like crazy.
  6. Place an Unwrap modifier on top of the edit poly object.
  7. Edit the UVs and just spread out the shellls so they have space between them and none overlap.
  8. Scale all the shells simultaneously so they’ll all fit in the 0 to 1 UV region. You must scale simultaneously to avoid mis-scaled UVs. As you see, this simultaneous scaling is the only reason I combined the objects to one in the first place.
  9. Pack the UVs so they all fit in the 0 to 1 region.
  10. Break the object back apart into the seperate objects.
  11. export the objects back to seperate obj files.
  12. Import the objects back into the lowest sub-D of their respective subtools.
  13. Joy! Cause now, each subtool has uvs that will interlock neatly all onto one page, within the 0 to 1 region.
  14. Export texture maps, normal maps, displacement maps.
  15. in Photoshop, layer up all maps of each type and use a multiply, darken, or lighten mode or maybe a layer masking system, whatever, to combine and merge down to one map.

This is a great workflow, and while I’ve gotten very fast with it, I’d love to know if there’s another approach.

Thanks Chris - that is a clever method. I will give that a try as well.

MC