ZBrushCentral

How to use Decimation Master on HD sculpting?

Can Decimation master be used to reduce HD geometry? This would allow you to sculpt to the highest degree and still push your models out of Zbrush at a low poly count while having the look of the high resolution sculpt.

This seems rather important, No resolution on this yet. Especially if you want to make a 3D print of you sculpt. Also important if you want to bake maps outside of ZBrush. I believe This can be done in chunks, go into HD sculpt, clone that section and then use decimation master on that chunk and then export. Still looking for a global solution.

HD geometry can go so high that the details contained in HD will most likely be too small to even register in current 3D printing resolution.
Your best solution is to use the capability to create displacement map and texture map from HD geometry and then take a lower res mesh with these maps to their destination.

I should have been more clear on what my final goals are for exporting out the geo after it has been decimated, I would like to bake out normal and occlusion data in another package.

Since the removal of ZMapper, I am not too sure if you can bake a map from a resurfaced mesh that is separate from the ZTool that holds the sculpting data.

This was possible in Zmapper but I’m not clear if this is possible in R3. If it is not then I need to get the sculpt out of ZBrush and bake elsewhere.

When doing so I would still like to retain the benefits of both HD sculpting and Decimation Master.

With the current Windows/Mac version you can do much better.

Simply import the low res mesh into the high res mesh, you’ll be asked if you want to transfer details, click YES, the imported mesh Will auto-subdivide and the high res details will be transferred. At this stage, you have the capability to refine the projection (an important capability that could not have been done with ZMapper) or even continue sculpting the mesh, and when satisfied, proceed with the usual process of generating displacement, color or normal maps.

Currently, Decimation Master can’t support Geometry HD because of memory limitation. A lot of work have been done on Decimation Master to support the high polycount of ZBrush. Trying to decimate a 800 millions polygons model would require a huge amount of memory.

As the Support said, for Printing Purpose (which is not what you are looking for), the Geometry HD will support details that 3D printers won’t support. But I understand what you are looking for.
I’m sorry, no solution right now with Decimation Master.

Thanks for the help. I just had a buddy at work show me Decimation Master here at work. Great tool. Super cool and with great results.

There is already the preserve boarder tool for decimation master.

What I (think I) could do is have pre planned Poly groups for hiding chunks of my model, then I could show lets say the head and isolate it, go into HD sculpt, clone the current tool, then run decimation master on this chunk and use the preserve boarders. Then continue this process for the rest of the model.

I think if things are done correctly, I could then re-assemble the model in another package.

Perhaps I was being a tad bit unrealistic on how I think the tool should/could work. (It is pretty amazing Decimation Master can do what it can do already!)

Baking between arbitrary meshes was/is my biggest concern.

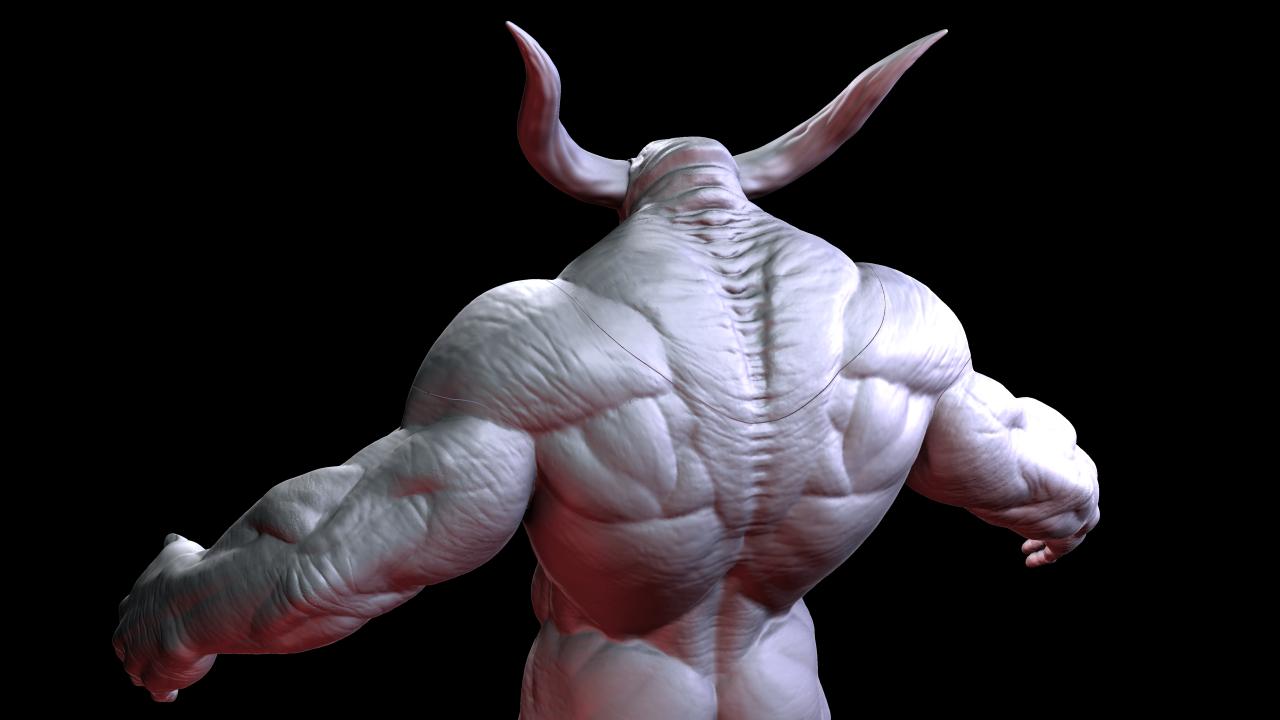
You are right, 3D prints can’t retain the detail yet but game models that have everything sculpted as geo (instead of bump maps) and then baked down to normal map is the main thing I am thinking about. (This can now be done in ZBrush no problem but what if you need to move the mesh outside of ZBrush?)

Thanks again for the clarification. :slight_smile:

In the future, we will think of a way to support the geometry HD as it will be more and more use in production as the level of quality increase and then, in the need of more details and probalby Decimation Master may work in the way you describe like spliting parts of the mesh in smaller parts and then, recombine everything at the end, but right now, it’s not possible as Decimation Master doesn’t read at all the geometry HD…

And no problems for the clarification :wink:

I was able to do more test with HD sculpting and DecimationMaster.

I have a pretty good work flow now. I sculpt to the highest Sub D level that my computer can handle and then I add two new HD sub D levels. From here I can separate my model with polygroups and sculpt in HD in very exact and precise regions. When done with the model I can go into HD sculpting using my predefined regions.

If I then clone my model in this mode it will make a new model of the HD sculpt that I can decimate using DecimationMaster. From here I use a threshold that gives me a low poly count and retains as much detail as possible. I have been using the “Freeze Boarders option”. Very awesome and powerful tool you have there.

There is only one problem, I am now able to move my meshes outside of ZBRush into Maya for rendering and normal map/AO creation. (I know this is possible in ZB but for our pipelines we us Maya to generate this informaiton.) all due to the power of the new HD sculpting capabilities in conjunction with DecimationMaster. But there is an issue that I am having with seams between my generated pieces.

[![heavyDemon_front.jpg|1200x720](upload://v4msAcfKowV8nBmtYJfqxojcuTB.jpeg)]![vertForVert.JPG|821x748](upload://yGSemD6J73Txo5SIo0eNxlYS7SU.jpeg)

Could someone from support explain to me if I am doing something wrong here? This work flow will work great for moving hi resolution HD sculpts outside of ZBrush for map baking purposes.

Thanks,

NickZ.

PS. I even suppose that you could use ZBrush to join all of your pieces together with the new Merge Visible and Weld tools in the Subtool area.

Attachments

heavyDemon_back.jpg

perfectSeams.JPG

Hey Nick

Yes you could just do a Merge Visible with Weld on. I think what has not been answered yet is this. You can not take HD out of ZBrush physically. What I mean by that is the HD sculpt can only be taken out of ZBrush through a normal map or displacement map.

When you go into HD mode you are entering just that a mode. Once you live the model is not in HD mode so when you export the model there is no HD there. Now the HD sculpt will affect the levels of your regular geo but the only way to get the detail that you are sculpting in HD mode out is to transfer it to a map in ZBrush. If you export the model from ZBrush there will be no HD.

Small not for you. When you clone a HD model you actually lose the HD part of the mesh.

Paul

Paul,

I understand that you can not get HD sculpting out of ZBrush, I also understand that it is just a mode that you enter into.

What I am trying to do is get a mesh out of ZBRush that represents the HD sculpt, but to do so at the lowest polycount possible.

So in order to do this I am:

  1. Using predefined polygroups to show very specific regions of my model to enter into HD sculpting mode. (This gives me perfect clean boarders and also lets me enter into the HD sculpting mode so I can see all the HD sculpt for that specific regions. My computer can handle a head region, an arms and hands region, a torso region, and a legs and feet region. If I use these regions I can enter into HD sculpting on this mesh at an HD sculpting sub D level of 2.)

  2. Once a region is entered into using the HD sculpting mode, I can then clone that model. (Yes I loose all the "“HD” Sculpting abilities at this point. This is OK because I am just taking a snapshot of that model in its current state. I am just trying to capture they model for the next stage. Same thing as exporting out an OBJ.)

  3. I then take the cloned HD sculpt region (My new static snapshot model of the HD sculpting region.) and then I run DecimationMaster with the “Freeze Boarders” option.

  4. After the model is decimated, I then export this out as an OBJ into Maya. (I can not use the .ma file format with models with large poly counts, it will crash Maya every time.)

  5. I repeat these steps to decimate and export each region until I have a fully formed model imported into Maya.

This work flow is working very well except for the gaps that are present between the regions that are imported into Maya. My question is, is there a way to make these models water tight for this process?

I know this isn’t a typical work flow that you might be expecting but it is a way to move a model that is well over 6-10 million polys in ZB into another program for render or baking purposes.

The only other work around that I have is to make additional poly groups that overlap the pre defined regions that I set up.

I would then have to follow the said steps listed above and then take all regions and run separate bakes for each region and then combine all the resulting bakes in Photoshop to generate a final map for occlusion or normal maps.

Thanks,

NickZ.

I have done a real quick test in ZBrush to determine that DecimationMaster and the export process are not playing a part in the formation of the gaps.

So I:

1.Took the Polysphere that ZBrush starts up with now.

  1. Reconstructed subdivision levels all the way back to a cube.

  2. Assigned a polygroup to each side of the cube. (6 poly groups)

  3. Moved up to the highest sub d level and then added new sub d levels (all the way up to sub d level 9)

  4. Added two HD sculpting sub divisions.

  5. Drew large strokes across all the polygroups (regions) and then I added noise to the entire model.

  6. I hid all regions on the sphere but one by using the polygroups that I set up. (Ctrl + Shift click on a poly region to hide all the model but that region.)

  7. Put my cursor over the geo and hit A to enter into the HD sculpting mode.

  8. Cloned my model while in the HD sculpting mode.

  9. Repeat steps 8 -9 for other polygroup regions.

  10. Once done I picked my first cloned region and appended all the other clone regions to it.

Follow these steps and you will still have a very small gap in between each region.

If these gaps were eliminated you could get a perfect representation of your entire HD sculpt outside of ZBrush.

[sphereTest_01.JPG]clonedPieces.JPG

Cloned Pieces with visible seams (Above)

Nickz: aaah, I understand now…

Gabo, you are right, but your comments are working when you exiting the HD mode…

Nickz: If I understand correctly, you are cloning when you are in HD mode with the preview (it’s what i successfully did), and you have enough memory to have all your polygroup visible when you are in HD mode, right?

Then yes, in theory, you can work on each polygroup and clone them when you are in HD mode and then, doing your decimation… Good trick if you have small polygroups with a low HD.

For the gap, we have to check…
i’m sending you an MP for another subject :slight_smile:

Oups, you replied at the same time (well, I didn’t got your reply notification until now)

Ok, it’s what I thought for the process and I can reproduce your steps too with the same gap.
I guess it may come from the smoothing. Perhaps trying to crease the border may help, but it won’t help your sculpting. I have to test that too…

Hello Nick

The biggest issue is here that when you enter HD mode there will always be a seam. This is because That is were ZBrush is sperating the HD geo from the non-HD. At this time there is no way to overcome this.

Now you could do a Mege Visible but most people computers will not even be able to do this test. I will think of maybe some other steps we can try. It will take some playing though.

Paul

So if these gaps line up vert for vert, you could in theory do this process for the entire model. And using the weld verts options you could reassemble a super detailed mesh at the right poly count that your computer could handle.

From there you could run a new decimation master pass on the entire model and get it into a good poly range for export with the most detail possible.

If only the process could be automated somehow…hmmmm…hint…hint! :wink:

Think of an HD DecimationMaster!!

:slight_smile:

Thanks again guys for the help! It is much appreciated!

NickZ. :slight_smile:

Try adding the following steps between step 7 and step 8…

7.1. Press Tool:Geometry:Crease
7.2. CTRL+SHIFT+Click on the group and proceed with step 8

YES! This does the trick. All the verts line up vert for vert. You can even use the weld and merge visible tools.

I have done this and I can even sculpt across the merged and welded surface and there was no holes. There was only a barely visible line between the surfaces. I think that might just be because the normals might not line up after you break the surfaces apart. I don’t think this will be a big deal because in Maya I will be adding a smooth normals to the mesh.

I did notice that the corners of the meshes were pulling apart slightly. I think I need to run the crease on all surfaces before I enter into the HD mode, I think that will solve that problem.

Oh yeah, one last thing. If anyone is going to try this take your clone pieces and make sure you delete any lower subdivision levels they have ( mine had 3). Other wise when you use the merge and weld feature it will run on the lowest subdivision levels and not the highest.

I’m very happy this works.

Now like I was saying… If only someone could write a script to automate all of this that would be aaaaaaawwwwwwwssssssooooommmmeeeee! :slight_smile:

sorry for the typos… On an iPhone.

Here is the final test.

[finalTest.JPG]

And here is a real run with my sculpt I am currently working on.

[twoDecimated.JPG](javascript:zb_insimg(‘170641’,‘twoDecimatedWire.JPG’,1,0))

Here is the proof that it is working!!!

You GUYS ROCK!

Attachments

twoDecimatedWire.JPG

Here is a test render in Maya. Perfect! :slight_smile:

[

](javascript:zb_insimg(‘170645’,‘renderingInMaya.jpg’,1,0))