ZBrushCentral

How to project texture from photos in ZBrush with ZProject and Image Plane?

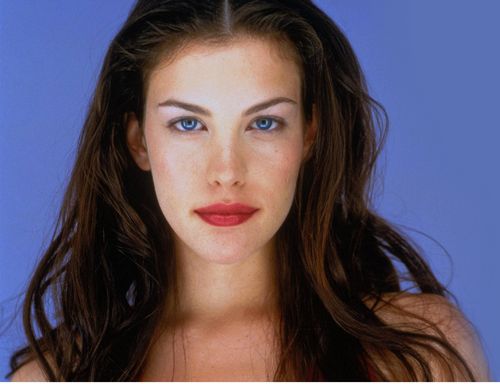
Hello! I try to use ZBrush (ZBrush R6) for texturing 3D head model first time and cannot figure out how to use ZProject Brush and Image Plane plugin to transfer face texture from photos to the mesh. First of all, I cannot find ZProject Brush in the list of built-in brushes - where should I look for this tool? Secondly, I’ve seen a couple of youtube videos about texture transferring but authors works too fast and in the customized UI, so I look for any text explanation of this technique. I’ve read that Image Plane plugin helps a lot in such texturing - how to use it correctly? For an instance, I have the mesh of a 3D head (UV-mapped already) and a frontal photo of face like these -

And I want to transfer the face texture to the 3D face, but when I load the texture image through Image Plane (Texture - Image Plane) and then load the mesh through Tool-Import OBJ, the mesh takes on the image as texture, like that -

And when I load the mesh before Image Plane, I see just the blank plane -

What is my mistake, how to load an image and a mesh? What must I do next to put on texture from 2D planes to 3D meshes, so that this texture can coincide to the shape of the mesh (nose with nose, lips with lips etc)? If you can, please explain it step by step, so as I never used Zbrush for texturing and this technique of straight transffering is completely new for me. I’ve seen videos from Psionic Design like “ZBrush 3 Basics - ZProject Texturing” abd other videos made in Zbrush 3 and they do it easy and fast but I cannot find this ZProject Tool in my menu palettes. Maybe it doesn’t require Image Plane at all? How to load image to background like in this video and point out areas of the mesh for precise transferring? Ideally, I’d like to get the accurate frontal face texture, which I may edit in Photoshop further, but if the texture will be just stretched and flattened over the UV-map, it helps me much too. Thak you in advance for all your replies.

Attachments

screenshot.2.jpg

Liv Tyler (9) (converted).jpg

screenshot.1.jpg

screenshot.3.jpg

Your texture image is flipped vertically…
You should update ZBrush, it’s currently free to registered users.

You don’t want to use plane or image plane, you want to use Spotlight.

Start with this tutorial (Nice and slow with standard interface.):
https://www.youtube.com/watch?v=hvC2HUF-RvQ

… and then watch part 3:
https://www.youtube.com/watch?v=G12dw-w64js

Thank you, Thor! It seems I mixed up two similar tools. Spotlight is really what I need, though it’s a bit tricky, but works fast and gives suitable results. Image Plane and ZProject, as I see now, seem to be purposed for reference modeling, not texturing, true? But where is this ZProject brush? I don’t find it yet.

But where is this ZProject brush? I don’t find it yet.

I don’t know why you don’t see it…
Mine is right where it’s always been - in the brushes menu:

zproject.jpg

Using the zproject brush on a plane that is in front of a sphere, you can do this:

zproject-1.jpg
zproject-2.jpg

Oh, thanks, I found it at last. One more question about texturing - as I see, Spotlight works fine for low-poly models with low-res or middle-res texture, but how to produce hi-res detaied texture to a low-poly model without much distortion and blurring? With some models (intended for Poser), where I’d like to get detailed face texture, this comes out blurry even if I subdivide models up to level 4 (at further levels ZBrush crashes on my system). I found that there is another tool named Projection Master, which helps to transfer texture straightforward without much subdividing as they told there - http://forums.cgsociety.org/archive/index.php/t-667834.html . Someone wrote that “You can look into texturing with the Projection Master which isn’t dependent on geometry for texture resolution. I’m just getting to texturing with ZBrush and from what I’ve read so far with this method you need to make sure you keep a 1:1 pixol to pixel ratio.” If I have a texture image (a photo of a human face) about 4096*4700 pixels and want to put this texture on the low-poly model and to get the diffuse map about 4000-4000 pixels, how to use Projection Master? Which options to switch on? If image resolution is 72 dpi, how to make it accord with pixol ratio? Some guy here - http://www.cgarena.com/freestuff/tutorials/maya/meetyou/meetyou2.html shows that Projectin Master gives better results than Spotlight for hi-rez texturing - what must I do exactly to project frontal and other photos to the face mesh to get such impressive results? Is there some detailed description of this workflow (text or video), suitable for newbies?

I found that there is another tool named Projection Master, which helps to transfer texture straightforward without much subdividing as they told there - http://forums.cgsociety.org/archive/…/t-667834.html . Someone wrote that “You can look into texturing with the Projection Master which isn’t dependent on geometry for texture resolution. I’m just getting to texturing with ZBrush and from what I’ve read so far with this method you need to make sure you keep a 1:1 pixol to pixel ratio.”

That thread is from 2008… Zbrush 3. That was before Spotlight texturing…

For absolute best results, the pixol -> pixel rule still applies … for a 4096 texture, you would want ~16mil polys for spotlight.

However, I’ve found that if your head is in it’s own subtool, you should be able to get reasonable spotlight/polypaint results with a 4096 x 4096 uv/texture map, with around 2mil points.

Very quick spotlight texture/polypaint on 1.8mil points:

face-tex.jpg

^^^^ obviously not perfect, but okay, I think.

Once you’ve transferred the polypaint to the texture map, of course you can use the texture on a lower subdiv level.
It all depends on how you are rendering as far as how much geometry you need to work with.

I think the problem you’ll have with your Liv Tyler pic is that the original is really not that great quality:

(1.5 mil points)