ZBrushCentral

How to make a police Badge

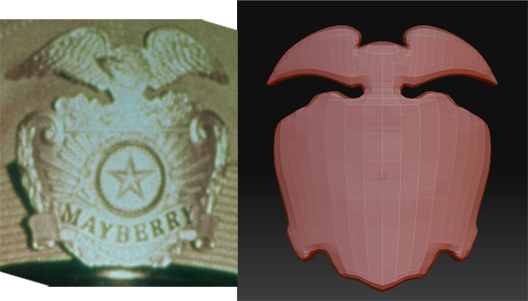
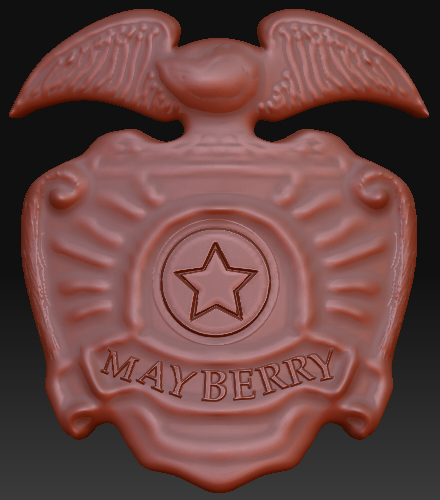
I was wondering if anyone knows how to make a badge. I’m sure its fairly simple ,but can’t seems to wrap my head around it. My goal is to make a base mesh for the badge and sculpt in the detail in Zbrush.

I tried creating the outlines in AI then imported into 3dsmax, extruded my spline. But when I imported the spline it made like a 1000 vertices around the edges and left the front and back faces blank. So I tried tessellating it. no luck. I Subdivided it and it gave me some geometry , but nothing really good enough to work with in zbrush. Does anyone know of any tutorial on how to make badges or even a tut on a detailed belt buckle might work.

I think I going to try and retop my current base mesh and see if that will work.

Let me know what you guy/girls think.
Thanks,
-C

Always post what version you are using when asking questions.

Assuming 3.5, here are two approaches I would take (I have done this exact thing before, BTW): Assuming the badge will have a slight curvature: 1) Make a polysphere, then flatten it along one axis (exit edit mode, then press "scale" without doing anything else, and it should bring up the old style manipulator which will let you easily do this, then press edit again, or you can do it via the deformation palette, or via the transpose controls) until the surface has just about the amount of curvature you want. 2) In retopology mode, draw out the badge "shield" silhouette over the center of the sphere, with quick, clean, simple, logical quads. 3) In the Topology palette, set the skin thickness to 1, or whatever gives you good results., and make an adaptive skin. Keep the Subdivision level of the mesh as low as possible to keep it easy to work with. The fewer points there are, the easier it is to pull those points into a shape without distortion occurring, so always work at the lowest subD level when establishing basic form. 4) At the lowest res, run an inflat brush lightly around the sides to thicken it up a bit if need be. The skin it produced should be already creased along the two faces, but you might need to add some creases at the corners to keep those. If you dont know how to use the crease functions, see the Zbrush documentation. Set the crease level to something like 4 to avoid impossibly crisp edges. Subdivide. 5)Take a screenie of the badge straight on forward facing, and use this as a backdrop in AI or photoshop or whatever to make and size the badge graphical design. Export this as a black and white alpha (make sure it rests in a square aspect ratio). 6) In Zbrush, Subdivide the badge adequately, apply this alpha to a brush with a dragrect stroke to drag out the raised logo and graphical detail on the badge. Using Projection Master to stamp in this detail will give you more control over the placement and allow for tweaking to make sure it fits perfectly. Viola! You could also experiment with the "make 3d" function in the alpha palette, it works better in 3.5. Import the badge silhouette as a black and white alpha, and use the make 3d to give it rough form. Then you could retopo it as desired for crisp edges, and then use the move brush with a large size and falloff to drag out a bit of curvature. Then repeat the above process from that points. Or, you could model it in a traditional modeler and import it as an obj. It's about a 2 minute job if that.

Thanks for the advice. While I was waiting for a reply I went ahead and retopped the bad version I did in max. I now have a nice badge ready to sculpt on. Now the next step. I will follow your advice. This will be my first time trying to make an alpha and project it. So… I might be back to ask a few questions if I get stuck. In any case I will show you my end result.
Thanks again for the help, It is much appreciated. This forum is great.

Just an update on what I’m trying to do.
Beings the image of the badge is to low res. I would need to make all my artwork black and white right. White is the positive and black is the negative?
Is that right. Can you use 50% Grey for a mid height?

Attachments

badge.jpg

This is correct. You can, however, invert the alpha at any time in Zbrush too, so don’t sweat it if you get it backwards.

What you have there though, is going to ideally require a combination of graphic detail stamping, and sculpting. The alphas you make, are going to be best for deliberate, mechanically precise shapes, like the star, the circle, , text, border bars, and the rays in the center, etc.

Other of those elements are going to need to be manually sculpted though for best results. Things like the bird, wings, feathers, and scroll work…things that would defy manually constructed alphas, with many subtle changes in detail and elevation.

You can, however, make a model separately pose it, then convert that model to an alpha itself, which will give it an “embossed” effect when applied to another surface, like the head on a coin, which may be applicable for what you want to do here. Check out this tut for an example:
http://www.zbrushcentral.com/showthread.php?t=63544&highlight=coin

Thank you for making me clear on the task at hand. Will post an update in a little while.
-Chris

small update. I fully understand the concept now. The projection master is very helpful except rotate doesn’t seem to be working?
The badge is coming along, nothing that special ,but I’ll keep working on it.
Thanks Again for the help.

Attachments

badge2.jpg

Well, using PM you have access to the 2.5D brushes, with which you can achieve different effects. Only some of them, like the “Depth” brush, support a rotation aspect when dragging out a drag rect stroke.

What I was really referring to, is the fact you can alter any stroke after the fact in 2.5 D mode. So, make a stroke (drag out a shape), then, without doing anything else, on the top shelf next to the draw and edit button select one of the MOve, Scale, or Rotate buttons. You can actually transform that shape on the surface, until you draw another stroke or make another action that commits that shape. The scale manipulator can actually "squash " the stroke one way or another too, not just scale globally. Very useful for making sure something fits just right.