ZBrushCentral

How to achieve symmetrical remeshing of clothes in Q-Remesher (Z-Brush R4)?

Hello! Need help advice on using Q-Remesher on meshes of irregular triangles like this one -

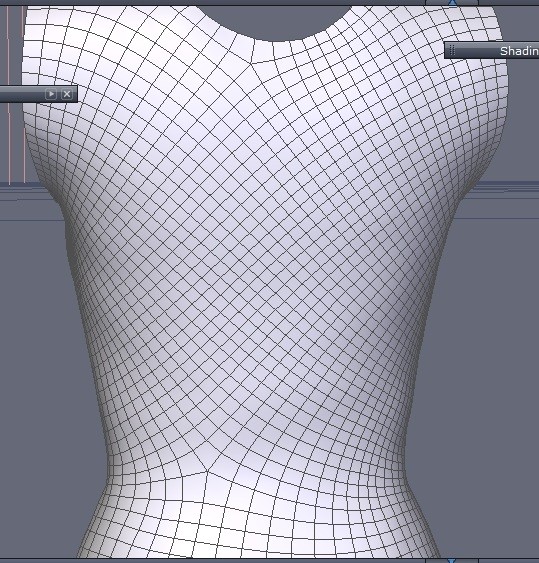
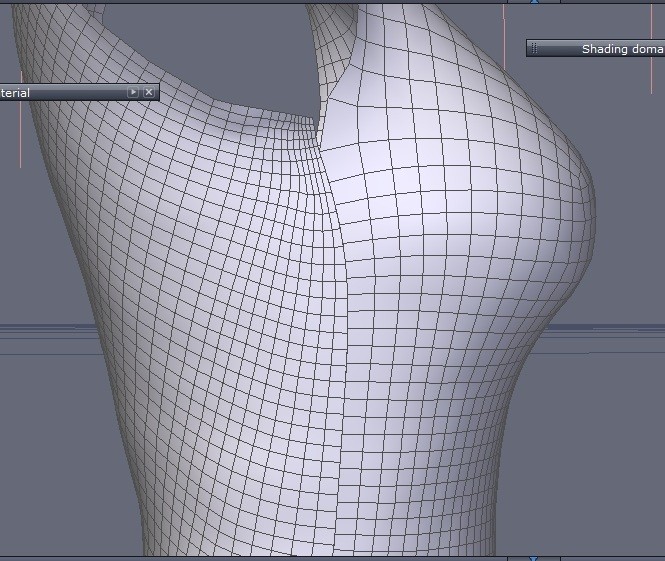
How to use guides within remeshing to get symmetrical edgeflow of quads and avoid spoiling the mesh. I try to remesh it and get several kinds of defects like those -

  1. If I remesh welded meshes without guides, I get twisted edgeloops -

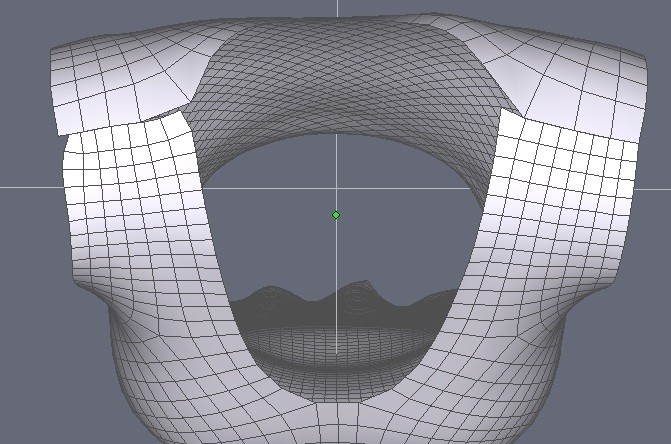
  2. If I break it on polygroups, I get different number of faces on front and back of the mesh or on shoulders or between torso and sleeves, it prevants normal welding (merging) points manually and I have to delete a great number of odd edgeloops, that spoils the model.-

Is there a way to remesh and get the same number of faces and vertices on both side of seams (the same number of edgeloops)? What settings should I set in Q-Remesher? Or there are some other tricks within Z-Brush? Prompt me, please how to do it, if you know, such irregular clothing meshes, generated in Marvelous Designer are very problem to remesh. I tried one nice plugin - Q-Remesher guides by ezbrush, it generates more clean edgeflow with UV guides, but the problem of different numbers of faces on seams remains. I even attempted to remesh flattened meshes (they copy UV layout of original mesh in 3D) and use them in Maya through Transfer Attributes, but came across the same problem. How to make Q-Remesher to generate even number of edgeloops on parts of the mesh, where I need it?

Attachments

a106ba3c36aed9b7f55e5142b0df9755.jpg

3b3a20edf9a1f7fe4c10e5a7f3bdc719.jpg

20871513bf74173bf623601e406437ff.jpg

5b3b50196766a6b1696481eaa4435746.jpg

Q-Remesher doesn’t exist anymore. You should upgrade your copy of ZBrush to ZBrush 4R6 P2. Upgrades are still free to registered users.

OK, but is there some progress about all this in ZBrush 4R6 P2? I mean some remesh tools or features, which let to remesh symmetrically without all those errors?

http://www.zbrushcentral.com/showthread.php?184622-ZRemesher-questions

See ZRemesher. Also, check out Joseph Drust’s ZRemesher Video.

Be sure to turn on symmetry when using zremesher, and the result should contain symmetrical topology.

Yes, thanks, I guess, the option of Partial Mesh and Freeze borders may help me? That is I should hide, for instance, torso and start remeshing from sleeves with frozen borders of the sleeves and then in torso Z-Remesher will create matching number of polys on the seam? Would be cool!

One more question - how to get in Z-Remesher R6 the equal number of faces on seams if the mesh is flattened like this one below - the places I need to get the equal number of faces are marked by black connection lines.
583c1e18f67140682cf4f5cf1f732edd.jpg

There is a technique of transferring attributes in Maya which lets recover UVs, closest to the original tri mesh -

“Zbrush should still be useful. Just output the meshes flat, then run the quad mesher on them. Then the UV´s can be projected straight from the originals to the new quad mesh. Then the new meshes can be wrapped back into it´s 3d form. using the same UV projection.”

That thread on the forum where people thought it up is long dead. So I could not learn anything there about remeshing itself, but maybe someone here tried to do something like this? Maybe my question looks silly, but it’s a nice tricky technique (gives clean geometrical UVs) and the only problem with old Q-Remesher is generating the same difference in number of border polys, which causes the errors I show above. Can Z-Remesher handle this problem and if it’s possible - how to do it?

I have no idea what you are really trying to do… why are you dealing with flattened meshes?

Why is the front separate from the back?

Why are the sleeves separate?

Here is a triangle mesh in zBrush (like your first screenshot):

shirt-remesh.jpg

Here, I turned on x symmetry and clicked zRemesh (using the defaults and holding the option/alt key):

shirt-remesh2.jpg

If I wanted edgeloops to line up, I’d sculpt the sleeves attached, then zRemesh and group

shirt-remesh3.jpg

shirt-remesh4.jpg

I don’t know anything about Marvelous Designer, but I’m guessing that for parts of your imported mesh, you should be able to mirror and weld (x-axis) in zBrush before remeshing to get the symmetry correct.

Hi, Thor! Thanks for explanations, I’m a noob in Zbrush, the more in new Z-brush r4 and I try to use it to remesh triangular meshes of clothing for Poser and DAz like this one (it has the Uv map I posted above) -

32bfaad8c731972648bd0b91336fdbdc.jpg

The main problem with such meshes is the need to get nice straight topology and keep their former Uvs (not literally the same ones but unfolded in the very straight geometrical shape you see above. It’s important for easy texturing and good-looking elements like trim, embroidery etc). If I remesh the full welded mesh and unwrap it in the Uvmaster along the same seams as in original, the Uv parts come out wavy, too stretched and much worse. One guy adviced me to break the mesh to polygroups (Polygroups from Uv) and remesh every polygroup (front, back, sleeves etc). separately and unfold the mesh in Uvmaster after polygroups, but in the result I get the unwelded quad mesh with different polycount on seams and Uvs are bad all the same. Another guy adviced to remesh not full, but flattened mesh and use Maya to transfer attributes from the original flat tri-mesh to the new flat quadmesh and then from the flat quadmesh to the old triangular full clothing mesh. So I can get the full quad mesh with the straight geometrical Uvs but it’s unwelded and requires manual welding on seams and has the same different polycount on seams. I’ve heard just a day ago there is a way to transfer old Uvs from old welded full tri-mesh from Marvelous Designer to the new quad full one (from Z-brush) but I haven’t cleared out yet how to do it. It is called transferring attributes and Uvs in Maya between objects with diffrerent topology. It seems, my problem worries just users of Marvelous Designer and not wide-known, so it’s kinda hard to get an answer. That’s why I questioned if there is a way to remesh flattened meshes in the new Z-Remesher to get coincident number of faces on the very seams, then after transferring all attributes I would just weld manually all points - torso to slleves, front to back and without deleting odd edgeloops. (If I use the full welded mesh, I get this coincidence automatically, it’s much easier, but the problem of Uvs is still unsolved. )

If I remesh the full welded mesh and unwrap it in the Uvmaster along the same seams as in original, the Uv parts come out wavy, too stretched and much worse.

It’s true that having straight UV edges can make 2d-texturing easier, but I find that with more complex shapes you actually have to sacrifice and allow some uv warping in order to create them.

You might want to look into Roadkill UV instead. It’s a free, small, dedicated standalone UV Tool that can give you some more control over your results. The more useful feature being the ability to pin UVs to place once you move them where you want them (so you can straighten your seams, pin them, and then relax the rest of it).

You can sort of do this in zbrush as well. Duplicate the unwrapped subtool (for safety), flatten it with UV Master, and begin moving the uvs around. Transpose+Masking will make it easier to move individual islands around, and if you mask everything except for one border you can straighten them by dragging the move tool towards its center. Once you have the borders straighten to your liking, the smooth tool can try to relax the rest.

One more question - where to look for ZRemesher Guide brush in Zbrush R6? And how to draw a straight downward line along the surface of a model (as if cutting it to halves)? Can I use UVs as guides (there was a plugin for Q-Remesher which was able to use UV borders as guides for remeshing, maybe it’s possible in ZBrush R6)? I need it to get more straight edgeflow along the borders of the patterns, while remeshing the welded mesh, otherwise I get curved borders -

e08625e9c32a021432b2ea9a4dd9692a.jpg

And how to use Freeze Borders in a right way? I gave it a try, at first breaking the mesh to polygroups from UV, then I switched on Freeze Groups Border, and it gives me the same polycount on borders but ugly, with curved triangles. The best and the most symmetrical result I get at last with the unwelded mesh without Freeze Borders but with the very different polys on seams - the front part of the mesh comes out more dense than the back. I have read about Partial Mesh remeshing, can it help me? This quote from the manual-
“ZRemesher has the ability to retopologize only the visible portion of a partially hidden model. In this case ZRemesher will automatically maintain integrity with the hidden portions. Use the Marquee or Lasso selection tool (Ctrl+Shift hotkey) to isolate the polygons that you wish to retopologize. ZRemesher will ignore all hidden portions of the model.”
I tried to hide polygroups by pressing Ctrl+Shift but on the front I get some error and zremeshing aborted. How to zremesh with this option to get the same number of polys on all seams of the model? I’m still lost in all these new options.

I assume you are working with an exported asymmetrical triangulated .obj with UV from Marvelous designer.
Is there any reason why you need to maintain the UVs from Marvelous Designer?

It might be easier to import the mesh and use zBrush to create new UVs AFTER symmetrical zRemeshing.

Imported mesh (with UV groups shown):
shirt_001.jpg

For zRemeshing, I would isolate the groups by ctrl-shift-clicking, then zRemesh each group with x-symmetry on and freeze GROUPS button pushed (NOT freeze borders). Do this for each group.

shirt_002.jpg

shirt_003.jpg

Now split the groups (Tool > Split > Groups Split), and create UVs for each. Tool > UV Map. Use Uvp

Now you can use UV master to unwrap/flatten each group/subtool. I kept Symmetry, Polygroups and Use Existing UV seams buttons pressed:

shirt_004.jpg

When you’re happy with each group, you can merge the subtools (make sure weld and UV buttons are pressed). After merging, Click on Tool > Uv Map > Morph UV, and you should see this:

shirt_005.jpg

Now you can create your texture map. To see how it’s going to lay out, you can go to: Tool > Polypaint > Polypaint from Polygroups

… then Tool > Texture Map > Create > New from Polypaint

shirt_006.jpg

Note: I’ve never done this before, so you might have to mess around with some of the steps to come up with a workflow that will work for you… I also just used the defaults for most of these steps (zRemesher, creating UV Maps, etc).