ZBrushCentral

how do I use the clone brush to paint out seams?

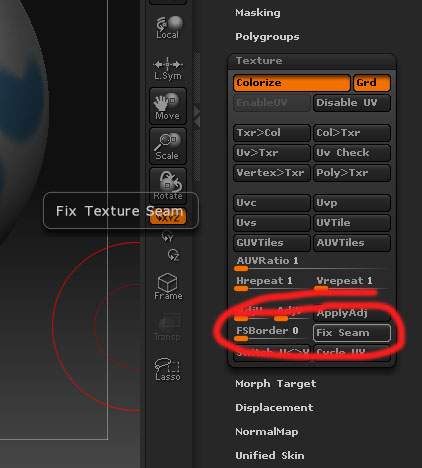
Im sorry, i’ve been scouring this forum for an easy-to-follow tutorial on how to do this, but I just don’t understand any of them and my eyes are starting to hurt. I have my model and textures already complete, I just want to paint out the seams in zbrush, but I dont know how to use the painting tools at all. Ive used zbrush alot for sculpting, but I always texture in photoshop. I tried figuring it out myself by using the projection master, but I cant get the clone brush to do anything.

Can anyone please let me know how to use it, or direct me to a tutorial thats literally for a beginner (sadly Ive come to realize I apparently am when it comes to painting in zbrush). I appreciate any help, thank you.

Hi,
have you tried the fix seam button in the Tool/Texture category. The FSBorder slider defines the UV-Overpaint in pixel, and the Fix Seam button tries to fix seams. here is a pic:
[seems.jpg](javascript:zb_insimg(‘84321’,‘seems.jpg’,1,0))

Ah, and make sure you’ve got a clean UV-Map with no overlaps etc. Checking this using the UV-Check button also in the Tool/Texture category. If something turns red in the created texture then you’ve got to clean up you UV’s.

The Cloner-Brush is actually simple, press the CTRL-Key and select the area you what to clone from and then release the CTRL-Key and paint the area you want the color/depth to be.

Hi, I’m also interested in this, but can’t really find how to make it work.
I textured in photoshop and now I only want to import my texture in zbrush and go over the seams.
I imported the model and the texture and flipped it so it was displayed correctly, but then what? How do i continue texturing on my imported texture? Do I have to divide my model and click the “texture to color”-button? If I don’t divide it high enough I lose some details and my computer doesn’t have the power to divide more than up to level 5. Also where do I find this clone brush. Only thing called clone I’m able to find is a button in the bottom of the brush palett and this doesn’t seem to be it. or is it?

thanx in advance guys!

Not sure if this will help for the result you want, but you can paint directly onto a texture in Zbrush without having to resort to texture to color with millions of polygons.

While you have the texture on the model, by importing it on the left, you can use Projection Master.

Position the model and zoom into an area you need to fix, no perspective, and use projection master to drop it to the canvas. Then you can use all the painting brushes under tools on the right, not the normal brush on the left. Then do your thing and hit projection master again and it will apply those changes to the actual texture and the model will be rotatable again. Rinse and repeat as you go across the model.

You should be able to use Zapplink to import the view into Photoshop and paint in there and then save and go back to Zbrush and have it applied to the texture. I did that test only once on a sphere with a random high res image and I got some odd artifacts, before I only tried it with polypaint.

thanx alot. very helpful. however when using projection matser and picking upp it blurs out the details a little. any tips on that?
thanks again!!

I haven’t used it that much myself, just some tests. I know whatever you paint and do will only be as sharp as the resolution of the canvas as it applies it to the higher resolution texture. So if you want to maintain the same detail on the texture, you have to zoom close enough so the textur’es pixesl are 1:1 with the canvas resolution. Thus, it might be best to create a higher res canvas and then shrink it in half to make things easier.

I recall there being some guides out there on how to achieve optimum detail when using projection master, but I’m not sure if it was only with polypaint and polygon count.

Let me see if I have a link saved anywhere.

This might help. I haven’t even had a chance to read it yet.
http://www.zbrushcentral.com/zbc/showthread.php?t=27680