ZBrushCentral

Error in displacement, within UVs (not edges) (pics and pics)

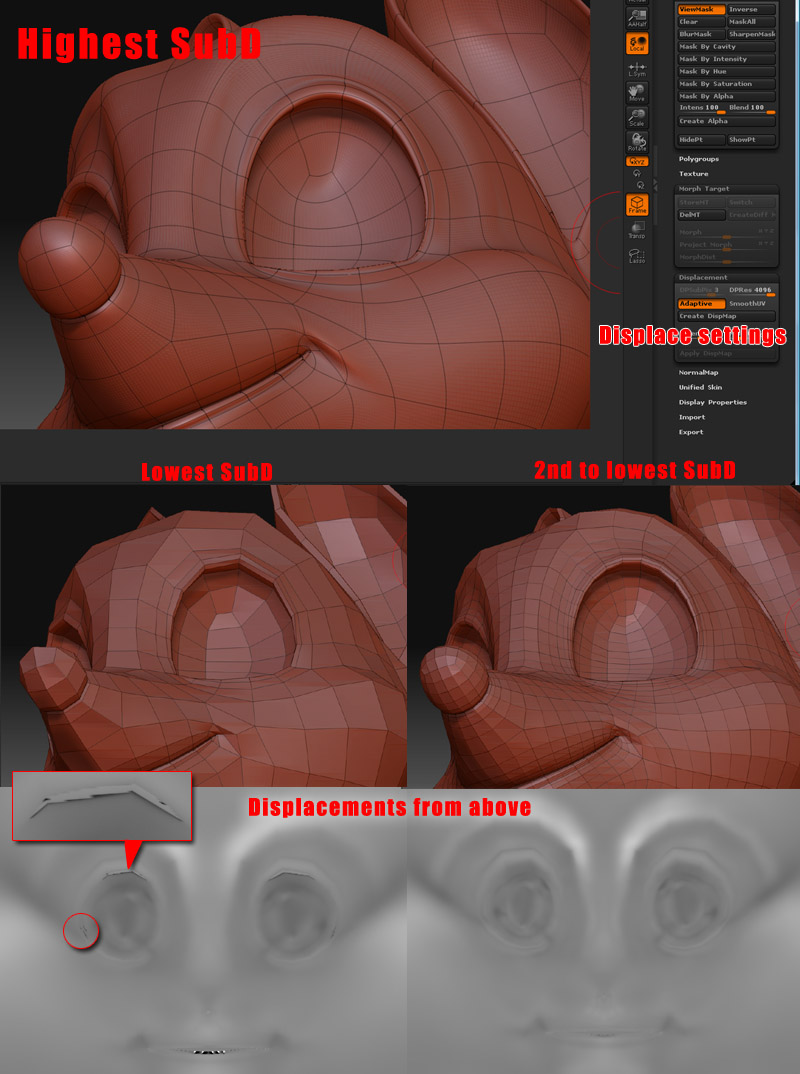
Not sure why this is happening. I get these artifacts around the eye when I create my dispalcement from the lowest SubD. Yet, the next subd up, I do it again and it’s gone. I tried smoothing and making sure nothing was pinching in the high subd, but nothing is wrong.

Any idea what’s causing it, how to fix it. I’d rather not use the displacement from the 2nd lowest on the lowest in Carrara, while it looks to do thing right, some areas are not as smooth as they should be.

Take a look:
[]

Attachments

displace_error.jpg

tool - displacement - turn on “smooth uv”

Smoothing doesn’t get rid of it, sorry, I should have mentioned that.

Here’s a close-up of the errors still there after smoothed UVs used:

And smoothUV is not good for me. Carrara does NOT smooth UVs so a smoothed displacement does not match right, I get noticeable bumps along curves, as you see below, along with the annoying errors still there.

I have yet to see a program that does not smooth your uvs when your model is sub divided… I don’t even see how that could work. I don’t use carrara but in max or maya if you sub divide your model and then look at the models uvs you will see its uvs smoothed out.

what de code are you using?

also you could go into ps and just blur out these spots.

Have you by chance used Pinch when working on this model? You might get better results by turning on Tool>Displacement>Adaptive before creating the displacement map.

Also, it’s hard to tell for sure but it looks like your sculpting may have resulted in an overhang of the mesh. Since displacements can ONLY move out perpendicular to the model’s surface, any overhangs will create a problem.

Strange, I wasn’t notified of an replies to my thread.

When I get a chance I’ll look into the UVs. Could there be a different between smoothing at render time and having the smoothing visible in layout?

De code? You talking about the quick code for multi displacement? Not using anything like that.

I have Photoshop 7. I thought about using the patch tool to blend the spots away, but doesn’t seem to work. Clone tool does. I haven’t really tried much yet in photoshop, I figure I’d rather solve it in Zbrush first.

Adaptive has been on, seems like I have to have that on. As if you were to do a displacement map with it off, the generated fill looks almost flat, no displacement.

I wouldn’t think their’s an overhang or impossible shape based on how displacement works. It should just be a smooth roll from the outside of the eyelid to the inside. I also tried smoothing the mesh and reconstructing high subdivision to make sure nothing was intersecting. But may there is some kind of angle or curve it’s having a problem with. Strange how the displacement generated one level up has no problem. So I guess I’ll look at that level more carefully and move the lowest to be more like it or similar to the highest.

I adjusted some of the points to not be as pushed in as deep in the eye socket. Now the displacement appears to be correct in that area. I’ll try some adjustments in the ear and other areas.

Though, I looked carefully at it and you wouldn’t think where the points were would have caused any problems.