Without importing some 3D text from C4D etc., can’t find a way to engrave / emboss text into a cylindrical object ? Everything seems to use frontal projection mapping.
Z brush is for sculpting, text other programs do better, you could always carve in the letters yourself.
If your cylindrical object has UVs (you can create a UV map with UV master), and has a high enough resolution/polycount, you can use a texture map as an alpha to carve/emboss text.


Unfortunately I can’t use UV’s at the moment. Control painting doesn’t work to unwrap things properly. There is a redraw error on the gfx card, has problems with most things.
Also pretty much every symmetrical object ends up non symmetrical …

Not sure how is your original object but you could use polygroups to isolate the areas where you want a more regular UVs. Then use these polygroups to do UVs islands. For example isolating the caps of the cylinder from the body.
You could use Zapplink with a high poly mesh and paint the letters in. Then use the Masking - Mask by color to create a mask that you could inflate using Deformations.
Thanks, not the fix I was after but works ok. 
Also, you could create the text as an alpha and then overlay the image onto your cylinder under Surface> Noise Maker… The 3D projection would create a mess around the sides, but UV projection would give you a clean result.
You’ve be able to alter the height of the text and keep you mesh at low resolution, and then only increase the resolution of the object when you needed to turn the text into actual geometry.
Thor … Is there any chance you can show the geometry, what brush did u use / or did you use a brush ?
Not sure what’s going on here, I’ve tried Thor’s way but my imported image is inverted, not flipped.
i noticed you said you can’t use UVs at the moment, but what if you make a duplicate of the cylinder, make a lower poly version of it so you can unwrap it, then subdivide up a bit and use the alpha mask technique mentioned above, then project that detail to the original mesh.
Thor … Is there any chance you can show the geometry, what brush did u use / or did you use a brush ?
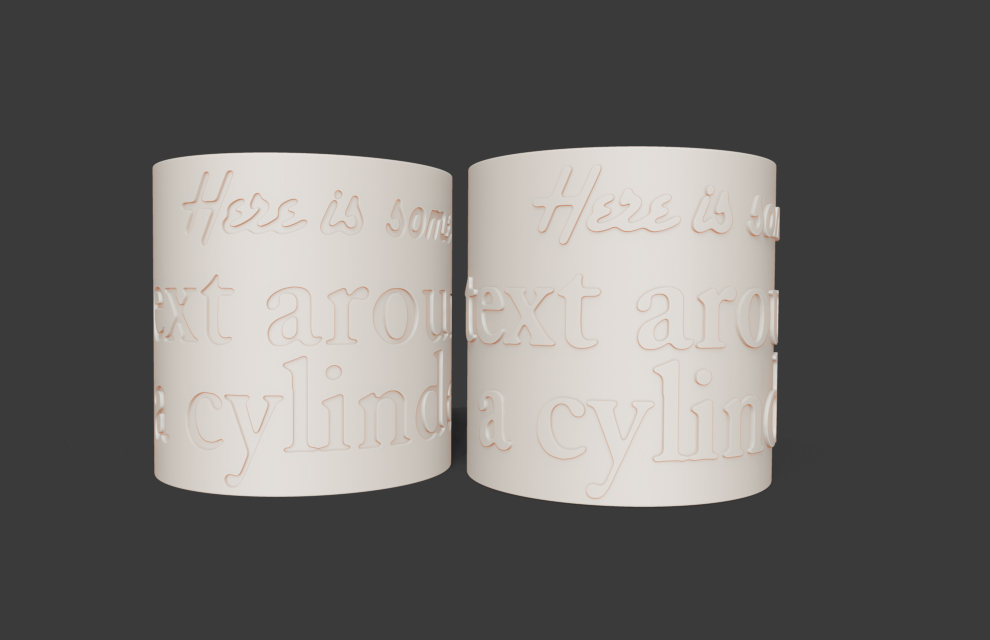
Geometry (lowest subdiv):

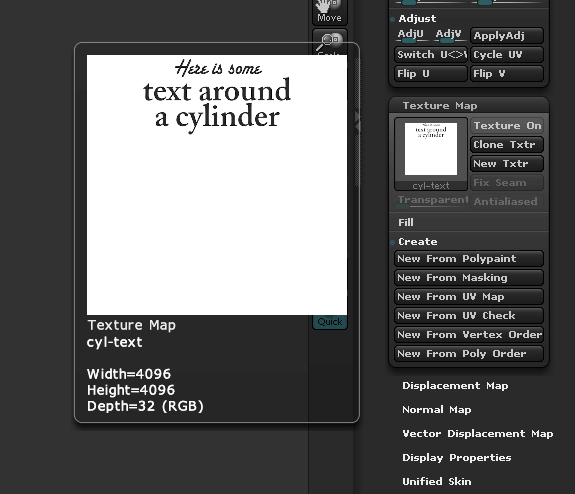
Texture map from UV check after UVMaster:

Text added to texture in photoshop (grid lines are not included in texture):

In order to position the text correctly, and avoid the seam, you may need to rotate/flip the object - you can turn on polypaint, and draw on the object, then create texture from polypaint to see where things are laying out. If the text goes across the seam, just mirror the object on z axis, and try drawing again. When you’re happy with the position, export the texture, open in photoshop create the text, and apply the texturemap.
In my example above, I created the UV map at 4096, then subdivided the geometry up to 1.5 mil polys before applying the texture.
Once the texture is applied, you can create a mask from color density, then create polygroups from the mask. Then you can edgeloop the groups, polish by groups to get rid of jagged edges. You may need to delete lower subdivision levels to create groups/edgeloops. Then you can use deformation > inflate on the text group (positive value = emboss, negative value = carve)
Pendragon, can you post a pic of your unwrapped object with wireframe?
p.s: I saw your inversion post - I’m using a Mac, and haven’t seen that.
Zeddie, unwrapping involves the UV. I took a look with the morph uv and watched it open up but also twist inside out.
Just to point out, the version of Zbrush having the problem is R47 P2. Tried reinstalling but still the same. I also tried an earlier version 4R6 and UV’ing works fine, but I can’t convert either zpr or ztl to an older version ?
Got hold of v4R7 and am finding the same thing, maybe there’s something included / changed with R7, must be something I’m missing. I think I mentioned not flipped, I tried rotating n flipping the imported image but not the problem. When unwrapped & flattened, the UV I’m now seeing and working on is the opposite side, so normally (R6) would be front facing, what I’m working with (R7) is back facing.
Does that make any sense ?
Working in Photoshop, I’d have to mirror everything woking backward. But the exported UV image placement staying the same.

Not sure if you can see what’s happening.
Tried to get a better shot of it inverting.

Pendragon,
Open UV Map > Adjust
… and click “Flip U”.
That should fix the mapping without having to do everything backwards in photoshop.
I don’t remember having to do this, but it’s a simple fix.
On a previous post you said the problem was with P2. You should be using P3.
Oh. So it is a case of flipping, sorry to have wasted time on this. Only other question, is there a way to make this default so I don’t have to keep clicking flip ?
Thanks everyone for the help, much appreciated.
