ZBrushCentral

Eerie

I have a question / Problem.

Yesterday I was messing around making this model of “Cousin Eerie”,
the first render is Zbrush it was okay, but when I rendered it in mental ray I discovered a problem with with the bump map from Zmapper.
I made a Cavity map and rolled it into a normal map ,but the high points of the face had no detail ( see pic), I looked at the cavity map and it did not have detail on those points either.
I am still a Noob, and I am not sure what the optimum setting for the cavity map should be… Help!

If any one knows what I should do, please let me know.

thanks
PATTONCEERIE.jpg

Attachments

Notex.jpg

I would keep the two maps seperate. Have you tried using the cavity map to control the diffusion property of the material? Also you may have to push the settings of the normal map a tad bit more.

show your low pol character and your uv layout and you’ll get a really fast answer.
I notice you have a very high geometry deep wrinkles and such if you lower level and your higher levels dont match like a huge change between level 1 and say level 8 it is somtimes smarter to use the projection capture mesh details in zmapper then the create projected normal map button.

your hair on you character looks a bit stressed this is telling me it might be a uv prob. If the UV area is to small in the area with details. It will not hold very fine details.
Also try making a disp map and load it as you alpha rather than a cavity map

Hey ,

Here are the maps and wire , it was my mistake , I was useing a diplacement map a Cavity map mixed with a diplacment map to make an overall bump map, and not a Normal map and cav.

None the less, the result is the same!..?
Anyone?
PATTONUntitled-2.jpg

Attachments

EERIE_disp.jpg

CAv.jpg

OverallEERIE_bump.jpg

Good old cousin eerie :slight_smile: After you resolve your current issues it will be nice to see this carried thru to a final image. :slight_smile: :+1:

dunno about the problem, but…I definitely knew who the character was when I came to the forum this morning. Are you going to do all of those good ole Warren comic characters? Uncle Creepy and Vamprella also? Loved those comics :+1: :+1: :+1: :+1: :+1: :+1: :+1:
Ron

looks ok here I do see maybe a problem and its only cause I ran into this before.

heres the design steps i follow

  1. make a character low poly not worring about uvs until after I get done with all the details in zbrush

  2. After I get done in zbrush export your lowest level to a program that does good UV layout. This way your greatest distance between normals are already thought out by zbrush and you and producing uvs based on a mesh that has details not a mesh that will have details.
    exsample : I have a thin character with UVS I export it to zbrush and give it a bulb nose. (BAD)

exsample2: I have a character with no UVS and a bulb nose when I make the UVS for the character The uvs flow following the bulb nose (good):slight_smile:

  1. after I get my UVs done and exported as OBJ I go back to Zbrush and do the following
  2. Load the tool with all the levels
  3. While tool is in edit mode I go to the lowest level
  4. Go to document new document and double
  5. import my OBJ with the good UVS and hit edit mode
  6. Dance cause you now switched UV sets Behind zbrushs back;) go through you levels you should have all the details

Go to highest level go to deformation scale and click the little xyz grey buttons scale you model up alot Zbrush LOVES making small models and disp maps and bump maps hate small models go figure!

Now go through all the steps you already know and I would use a LOCAL map not the ancient bump map of old (greyblack)

last when you do import your model back into your render program MAYA, Studio max ect ect ect.
Check you UV edges I bet you anything that they need re sewing in the middle.
Slap zbrush for using grandmas seem ripper behind your back (bad zbrush)
hope that helps;)

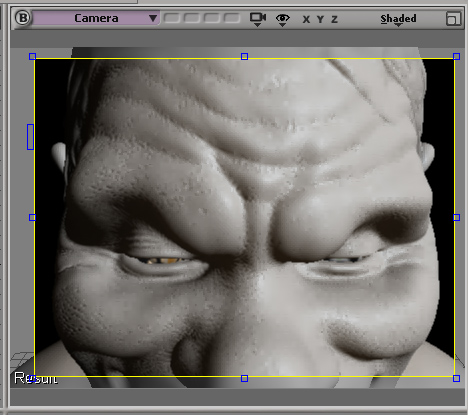
Looks like you have your maximum displacement set to low. If you have the high points going up to like a .9 and you set your max upper level of displacement to .8 then the top of all your displacement is flattened off at .8 so everything higher is just a flat skin. Does that make sense? I am talking about the renderer. Try increasing that field.

Thanks guys ,
I will look into every one of those options!

If anyone has optimum settings for zmapper cavity maps, please let me know!!
Thanks again!
PATTON

Hey Guys,
I have been playing around with Mental ray again (ARRGGG!!)
I have made some headway, with some help from Lemonado!!
Here is a mental ray render with a simple sss shader.

I may do some color today if I have a chance.
PATTON
eerie_small_wip1.jpg

Nice work! the modeling looks great, and reminds me to finish my Creepy / Eerie collection.:wink: I hope to get XSI sometime this year, so i’m following this thread.

"Now go through all the steps you already know and I would use a LOCAL map not the ancient bump map of old (greyblack) "

What do you mean by LOCAL?

Uhhh…I don’t know what local is either…

Patton

Here is a quick color version, from mental ray.
I did some crappy hair in photo shop.
PATTONeerie_col_wip_small.jpg
PS. what is a Local map?

ZMapper, what’s that? (I work with Mac :evil: )

Mac…what’s that?

More Art Comes :lol:

btw, nice image you dude! We need more fun here :wink:

More artsy Comedians?:stuck_out_tongue:
PATTON

Very nice start!!

Greg

Zmapper= A plugin for zbrush that produces local maps + diffuse maps
found here
http://www.zbrushcentral.com/zbc/showthread.php?t=31281&highlight=zmapper+download

Local Map= Local bump mapping (blueish in nature)
Monocromic bump maps = Black-white
With local map light is told where to hit a object using its own object space. Different colors tell light to hit in different directions. and it is endless.

Monocromic tells light to hit a object either in or out

just watch the video from the link above it will clear things up.

Hopefully they have the plugin for that MAC thing of yours.