ZBrushCentral

Combine 2 Normal Maps with this Photoshop Action

Sorry for everyone who downloaded and tried to use the first action I had up here. I found an error in the text and one spot in the settings that needed tweaking. I welcome feedback from anyone who gets it to work or has a problem using it.

If you’ve ever wanted to combine a noisy bump based on the texture you painted with a smooth round bump that you generated from Zbrush, this is the sollution for you.

I finally figured out how to do this and I put it in an action. This will seriously speed up some of your texturing work. I’m sure I’m not the first to do this, but I’ve been looking for a while and never found anything this easy to use.

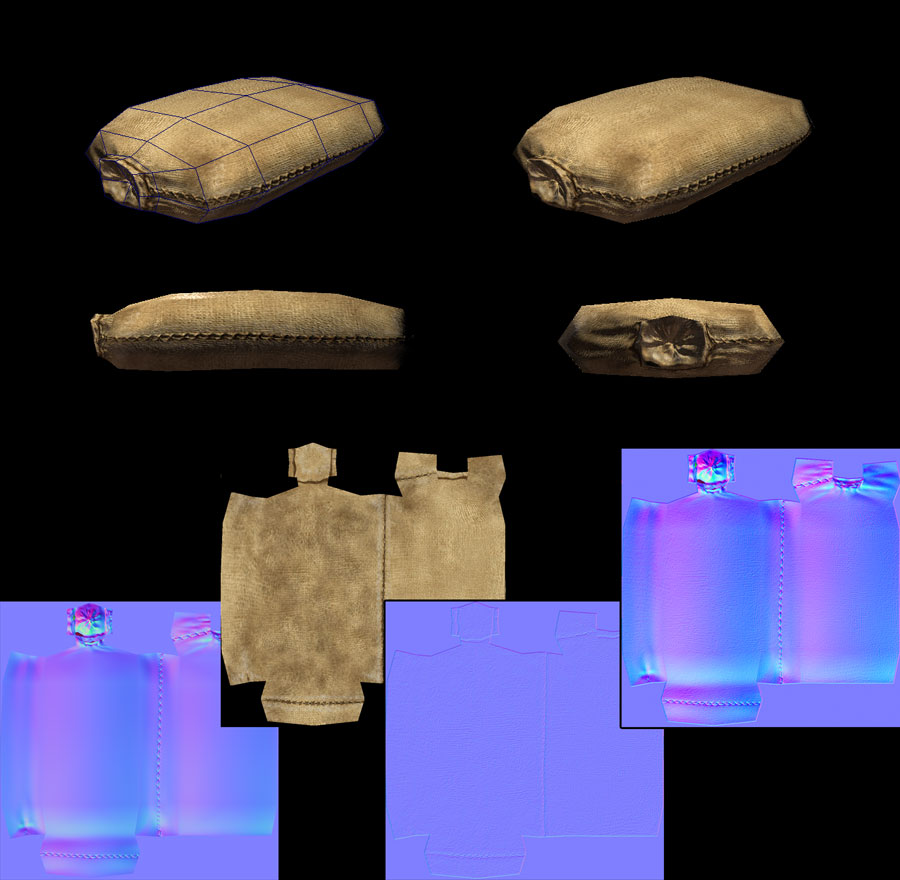
The picture below explains why this is useful. The example is of a sandbag. I sculpted the wrinkles and stitches in Zbrush. I painted the texture in Zbrush. I generated the smooth Normal Map. Then I used xNormal to generate a noise Normal Map to match the color map. (You can use the Nvidia filter in Photoshop also) Then I used my photoshop action to combine the two bumps.

Here is the link to my action. This is a new link
http://www.jcappelletti.com/jc_awesome_actions2.atn.zip

The action has a message with instructions. Dowload and use it for free. Just remember who you got it from. :smiley:

-JC

[attach=82558]NormalMapCombiningDemo2.jpg[/attach]

Attachments

NormalMapCombiningDemo2.jpg

hey, just stumbled across your action…thanks for sharing it! :slight_smile:

(have a look at crazybump.com for an additional option as well)

WailingMonkey

I’m trying to get all the kinks out of this action, but it seems to be just a little off every time I try it on a new model. Here is a picture of my latest test that I got to work. I added a STOP at the end of the action explaining the final tweak and how to make it work consistantly.

Basically, the flat blue color of the normal map has to be RGB 127,127,255. If it is even off by one number, you will see problems at your UV seams. This has always been the problem and the reason why you can’t just blend two normal maps with a simple blending mode in Photoshop.

Here is the new link.
Click here to download Ver 3

Attachments

CombineDemo02.jpg

hey jc.
nice post :0)

You may already be doing this, but what I’ve been doing is separating out the detail normal map into 2 layers. One layer is set to overlay with the RG channels left as is with the B channel set to 128,128,128. The other second layer is set to multiply (or darken) with the RG channels both at 255,255,255 and the B channel left as is. I find it useful to not have the layers merged together so that I can adjust opacity or easily add/remove the detail if needed.

Here’s the action that I’ve been using. The minor glitch is that it needs the canvas borders to have some information or else it has trouble with positioning the layers correctly so just make sure that the empty space is filled with 128,128,255.

anybody have this action available for download?

I wrote that tool a while back for a project I am on. Sharing it for whoever needs it. http://www.planetinaction.com/software/ncombiner.htm

beauty! thanks!

There is a photoshop plugin which will “re-normalize” your pixels after editing.

Here is the most comprehensive explanation of normal mapping I have come across on the interweby
http://www.bencloward.com/tutorials_normal_maps12.shtml

Ping Golf Clubs for Sale

I think more and more golfers want to become a golf star. Another negative factor with the Ping iWi Craz-E putter is the overall appearance which lacks in tradition. In addition, the cheap golf clubs also comes off the face a bit quickly, but this is something that can be controlled. ishiner