I’m doing a series of busts that need to be flattened down to rest on a surface like a coin. I realized that Zbrush’s scale tools retain detail really well so I sculpted the head entirely as a bust first. I’m just wondering if anyone has any suggestions about how exactly to compress a 3d head to a relief other than the obvious scaling and manual manipulating (ie. normal and displacement maps converted to geometry or something with projections).
http://www.youtube.com/watch?v=1s9i404fOx4
http://www.youtube.com/watch?v=-SFPhiGLknk
Maybe that helps.
Projection Master will do what you want. This is a quick test (obviously the shoulder needs to be taken care of). I flattened the model first using Tool>Deformation>Size in just the Z axis, then simply projected it onto the ‘coin’ using Projection Master.
Attachments
Alphas: That tutorial on grabbing the alpha channel is great and covers one of the ideas I had. I’m at the point where I know Zbrush can do certain things but don’t know how yet so that’s cool. The drawback for what I’m doing is that the depth on it is less rounded and relative which is fine for a coin but I’m doing this for 3D printing which needs a bit more depth.
Definitely helpful for other things I’m doing though.
Projections: The projection was another thing I was thinking about but I didn’t mention that I need to have the bust separate from the coin (I’m doing multiple busts so it is easier to keep the tools separate). It is a better approach since it creates a rounder form but since you have to flatten the mesh out anyway, It would be better for me to keep that.
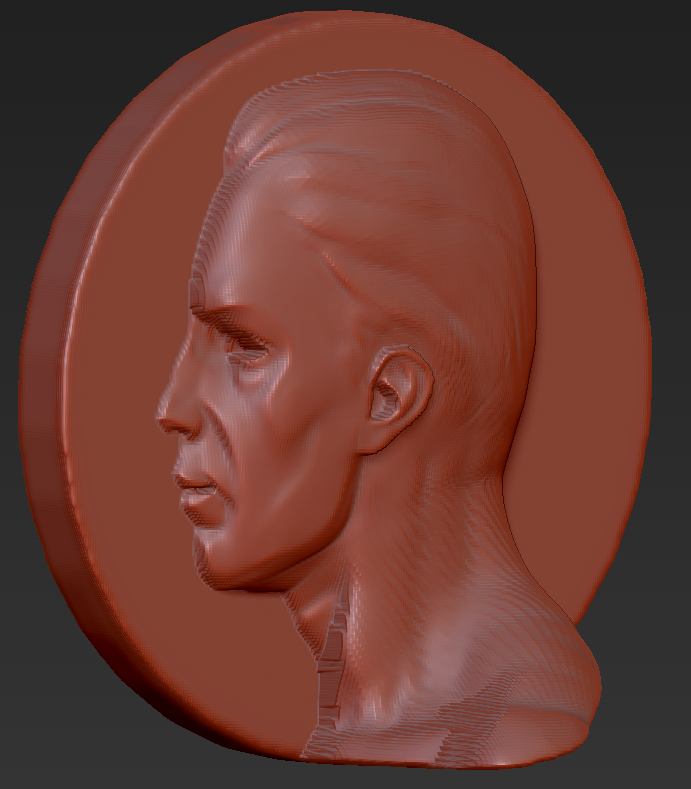
I went ahead and tried what I had in mind anyway, scaling and tweaking it by hand, and found that to be more adaptable before and after it was scaled. I basically started by defining the boundary of the profile by spraying some color on it from the direction it was going to be viewed, then I went over that with a black line to mark it off better. I found that the shoulders obviously have one straight line all the way across and the head has a second (being a sphere and all). My goal was to get the unflattened bust to have a single, flat back that it could be scaled against (ie. the front shoulder shouldn’t come any further forward than the farthest point forward on the head). I used the transpose move tool to clip off the back of the shoulders and head up to the two lines I had drawn on them. I didn’t want to rotate them to be lined up so I used the deformation palette to skew them to be flat along the plate/coin’s front axis. I filled in concavities behind the nose, ears, hair, etc. and repaired the neck (which isn’t very important in profile). Finally, I scaled it down to the thickness I needed. Another useful part of this process is that it keeps the subdivisions of the original mesh, meaning that I can go to a lower level and mess with the general bulge of forms (which are no longer realistically proportioned to each other).
The only thing that is left after this is to go over it to emphasize any details that disappeared. I found that I didn’t have enough geometry originally and having more would have protected some of the detail a bit more. Lastly, I can cut off the clipped edges of the back of the portrait and fill that in manually.
Here’s what I had (just a proof of concept, not the final “coin”).

