ZBrushCentral

UV mapp from maya ended up useless!

I just exported my Zbrush file to Maya and the polygons were separated for some reason. The main problem was, I had already UV mapped everything in Maya into the UV space and did some detailing work on it in Zbrush. When I exported it back to Zbrush, all my UV maps were gone!!! Instead of the layout I had in the UV space, I had a bunch of 2x2 blocks of UV’s going across the UV texture editor! Why did it do that??

Problem number 2 was while modeling in Zbrush, my polygon was no longer uniformal. I clicked on frame and some parts were separated in colors and I also had triangles around the deltoid areas. I will screen cap. Please help me! This is the second time exporting something has screwed me up. I’ve never had any success doing it yet. Thanks!


Zbrush 3.1
Maya 7.0
Intel Core2 Quad CPU
Q6600 @ 2.40Ghz
2.41GHz. 3.25 GB of DDR2 RAM (OCZ 2x2gig)
ATI FireGL V5000

I can’t help with the UV problem because I don’t have experience with Maya and don’t know the full history of what you’ve been doing here (steps that you’ve followed and settings that you’ve used).

For the other problem, did you at some point partially divide the model?

All my Zbrush settings are default, I haven’t tweaked or changed anything. So is there any reason why zbrush might change the UV layouts?

And no, I didn’t partially divide anything, it just ended up like that? Is there anyway I could smoothe it out or combine the object so it would all be one color?

I would have to agree with aurick as it looks from your screen cap that you partially divided the model. maybe you did it by accident and didn’t realize it. the i’ve never seen a polygroup setup like that unless it was partially divided. it is also would explain why you have added UVs when coming back into maya. unless you uniformly divide your model, it will not know where to map your uv’s, so it will place them in the given ratio of your map in squares.
couple things to make sure of, and one thing you should always do. never ever import/export over the same model. i always make an import obj and and export obj. this way i know i have something to fall back on in case something screwy happens. second, when before you export out of maya, delete all your history and make sure that your model is one solid model with all edges merged that need to be. when you did your uv layout, did you use the maya tools or a different plug-in? if you used an unfold uv plug-in, it may have physically cut your edges instead of your uv edges. it all seems kind of fishy at this point, but let’s try a test.

in maya, take your model and just run auto mapping for your uv’s. select your model and export the obj. import it into zbrush and in the tool>texture palette, run a UV check and see how the texture map pops up. after that, select texture>texture off. hit ctrl+shift+A to clear out any possible masking that may have happened. ctrl+shift+LMB in your workspace to make sure all polys are un-hidden. then go to tool>geometry>divide. hit shift+F and see what your polygroup frame display looks like and let me know what happens. if it all works out okay, then it may just be those two instances i described earlier. uv setup in maya, or partial divide in zb. just be thankful you didn’t have a poly explosion. i hate it when those happen after you have spent hours and hours on a model in zb. they’re just frustrating.

I’ll try what you just said in a bit.

But to answer your question, yeah I might have divided on accident and didn’t realized. I did infact hid the arms and vice versa to add details. While doing so, I did move up and down on resolution…so I guess I really did subdivided.

My maya OBJ that I exported had its history deleted, merged everything was fine. It did have a few triangles though, but I didn’t think it would be a problem.
I also use my exported maya obj as an import, but I do save it as a separate file. Is that a bad thing?

As for doing my UV’s. I went back and fouth with Maya and Headus UVlayout. I imported everything back into maya, merged all the verts, cleared history, froze transformation, deleted un needed nodes etc etc.

Anyways I’ll try what you just told me to do right now.

Another Note. When importing, it asks you if would like to split these polygons to sets of symetrical triangles? Or to a combination of Quads and Triangles? What would be a better selection?

Quads and Triangles(compatible with Z2) whats Z2? Zbrush 2?

Or

Symetrical Triangles Only?

I usually Quads and Triangles, but right now I just chose Symetrical Triangles Only.

This is what I got with automap from Maya.

I actually did get an explosion once too. I didn’t know how to fix it so I scrapped it and started over. Another time, I exported it over, the UVs were alright looking, but…when I clicked on the UV from the UV texture editor, multiple ones were selected on the actual model. So this is like the 4th attempt starting over and now I’m getting frustrated. :frowning:

Another question. So how would I smoothe out and make all the frames combined/same color if I subdivided on accident in certain areas?

With my layout I did in Headus UVlayout and exported to maya for clean up.

I also just rechecked my current one I’m working on and everything is bright Red. Its not greyed out like the rest sooooo I don’t know when the UV messed up. SO I guess I have to start over or re map this hi rez map?

Another thing…the resolution my level 1 is pretty high poly too.

Ya I dont use maya I use c4d and bodypaint the UV mapping is awsome in bodypaint.

Hope that helps dump maya and come to the C4D dark side mwhahahahaha!!!

check out bodypaint the best uv mapper I ever used. plus maya’s animation coding sux and is very hard.

Oh and um your pc specs are kinda pointless a .1 overclock is not really worth mentioning.

I also have the q6600 OC 2.4 to 4.0 ghz and a Bigwater 760 Thermeltake water kooler and a air conditioning unit in my pc and 2 8900’s PCI 2.0 and 4 LCD flatpanels 23.5 inches but I dont list it in my profile it makes it look like your bragging pointlessly.

I dont know if your saying your ddr 2 is 2.41 ghz but that is impossable seeing ddr2 800 MHZ is the max before ddr3 that is some intense overclock lol!Id like to see the voltage gain on that.

I copied it from whatever my “my computer” properties is saying. I think I remembered a thread about you having to post your PC specs so people can understand what exactly you’re using, so instead of having to type that all the time, I decided to just put it in as my signature. I have everything as default, I never overclock it or anything. As for Zbrush 3.1 instead of Zbrush 3, the interface is different with some other changes. I’m just trying to be as specific as I can. Not trying to be a know it all computer nerd or anything. So sorry if you think I’m bragging, I’m not.

PS: I changed some stuff so it doesn’t look like I’m bragging. :confused:

thats understandable the .1 ghz is like what lol

the only thing the machine specs matte rto is poly count and um the prefences memory settings make sure you not using default its set for like ultra crappy machines.

does maya have projection uv mapping id prob use a nice cylinder uv mapping and stretch the polies.

most of my faces looked skewed as hell in uv map but render the way i need.

can you connect those uv polies in maya or select different sections like arms and legs i use a different setting then i do for body and face.

in fact in the face you need a nice line break at the forhead to uv map it the best.

i dont know maya that well I did some digital tutor human modeling tuts long ago but I dont remeber the uv mapping process to much.

its prob very similar.

any uv map comes out like crap for me I always hav eto uv map it myself. Ive never seen a program uv map something the way i want. with one click.

here is a basic example of what the 3d app puts out and what you need as an end result its a process complex as making the model.

some models I use multi uv layered on top of each other for full 3d renders not um game those are single mostly.

the lef tside is garbled and useless the right side has been uv mapped.

you need to learn uv mapping this doesnt apply to zbrush and I am by no means a zbrush expert but I am a c4d and bp3 expert.

i dont know much other uv ampping in others apps like 3ds max and maya but i can model in both.

even them im sure its no one click insta uv map even a retopology wont help uv its all in the uv map projection and knowing how to do it properly.

Attachments

BaseSknUVWmap.jpg

Hmm, I’m still new to Zbrush. I’ve been on and off it for a few years but I never really got into it so I don’t know what preferences to use or what most of these things mean. I DOOOOOO crash a megaton. I can’t save my file when I’m on high resolution. Everytime I save, I have to reduce to my low res cage which Kinda sucks. Would the preference work?

And yeah Maya has projection mapping. It does kinda suck. I only use it to separate the UVs and then I bring it into UVlayout. It makes everything a lot easier for you. :slight_smile:

Its your memory settings we all crash like that in the beggining
Then we set our memory settings correctly default is the problem bro google zbrush prefences or search the forum on it.
For mem u want to match the amount of ram and i use undo 8 ok

I also use soft ram or virtual ram its. its a windows swap folder that holds random info like ram i have a tera of HDD space on my rig so I use 15 gigs for soft ram this also helps.

decide what you want to sacrifice. and that will help any machine with ram issues. crappy or good.

and we have the same chip ya i had the same problem we have quad cores you also need to set the multi thread core to 8
2 threads per core.

that will make zbrush ultra effecient and also dont use zbrush to save your files that will crash it I use Svelngi zmodel save zplugin its doesnt crash.

and auto save smy models for me you cant survive without svlengi’s save tool.

I can’t get my UV maps all in one piece like you did there. Everytime I do it, I break them into a LOTTTT of places and I get seams when painting. I’m still not sure how to fix that. When I do get it like the way you got it, the textures get stretched. THere must be a way to paint over seams?

Seam painting or Edge paint is because those polies arent conected like arm for instance I would do a flat projection on it and get the 2 halfs of the polies I then would connect one edge to the other you test which edge by painting a white do on the seam u need.

then you connect them by dragiging the points to each other and use snap points thats what c4d uses. then I would paint it and not have a seam line down the uv map.

What I know of Zbrush…

  1. Using UV Check, you want NO redspots. A redspot tells you that
    there is overlapping UVs and you won’t be able to generate Normal or
    displacements that way…

  2. In the Tool>Texture rollout… There is a ‘Fix Seam’ Button… To the
    left of it there’s something called FSborder, or something like that. The
    default is set to 4… If you click ‘Fix Seam’ with this default of 4, that will
    give your texture a 4-pixel flood over the UV border shells…

Finally, I’m unsure, but in Maya… It’s always good to set the checkbox on
import to ‘false’… Maybe this is the same in export???

I’m having a problem where I’ve made an entire model in Maya, then
sculpted and painted in Zbrush. Then going to create a Normal Map…
FRIGGIN’ Error… I did my UVs in Headus UVlayout, and forgot to check
the UV Check for redspots in Zbrush. I’m wondering how I can take this
little finger, flatten it, and replace it on the UV board without having to
redo everything… Using Auto UVs will work, but I’ll have to repaint EVERYTHING>…

Hope this helps… Hope I can get a little???
Laters…!

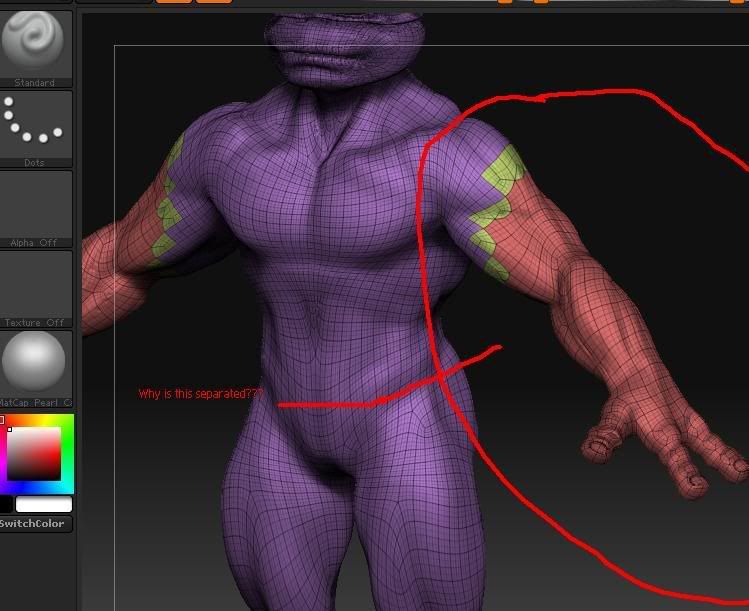
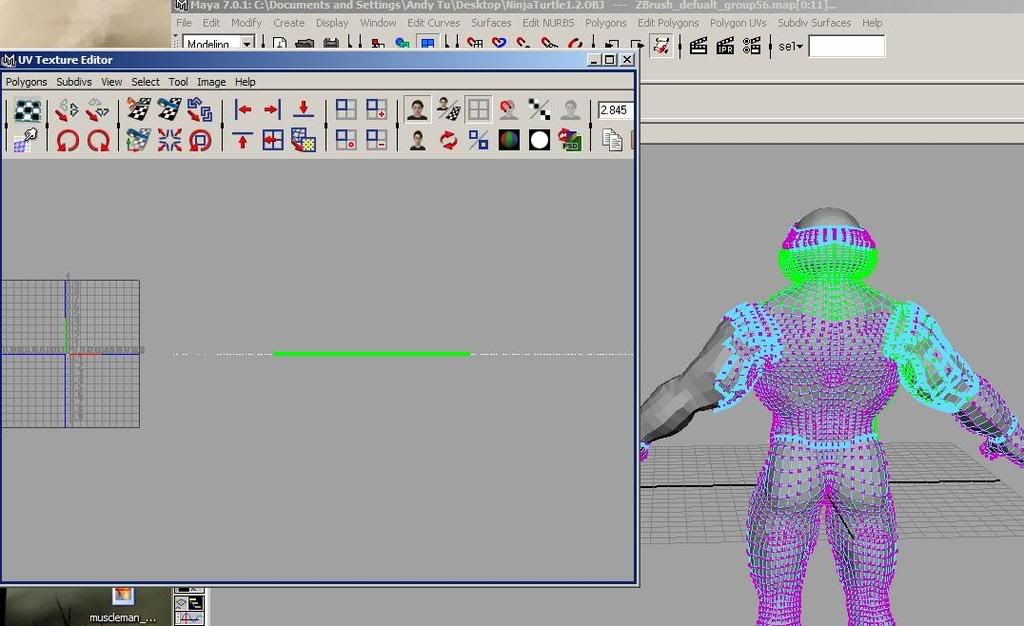
Anhslaught: the quad/triangle message you get when you import into zbrush is a message you never, ever want to see. this means you have some n-gons in your model (5-sided polys). You should always try to model in quads and a minimal amount of tris. so when you import into zbrush, since it doesn’t like n-gons (no 3dapp does), it wants to make the ngon into something, so it splits it up as best it can. go back into maya and go to Mesh>Cleanup… (maya2008). In the “Fix By Tesselation” section, uncheck all items except for the “Faces with more than 4-sides”. You should see your model change color to light blue wireframe, face selection mode. If you hit “4” on your keyboard to go to the wireframe view, you will see certain selected faces highlighted in orange. These are the faces you need to make note of. Undo the cleanup function and go back to one of the n-gons and fix the topolgoy in that region so that it keeps it in quads. Run cleanup again to identify each n-gon, undo, fix topology, etc. etc. Hopefully, by doing this, your uv layout will remain the same.

In 2008 any added polys to an already existing uv layout will be applied accordingly and not just randomly placed in your uv layout like in older versions. This however will only work if you don’t delete the ngon and create brand new extrustions. you have to only work by spliting the polys and deleting edges, do not delete any of the faces.

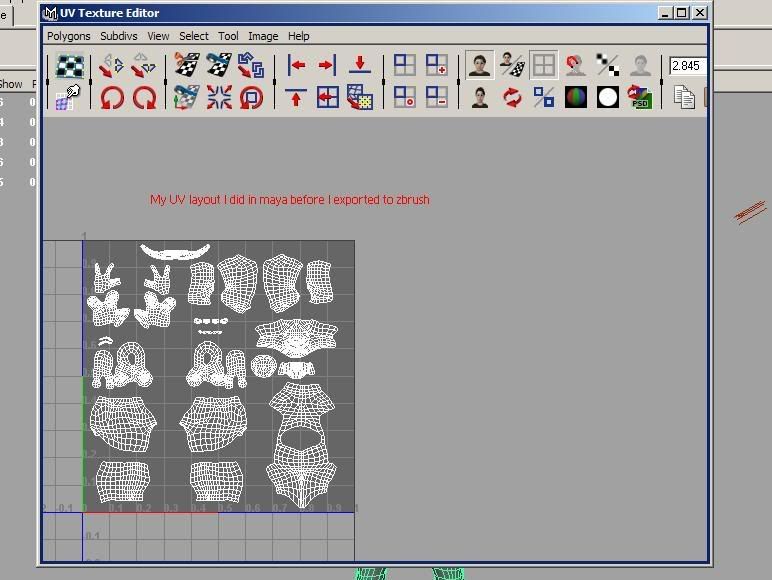
If you want your UVs laid out like the attachment shown by infamouskiller, then you just need to play around with it. There was obviously some unwrapping and relaxing tools applied to his layout to obtain the smooth uv flow. Your original layout looked good, I think you just need some more experience that will only come with time. UV layouts used to frustrate the hell out of me, but now they’re just part of the process. Some helpful little quirks I have picked up. …

Let’s say you layout the torso, the head, the arms, and legs all seprately. Well you want to have a fairly even distribution of pixel ratio over the course of your uv’s. this will give you nice even detailing in your maps and nothing will be over pixelized. Good way of checking this is by the typical checkerboard. In the UV Texture Editor, select just a couple of UVs in the center of the torso region. Hold down “SHIFT” and hit “>” multiple times. This will grow your selection region and it will stop once you have reached the uv border of the torso. From there just use your move and scale tools to obtain a UV layout sutible.

NO OVERLAPPING UVS!!! The only time you should overlap any uv’s is if you are re-using uv space, typical in gaming to obtain maximum detail over small resolution maps (reuse arm uvs, reuse legs and hands, etc. one uv shell for 3 swords, so on and so on). This is a big no no while working in zbrush, which is why a lot of people will use other apps like xnormal to obtain their normal maps and so on. not sure how bodypaint handles uvs, but i am sure it does an excellent job.

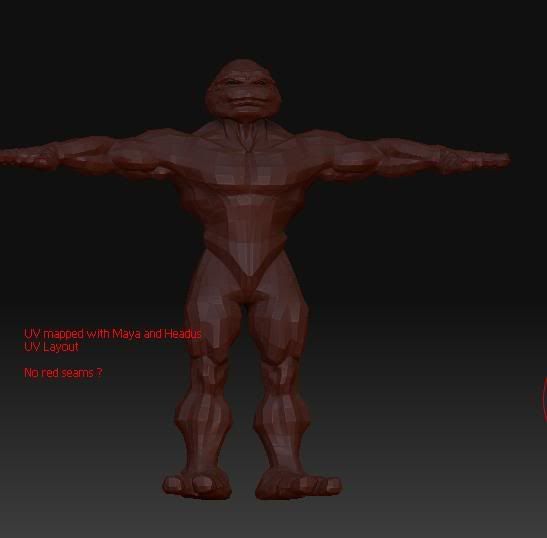
as far as your model looking solid red in your frame view, that is a good thing. this means it is all one polygroup and not partially divided like the original problem you were having. now you can go in and hide and unhide polys and make your own polygroups to speed up detailing the highres model (switch to lowres, shift+ctrl+lmb on your model to show only that polygroup, move to high res, detail, move to low, show entire model, back and forth back and forth) so that your computer doesn’t bog the hell down while using millions of polys. i’m working on one right now that is 3.5 million on 6 divisions. if it wasn’t for polygroups, my computer gets kinda sluggish.

anyway, gotta go to work. good luck.

p.s. you don’t have to use another app to unwrap uvs. maya will layout sections just like any other app. some do perform better operations, but for what you need to accomplish right now, don’t get too over your head. check out this good tutorial from 3DTotal.

Thank you firebert. Infamous Killer is helping me with Zbrush. Fixed the crashing definately. :slight_smile:

Anyhow, I don’t want this thread dead yet because I haven’t yet solved the problem.

Anyhow…

Ive been watching videos and they always say to export and import the same way, but Infamous Killer said I need to do it with Zmapper. Is the import/export for zbrush really that useless and the whole reason my UV’s are getting messed up?

And. Do the Displacement, Normal map, color map all share the same UV coordinates? Or could Displ/normal maps have a separate one from color maps? I was under the impression that it HADDDD to all have the same exact coordinates. But, I was told that after I UV map in Maya, export my obj to Zbrush, detail it, create norm/displ maps, export out to .obj, bring back to Maya, I would have to redo my UVs again for a different map. Is that true? or just one way of doing it?

Anyhow, I’m going back to my obj file and fixing the ngons and triangles, fix the UV’s. (Should all the parts be in one UV space, or should each main part have its own UV space?) Going to start over in Zbrush with the model. If there’s a proper way to export/import the obj, let me know what I’m doing wrong.

Thanks, nice to get as much help as many ppl as I can.