I need an application that can change the UV layout without changing the point order of the exported model.
Check this out. But take care that you are 100% shure that your existing application is doing something wrong and that it is not a setting you are missing before you invest in a new tool. Hmmmm that’s funny… I give this advice but always get the new toy aehhh tool anyways hahaha.
http://www.zbrushcentral.com/zbc/showthread.php?t=38719
Good luck wrapping!
Lemo
PS:They have a demo… try it!
Thank you lemmonado,
I actually try everything to make a new uv layout with max. But in some circumstances max is changing the vertex order on import, especially if mesh has triangles and this is totally unavoidable.
I found a little application that modify obj file and try to fix the vertex order changed by max. But it didn’t work for me. I’m now trying to contact with the author of this app. When waiting, it can be good to try another alternatives.
Are you sure about this UV layout tool is not changing the vertex order on import or export?
I bought the dongle version and am very happy with it. And no, I have not experienced any modification of geometry data. But then… I do not work with max. Best thing is to give it a run with the demo version.
Lemo
I’m still waiting for the trial password but I don’t think headus uv can make uv layout without changing the vertex order.
I just tested deep uv. It is changing the vertex order like max and causes collapse when updating the model in zbrush.
Lemmonado, headus uv layout really good. I liked to play with that toy;)
But I couldn’t find any option like pelt mapping. Is there just a flatten option? If so, working with that tool is just a waste of time.
Hey cg-designer ,
Have you checked out Silo ? They are still on the Beta versions of their latest release (Silo 2) so it’s not yet stable enough for serious work . But , I was playing with the UV unwrapping options in there and its fantastic stuff ( and they are planning many improvements to the UV mapping for the Alpha release ) .
The best things about UV unwrapping in Silo is ;
-
You can select edges as your seams that must be cut kinda like the Pelting Plugin in Maya .
-
If you turn on Live UV Unwrapping you can select some uv points and when you move them the whole UV shape reacts to the changes like elastic . You can also pin UVs so that they can’t move . This give you some amazing control for fixing areas that are seriously overlapping and complicated .
What takes me like 45 minutes to UV map the old-chool way in Maya, takes me about 5 minutes in Silo 2 Beta .
Hopefully with Zbrush 2.5 it will have its own ‘in-house’ UV Unwrapping cause I hate leaving Zbrush at all 
Anyways its worth checking out since its one of the cheaper softwares out there .
Best Wishes ,
Kevin
Hey Kevin,
You are suggesting Silo for UV mapping but the producers of Silo are not suggesting Silo.
Here what they say:
“For more detailed texture mapping (such as human faces), we suggest you export your model to .obj or .3ds format and use a specialized UV editor.”
http://www.nevercenter.com/faqs/
I think I’m looking for that specialized UV editor they were mentioned 
cg-designer ,
It makes sense they would say that, since their UV toolset is currently incomplete . They are still in the Beta phases of the software development so it is only fair to tell people they can’t use Silo’s UV mapping as your main mapper . I think by the time they get to 2.0 Alpha they will have a great system worked out .
The main reason why you can’t only use Silo for uv mapping at the moment is that there is no Stitch and Sew functions . So when I have everything lined up I still have to go elsewhere to sew it up .
Another current problem with the Beta is that there is no Mirror Symmetry function for the UVs so you end up with slightly uneven shapes . Obviously this is not great .
So what I am saying is if you need something right now, then go for that UV software , but check out the Silo final version when it’s out, cause I have a feeling it’s going to be a good one . Silo Features like Live Unwrapping and Pinning UVs are features I have always wanted in a UV mapper .
Best Wishes ,
Essclock
I would recommend Headus UVLayout to anyone, it’s made THAT much of a difference to my working day. There are enough video tutorials on their website to get you right up to speed with the hidden power in this app. http://www.uvlayout.com/index.php?option=com_wrapper&Itemid=67
At it’s simplest level you have 3 windows with respective keyboard shortcuts.
- uvlayout window
- object edit window
- object view/result window
You can jump to window 1 at anytime where you will hover the mouse over a dropped shell and simply press F. This is the essence of UVLayout. It uses (I think) a physics based algorithm on the shells to Flatten out the mesh.
This is at it’s most basic as there is a lot of hidden power. Stacking similar shells, straightening edges along border/internally on shells, Auto packing etc etc. With the added bonus of having a colour feedback on your mesh you can instinctively highlight problem areas and adjust accordingly.
I am no Shill, I’m just thrilled that there is an app out there that does such a superb job of easing the headache that is UV map problem solving.
ghib, will using UVLayout resolve the fact that once you reproject your retopology’ed mesh that you made uvw’s for those uvw’s will get ignored?
Is this problem even linked to vertex order or is this a problem that Pixolgic knows about?
I’ve partly solved it by using Max to calculate normals (it works nicely), but for workflow it would be much better if I could stay in Zbrush.
Bouncing 2 mill polygon models in max is not the most fun, but it is doable.
hey BooMMooB, If you do your lowpoly mesh then take that to zbrush for a straight sculpt. you can export the lowpoly mesh from zbrush to UVLayout… do your uv mapping then update the obj file and just import that new obj file over the existing tool. should retain vertex order etc and you can then do your normal map bake within zbrush.
If on the other hand you do your sculpting 1st then create the low poly mesh in another app, you will probably need to go down the zbrush retopology method which allows you to import a mesh to zbrush and use that as your retopology tool and rig it over the old hires mesh. This allows you to use your new topology and step up the levels and retain the hires detail. This is my preferred method.
Certain other apps allow you to use arbitrary hi&low res meshes which is another option so the two don’t need to be connected. But the zbrush retopology method is a really nice addition to the workflow… allows you to keep moving forward with your retopology stage without losing any detail along the way.
In my experience max really messes with vertex order when exporting to .obj format. Some of my work colleagues got into a mess using max to pelt map and wasted many hours of work. I wouldn’t recommend it unless you know what you’re doing.
Not sure if this answered your question but it’s about the extent of my knowledge.
Hi Ghib
Thanks for answering.
I think maybe it would be better to describe my workflow.
- I make a low poly base mesh in 3dsMax9. No UV’s on this.
- I take this to zbrush and sculpt to step 6 (1.2 mill polys)
- I make a new lowress mesh in zbrush with retopology.
- I export the new lowress mesh to 3DSMax as .obj and do UV’s with peltmapping.
- I use projection to get my detail from the highress zbrush model onto the new lowress model with uv’s.
here it breaks.
I can get detail onto the new model, but my uv’s are screwed. I have checked the lowress model in zbrush with ‘check uvs’ to see if indeed does register in zbrush as having UV layout. It does. But once I get busy with the projection zbrush seems to ignore the uv’s altogether.
I’m seriously at a loss here.
I also tried another way.
- I make a low poly base mesh in 3dsMax9. No UV’s on this.
- I take this to zbrush and sculpt to step 6 (1.2 mill polys)
- I export the lowest level mesh to 3DSMax as .obj and do UV’s with peltmapping.
- I import this into zbrush again as .obj expecting it to replace the original lowress mesh.
But sadly it doesn’t work. I also tried the same but using Wings3d instead of 3DSMax but that wouldn’t work either. In both cases I got the error that the mesh should have the same number of vertices as the original. The fun/strange part of it though, is that if I delete the higher levels of the mesh in zbrush (leaving only the level1 level left) I can replace the model (!!!). Now I thought that as very odd.
Anyone with an idea of how this can be? And to my problem in general. Right now I have gotten around it by exporting the highress model to 3DSMax and generating the normal map there instead of Zbrush. It works, but it’s a drag and I’m afraid of pushing 3DSMax into the 4mill polys and beyond…
Thoughts and guidance on this are much appreciated.
(Using ZBrush 3.1 on WinXP on a dual Xeon PC)
To use UVLayout within your workflow you would:
(do the following instead of the highlighted text above)
- Export newly topo’d lowpoly model into UVLayout and cut up 'n flatten your UVs
- Once done in UVLayout, hit ‘update’ button and re-import new UV-d lowpoly model
back into Z3.1 (it will have a name like ‘yourmodelname-uvlayout.obj’) - Continue on with your Z3.1 goodness
Sorry I can’t help you with the Max stuff.
cheers.
WailingMonkey
I downloaded the demo of UVLayout and made a simple test.
polyshere in zbrush
divided it to level 5 and did some simple modelling
assigned UVTiles
exported to .obj
took the .obj into UVLayout and unwrapped the model
Hit update
imported the new -uvlayout.obj model into zbrush at level 1
voila
it worked!
This showed me that it does indeed work. Thanks for all the help.
at the moment i think it’s impossible to reorganize the map data after exporting/importing objs. Obj’s reset the vertex info. Sorry bro… you’re hosed. I’ve tried a million things… nothing works. It’s not an UVLAYOUT thing, it’s an OBJ exporting/importing thing. let me know if u solve the problem… but it might be logically impossible
dead_companion - It is actually possible. It’s just not possible in some applications. So taking the model back and forth between 3dsMax and zbrush is not an option. 3dsMax screws with the vertex order. I also tried Wings3D (which also do nice unwrapping) but Wings3D also screws the vertex order on .obj export.
But, there’s hope. UVLayout lets you unwrap the model and import the model back into the lowest division level in zbrush. So, while it would be better to have the option to freely transfer models to 3DSMax, atleast now I’m able to get some nice uvw on the topolgy lowress model.
UVlayout might now be the only program that doesn’t screw up the vertex order, but I haven’t found any other.
Hope this helps you also.
cheers,
Peter
okay that’s interesting. but since i do a lot of production work in max, it kinda sucks that max will scramble the vertex order. Here’s a typical example of why it sucks: Say u baked vertex color onto an object, as well as vertex alpha information; and say u had to do some manual tweaks to the vertex color - u end up with an object that has pretty complex vertex info. Now, say u wanted to remap that object and unwrap it nicely in UVLayout. The ideal scenario would be, take it into UVLayout, import it back into max and copy the alpha and vertex color channel info onto the new, nicely unwrapped object - impossible. Once u copy and paste that info thru the channel editor, u get this really wacky, broken results… it sucks. Also… let’s say u wanted to load the UvUnwrap info onto the object already in your scene… there’s the illusion that it does it (since when u go into unwrap mode it looks exactly like the way u unwrapped it in UVLayout) but since vertex order is scrambled - the object itself looks like crap. Oh well. I hope this is something that is addressed soon by Autodesk because it’d be awesome to be able to copy channel editor information back and fro imported/exported objects and still retain vertex order. Let me know what u find out!
I have a question about uv’s in maya to zbrush. I have read some documentation of proper uv layout in 3d apps is vital before importing into zbrush.
Question: What does it mean to have a 0 to 1 ratio for uv mapping (in 3d apps) before importing to zbrush?
This is the way I work:
Thanks
Roger_01 :
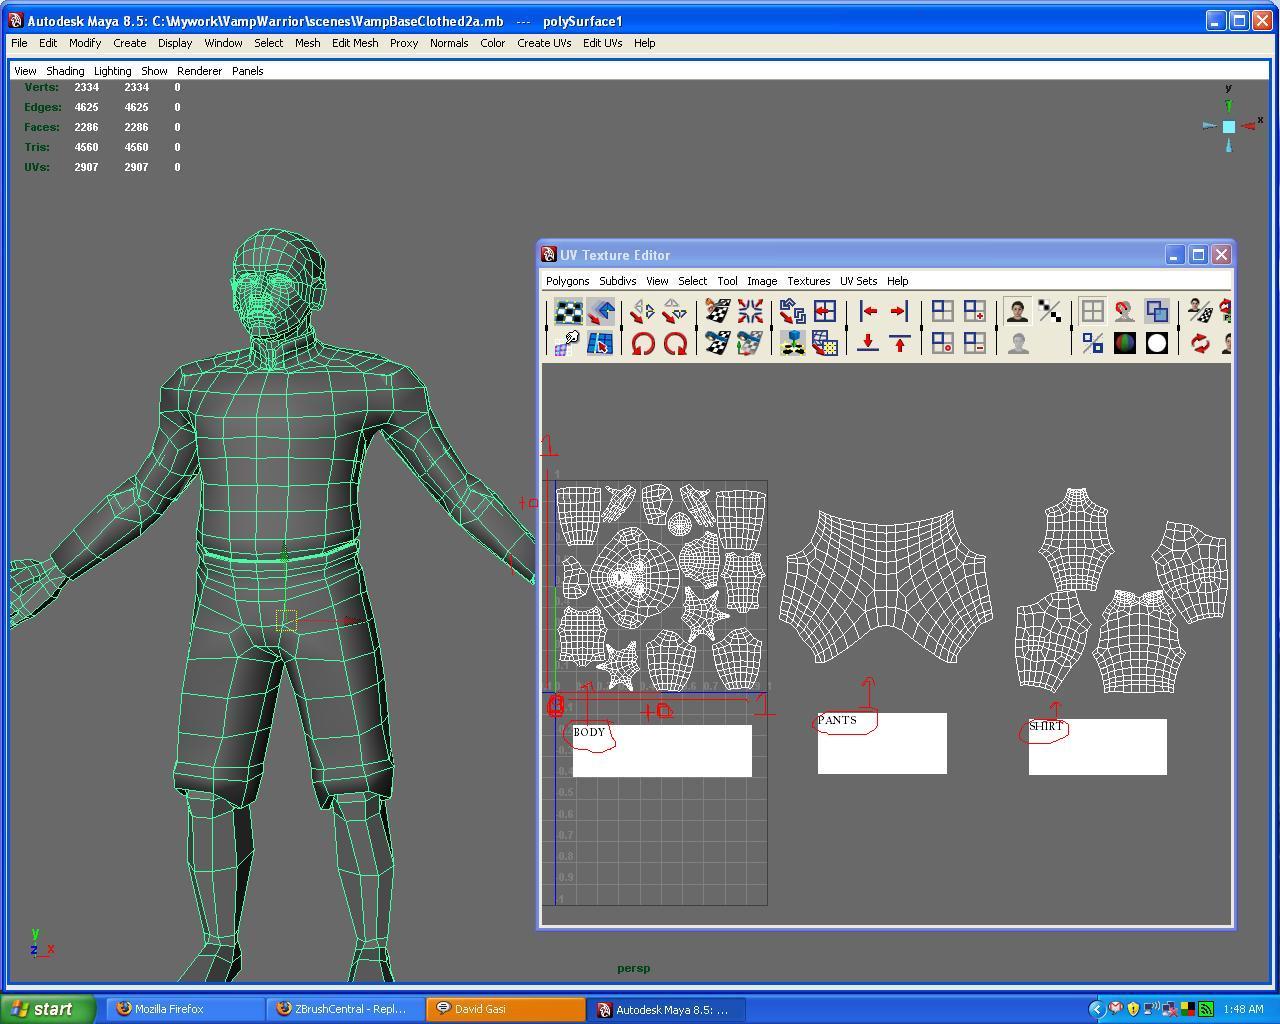
the UV texture editor in maya ranges from -1 to 1 in the U and V direction…for practical purposes , 0-1 ratio is like if you have multiple objects, you could apply an individual texture/material for each object…without having to have everything all in one texture… say for instance all the body UV’s will be in 1 texture square…(can have the full body texture - no clothing included) the shirt will have its own texture square (have a totally seperate texture for the shirt)…etc… kind of hard to say in words i’ll post a picture to show you what i mean…In maya if you use pelting tools…i believe it automatically makes everything 0-1 texture space…also about your importing problem, i’m not sure about MAX but perhaps it is the same as for maya…when you are importing go to your import options and make sure “create mutiple objects” is set to false…if it is true it will change your point order.
Attachments