ZBrushCentral

Strange displacement map issue

Hey folks,

I have a strange issue happening with my displacement maps that I have never encountered before.
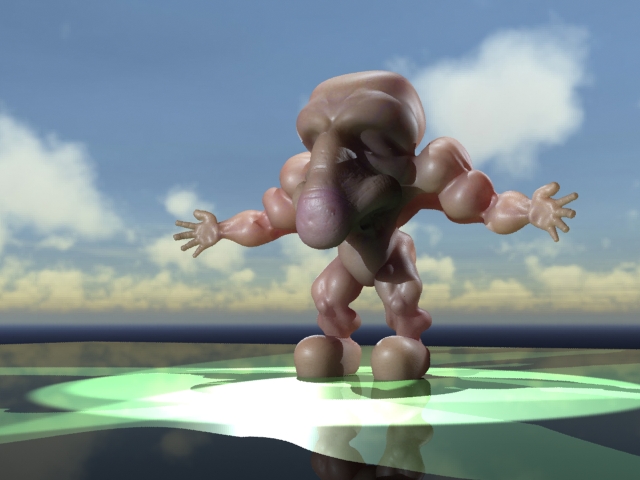
I’m rendering in MAX2010 using Turbo-smooth and Displace modifiers.
this render only has Displacement applied, no normal maps.

[attach=184847]nose02g.jpg[/attach]

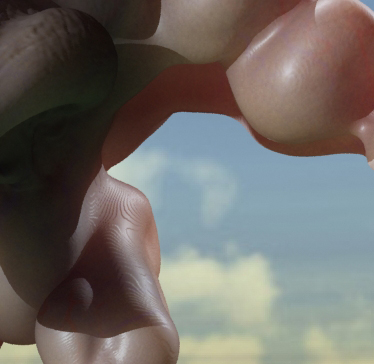
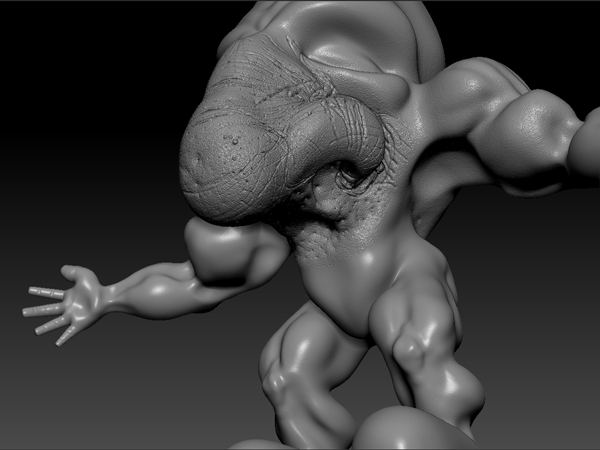
The problem is that on the smooth areas of the model, I’m getting what looks like Wood Grain or finger prints.

Here is a closeup of the problem.
[attach=184848]nose02gzoom.jpg[/attach]

I used SculptHD on this mesh, and use UVmaster (which is amazing) for the UVs.

I thought that maybe the SculptHD was causing the issue because I don’t use that all that often. So I did a test with just the subdiv and no HD and I got the same results.
I also tried exporting several sized Displacement maps from 2k-8k. the smaller maps had some improvement.
I used the clone displacement button and saved the displacement map as both a TIF and as PSD the PSD had slightly better (smoother) results but still has the issue.

I also thought maybe my base mesh was too small so I Deleted the first 2 SubDivs and use a bigger base mesh and re created the Displacement maps.

Also I didn’t get the level of detail that I have gotten with other meshes in the past.

I have never encountered this before and I have rendered with the same process with no errors.

Something else I noticed was if I use ReMesh All I get a similar ‘wood grain’ effect in the models newly created ReMesh.

This is very confusing.

Thanks in advance for any help.

-NinjaRobot

p.s.
this is one of my first posts I hope I got the images to work correctly.

Attachments

nose02g.jpg

nose02gzoom.jpg

Which version of ZBrush are you using? Are you following the tips here: https://support.pixologic.com/index.php?_m=knowledgebase&_a=viewarticle&kbarticleid=42

What is the bit depth of the map you’re creating? What you show looks like it could be getting turned into an 8-bit map somehow, which doesn’t have enough data for a good displacement map. Are you opening it and saving it out of another program by chance, like Photoshop?

@aurick

Thank you for the link. I have not done everything in that support thread that yet, but I intend to do so.

I did set the Mid slider on the displacement to 0 and I got even more distorted results in Max but I assumed that was a setting in max not Zbrush issue.

Zbrush 3.5R3

Displacement > Adaptive>SmoothUV>FlipV>3Channels>32bit were all on.

I did both, create and export map, and, Clone Disp options to create different versions of the Displacement map.

I just checked my PA blur slider its currently set to 10, I’m not sure what that does. but the link you provided says set it to 8.

I’m going to redenerate the Displacement maps with the PA blur changed to 8. are there any other adjustments I should do to the settings.

should I be exporting with the export button or with the Clone disp? is one better quality than the other?

If I didn’t say THanks for the help.

-NinjaRobot

Hi,
it seems one of my posts didn’t get posted.

I’m using 3.5R3

Displacement settings:
Adaptive
SmoothUV
Flip V
3 Channels
32 Bit

I am not using anything to edit the created psd or tif.

I made some changes to the Zbrush settings.

Pa blur to 8 mid is still set at 5:
[attach=184886]pa blur8 mid5.jpg[/attach]
It still has the ‘wood grain’ showing up.

Pa blur to 8 mid is still set at 0:
[attach=184887]pa8 mid0.jpg[/attach]
This version looks much better in the areas that got displaced… I just don’t understand why its not displacing some areas.
Could it possibly have something to do with the other 2 settings under ProjectAll, Dist slider, Maximum button. just speculating.
If it matters my Dist slider is set to 0.1 and the Maximum button is on.

Oh yes I had another question about the SculptHD slider, when you are creating the Displacement map, it says you have to be on the lowest SubDiv level. does that mean that SculptHD slider has to be set to the lowest level also?

This is how it renders in Zbrush:
[attach=184888]ZBrush Document.jpg[/attach]

I normally get a really good render in max with just the Displacement map before I add the Normal map. I set the turbo-smooth as high as my system lets me I normally set it to like 4 or 5, this one is set to 6 and the displace is set to 0.02 on generic units. not sure if that is helpful or not.

Thanks in advance
-NinjaRobot

Attachments

pa blur8 mid5.jpg

pa8 mid0.jpg

ZBrush Document.jpg

Hi,

I had some limited success after many trials with different settings.

I stumbled across this thread:

http://www.zbrushcentral.com/showthread.php?t=83423

aurick talks about texture map sizes, and how ZBrush upsamples the data to create a texture if the model is small for the texture map.

My nose model was 125millon polys in HD but only about 1million with regular SubDiv. My first thought was I needed a 4k map. but after reading that thread I switched to a 2k displacement map and things seem to smooth out in the areas where I was getting the ‘wood grain’ effect.

I was always taught that the Bigger the map the more info for rendering this goes against what I have learned but maybe I was poorly instructed. :confused:

No image at the moment I’m on my laptop.

still not perfect but much better

Thanks aurick for pointing me in the right direction, and for your many comments on other threads.

if anyone can add to this I’d appreciate it.

-ninjarobot