ZBrushCentral

Separating bas-relief model from background

Can anyone suggest a better way of doing this?..

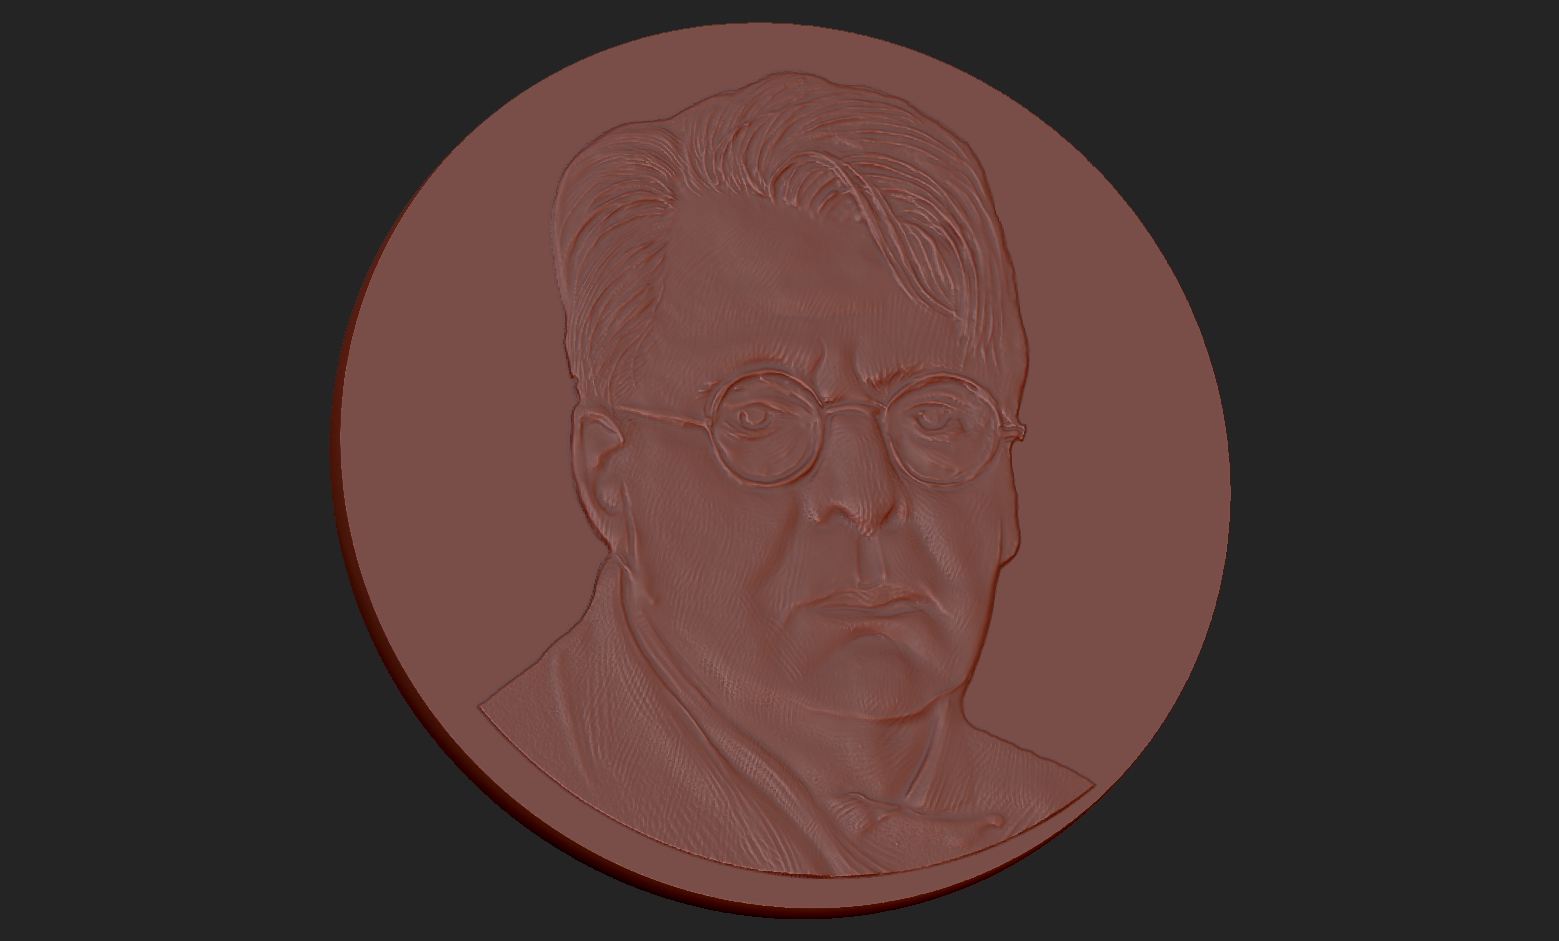
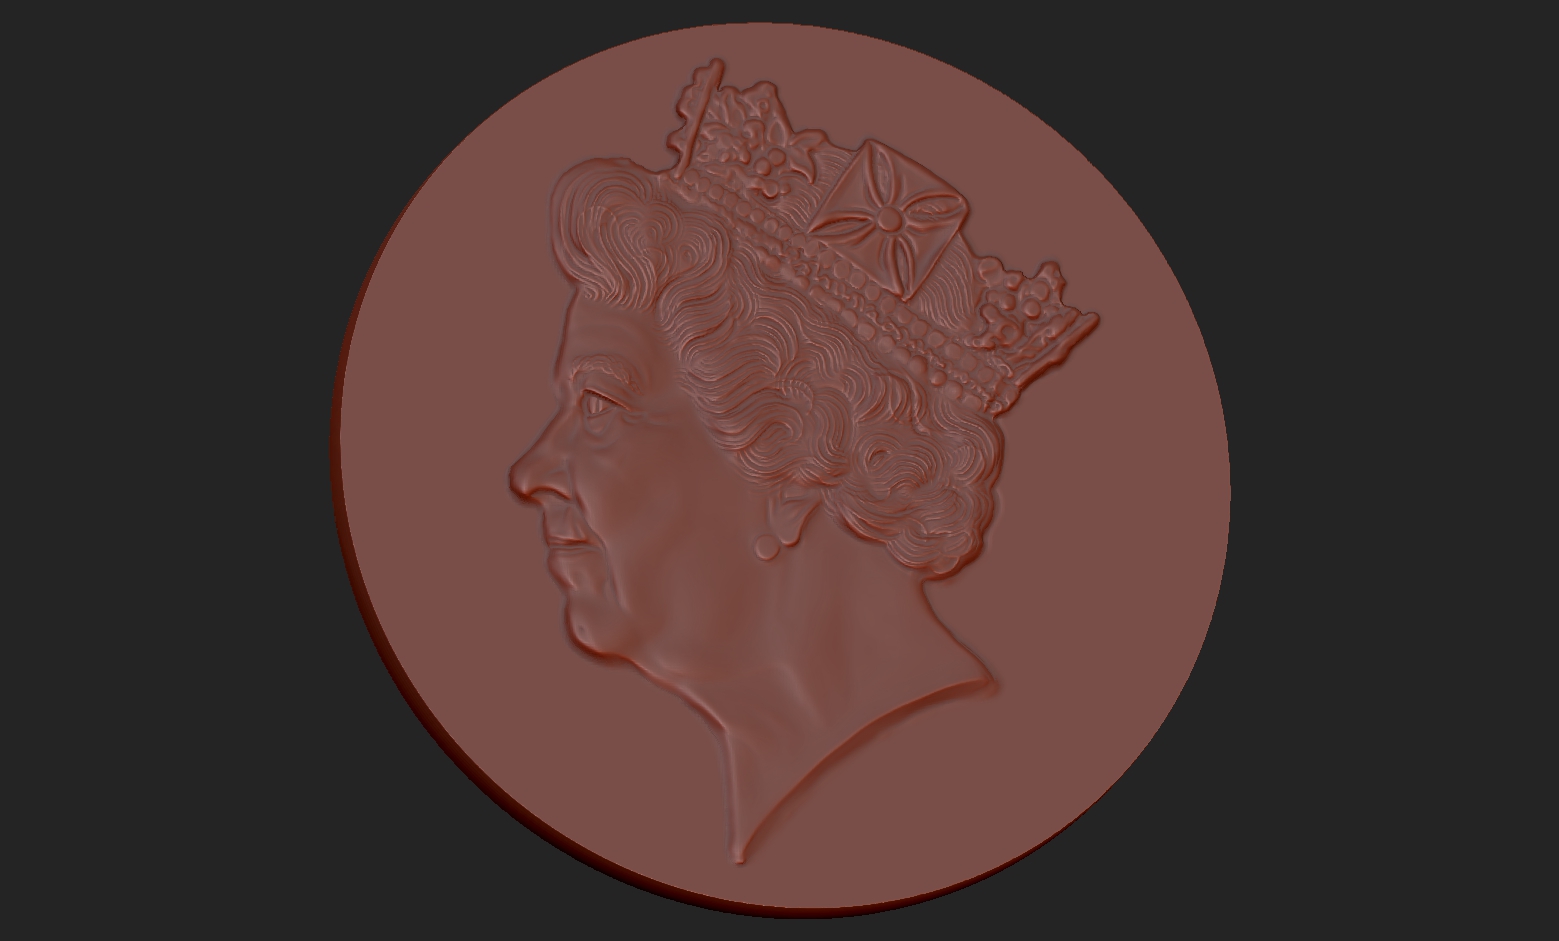
I work in bas-relief, mainly for the coin and medal industry, so my models are very low, on a flat background.

I use a dynamesh disk as a base, which works fine, but I’m not satisfied with the results when I trim my models away from the background.

I’ve tried masking/ extracting, and masking/edge looping (then hiding and deleting hidden), but unless I push the model up to a really high poly count, I get unacceptable jagged edges - models are imported into Artcam for CNC tooling, and anything over a couple of million polys or so causes trouble. (I know that actually quite high, but the jagged edge from a trimmed 2.5 million poly model would show up on the tooling, and be rejected. To give you an idea of scale, the models shown below would be engraved at about 30mm diameter, with a relief height of about 0.2mm - 0.3mm.

Masking by hand also tends to mean that I get small ‘gaps’ where the mask has clipped the bevel between the model and the background. These gaps get automatically filled in with flat planes when the model is imported into Artcam.

Expanding the mask to ensure that I don’t clip the bevel just leaves me with a thin flat border around the model, which is actually harder to remove than the full background.

I’ve also tried masking by cavity and peaks/troughs, but can’t get a decent result.

Can anyone suggest a better method for isolating and removing the model from the background, or tell me where I’m going wrong?
I’m not a comprehensive ZB expert - I learned the tools as I learned my specific processes, so I may be missing some useful functions.

I also have access to Modo, if that’s any help.
Many thank for any suggestions.

Pics attached to show what I mean

Attachments

ZBrush Document2.jpg

ZBrush Document.jpg

I don’t know what your current workflow is, but you should be able to create a silo mask that you can use to create a group - which you can then use “Polish by groups” on.

You can use Alpha > Grab Doc
Export the alpha, then use Photoshop to create a silo mask from that.

000.jpg

In order to avoid distortion, you might consider sculpting on a plane instead of a disc - this way your alphas will be square.

You can apply the silo as a texture, then use Mask by Color > Mask by Intensity

Now you can create groups from mask Ctrl-shift-e
and polish by groups.

001.jpg

002.jpg

003.jpg

004.jpg

I guess I’m a bit at a loss for what you’re trying to achieve. Do you want to remove the coin section from the mesh and only keep the sculpted head?

Yeah, what Thor said.

Like Beta, I’m not entirely certain I understand what you’re after, but the Trim Curve brush will slice cleanly across geometry leaving no jagged polys. Even a low poly object. So, turn the coin on its side, and draw a slice in between the coin and the raised portion.

On second thought, that may not work so well for you unless you raise the profile of the relief high enough off the coin to get a clean slice, and even then the way it auto closes the hole can sometimes be problematic in narrow recessed angles. If your work process allowed you to simply leave the back side unclosed, you could just delete that portion.

An alternate way of thinking about all this might be to not sculpt relief directly, but just convert fully sculpted 3d models into bas relief. You can see in the following example I’ve grabbed an alpha from the ZB Demo Head, applied that to a brush with the “Drag Rect” stroke type, drawn in out on a disk with the Z-intensity set at a low value in order to get minimal raised surface. Then I’ve just squashed the actual head along its X axis, and flatted the other side for a “separate” 3d profile:
basrelief.jpg

Hi guys,

Sorry if I wasn’t clear enough - yes, I want to remove the sculpted area from the ‘coin’. I’ve tried Trim Curve, and it works fine, but the relief heights that I’m working at are so low sometimes, that I simply can’t see the point where the relief meets the table accurately enough to line up. I really need to define the model profiles face on. It’s a bit of a pain in the arse.

Thor’s method is gonna work, I think. It’s worth a brief trip to CS6 on every job, if it solves the other issues.
I’m about to start a portrait job this afternoon. I’ll give it a go then.

Many thanks for your input :slight_smile:

lol…I missed your last post. Exactly the problem I have with Trim Curve.

Interesting that you suggested compressing 3D heads. It’s a bone of contention in the industry, along with automatically creating reliefs via greyscale, from photos.

bas-relief relies on light, rather than form, to create the illusion of 3D, and has to fit into some tight tech specs to be viable for production. Compressing a 3d head gives you high relief in all the wrong places, which would then ‘steal’ metal from the design on the other side of the coin during the striking process, which stops the design from being stamped fully.

I spent 16 years working as a hand modeller and engraver for the British Royal Mint, and there’s simply no way of getting it right automatically (not that I’m a purist, of course!).
A lot of the work I do is replicas of lost or rare coins, which would have originally been hand engraved, so the ‘human’ quality that ZB brings to the sculpt is really important.

It’s your area of expertise, of course. Didn’t mean to open a can of worms :wink: .Whatever works best for your needs. I just thought it might get you think along the lines of creating the relief as a separate object to begin with, if you’re going to need a super clean separation.

I will also draw your attention to the functions of “Create Difference Mesh” from a stored morph target in the Tool>Morph Target menu, which I believe (although not sure–someone correct me if Im wrong) works with the unified skin resolution control.

And, if you get to the point where you have an isolated alpha of your relief, the “Make 3d” function in the Alpha menu, which you may get some mileage out of with a sufficiently high resolution setting.

Decimation Master, Dynamesh, Zremesher, and Projection are all powerful tools for cleaning up unwieldy or jagged objects.

I’ve tried Trim Curve, and it works fine, but the relief heights that I’m working at are so low sometimes, that I simply can’t see the point where the relief meets the table accurately enough to line up. I really need to define the model profiles face on. It’s a bit of a pain in the arse.

Although I do understand why you might prefer sculpting on a “coin”…

If you start by sculpting on a plane (instead of on a disc/cylinder with depth), you could use “Delete by symmetry” (z axis).:

Dynamesh made from Circle 3D:
(Clay buildup with zIntensity 5)

relief-003.jpg

Delete by symmetry (z)

relief-004.jpg

Results are pretty smooth — Dynamesh was 3 Million polys

That’s a neat trick with the delete by symmetry Thor. That’s definitely going into my bag of tricks.

Here’s how I decided to solve this problem after a bit more thought. Even if it doesnt work for you, hopefully it highlights more options. I wanted to do it in a way that allowed just sculpting willy nilly on a surface without much forethought if necessary.

So you take your coin or surface in questions, fill it with a base material in Color>Fill Object. Then select a different material for your sculpting work, turn the MRGB function on the brush controls so you’re painting material as well as Zdepth, and just start working. It’s easier to control if you just apply previous sculpting work as an alpha with a drag rect stroke, but you can also sculpt freehand and paint out the silhouette stroke by stroke as you’re working in details. If the material differentiation is distracting, just turn off polypaint while you work, then turn it back on to preview afterward, and see if you need to do any cleanup on the outline.

In this case, I simply drew out the Demohead alpha with a dragrect stroke.

Then go to Tool> Polygroups> and Group by Polypaint. Your sculpt will be one polygroup, the base another. The outline will be a bit jaggy, but by the time you clean everything up in dynamesh>Zremesh>Projection, it probably won’t matter. But if you did want to clean up the outline further, hide your relief polygroup to protect it from smoothing, and run the base through Group loops at a setting that gives the results you want.

Then, select the the head polygroup again, mask it, invert, then in move mode extrude it slightly by Ctrl-dragging the center circle on the tpose line. Draw it it out just enough to get the separation you need for a clean cut from the base. Then either use Thor’s Delete by Symmetry option, or the trim curve brush to cut it away. If you simply delete the auto closed section with the Trim curve brush, it gives the same results, however it is a bit more precise to line up the cut with the thinner floor line and delete by symmetry.

And there you go. “Wafer thin” , and pretty clean result without having done any Dynamesh>Zremesh>Reproject cleanup yet. If you want to close the model, do a Mirror and Weld along the Z axis, flatten one half with a clip brush, then Dynamesh>Zremesher>Reproject to clean up.

basrel2.jpg

Lol. No can of worms, just the traditional argument over ‘craftsmanship’.

Many thanks for your suggestions - I’ve used a couple of them, but there’s plenty for me to experiment with.
I’ve kinda learned zb while figuring out a specific process, and I’ve only recently started to get my head around topology and ‘clean’ meshes. I didn’t think it would matter for such low sculptural forms, but it does!

Okay - just seen your last posts, Thor and Spyndel.

Genius! Absolute genius. Both of those do exactly what I needed, and fit right into the workflow.

Awesome! Thank you!

Free bas-relief portraits of you both, if you ever decide to start your own currency!

Free bas-relief portraits of you both,

I don’t want to be accused of defacing any currency. I’m pretty sure that’s against the law. :wink: