When I try make a normal map of my object, result you can see on attached picture. Imported object have millions of polygons but normal map looks like flat plane. How can I do it better, thanks in advance.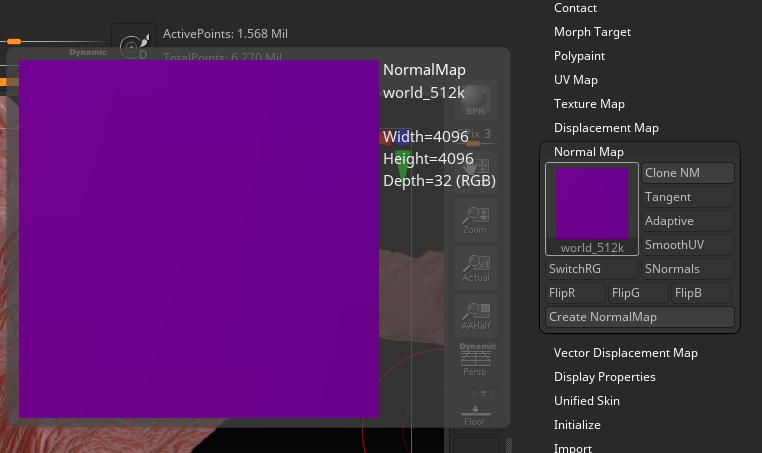
Does the picture accurately represent the settings the Normal Map was created with? Because this looks to me more like a Tangent map, not a world map. When ZBrush generates a normal map, Tangent maps are created with a limited range of blue and purple hues as a solid square map. A world space map (created when the Tangent button is disabled) should be created with many more colors and black spaces where the UV islands are not present.
In the case of a tangent map if the surface detail is not very extreme, it is very possible to look like a square of solid color with subtle gradations not easily seen by the naked eye. In such a case you would actually have to apply the map in an external application to see what the map is really doing.
From this statement I should remind you that the less of a difference there is between the the base level geometry you’re generating the normal map at, and the highest level of subdivision that youre capturing detail from, the less visible variation there will be in the map.
So if you did something like just imported a mesh that was already high rez, and simply subdivided it once to generate a normal map for it (ZBrush requires at least 2 subdivision levels to make a map), instead of creating export quality low poly geometry to generate the map for, there would be very little differentiation visible in a Tangent map. It may very well look like a solid blue or purple square to the naked eye.
However, if all this is understood, and the picture accurately represents your Map creation settings, the first thing I would check is your UVs. With the original UVs safely backed up in a file someplace, delete the UVs and create new ones in ZBrush. Use whatever ZBrush generates by default, and don’t edit the island layout. Generate a new Normal map, and if there’s a radical difference you know what the culprit is. There are a number of things that can go wrong with UVs.
Thank you for your response! I tried repeatedly what you recommended to me but the result was bad. I even got a normal map once. It looked like a normal map but it wasn’t fully right. Is there any tutorial - step by step - how to create a normal map of object in Zbrush? Thanks
Remember that normal maps are generally used to capture the detail from a high rez mesh in a map that can be applied to a lower rez mesh in an external program that can’t well handle the polycount from the high rez mesh. They would be commonly used in a real time or game animation. If you aren’t creating a significantly lower poly mesh to create the map for, then the base level geometry and the high rez geometry might not have enough difference to show up very well in a tangent map.
Just as with displacement maps, normal maps capture the difference between two meshes. The less difference there is, the less of a map there will be.
Thanks you for your link. I have still problem with state of normal map output.
Look at the picture please. The source from the Substance Painter is otherwise rotated. That’s a minor problem. The second problem is that the color is different. I tried Flip R, G, B variants … but I didn’t get the correct color of the normal map like from SPainter. How to do it?
And one more question. Is it possible to save a normal map as a 16-bit raster or only an 8-bit raster pic?
Thanks.
The image on the left is the correct way a tangent map generated in Zbrush should look, unless you flip the blue channel.
You may benefit from resources devoted to your target app for this issue, as that seems to be where your confusion is coming in. Some general education on the nature and types of normal maps may also be useful.
The flipped map is because not every program calculates their worldspace the same way. Until such time as all 3d software makers get together and agree to all do things the exact same way, the only recourse is to understand the way your target software prefers it, and to flip the map generated in ZBrush to accommodate that. You can set this option as a part of Multi Map exporter output.
It’s a simple process.
- Load the Demo Soldier tool from Lightbox
- Switch to subdivision level 1, and create UVs for it with UV Master.
- In Tool > Normal Map, with Tangent button active, click create Normal Map.
With the default settings and tangent active, it will produce a solid square of blue to purple hues. This is normal and expected. The amount of color variation you see will increase with how much physical difference there is between the base SubD level the map is being generated for, and the highest level of subdivision.
Without knowing anything at all about the file in question and your working process, I can only tell you that if your results are different, figure out how your mesh or process differs from the sequence above.
Yes, when I follow your three steps, I got something that looks like a proper normal map (on ZBrush default object). If I want to do the same on the my own imported object and “tangent” option is checked, then the normal map is not correct. I am getting only a uniform light blue-purple output. I get nonsense. If “tangent” is not checked, then I get something similar to a normal map but with different colors, as you can see on picture more up. So, the “tangent” button doesn’t work as expected in my case.
The original object, it means SDiv1 has about 260 000 polygons, SDiv3 has 3 million polygons. And SDiv3 is set to active for normal map calculation. So where can the problem be, please?