ZBrushCentral

My Displacement results in 3DS Max

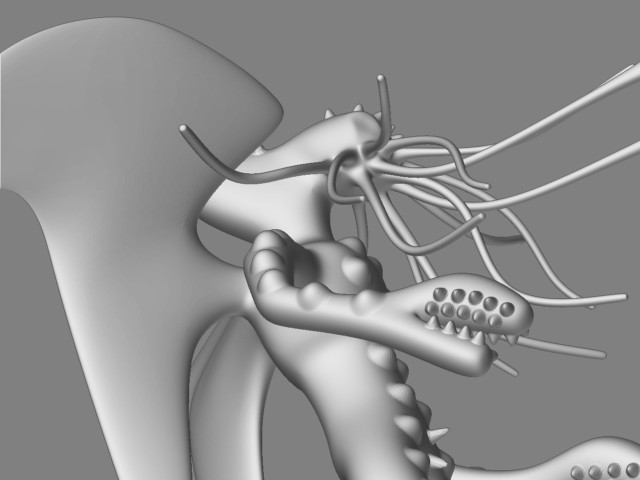
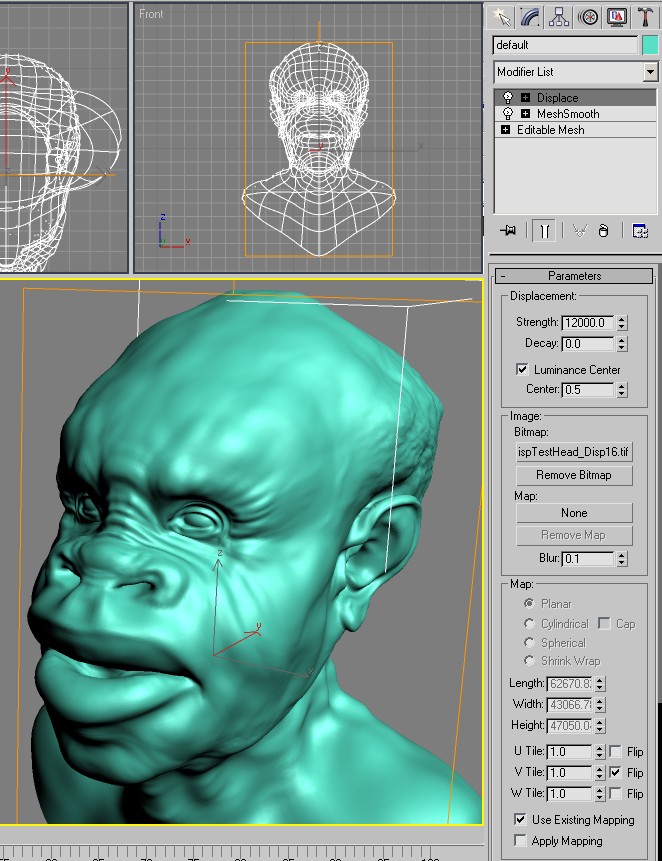
I’ve finally figured out the use of displacement maps generated in Zbrush for use in 3DS Max. I’m starting a Max-centric thread because the general displacement map thread is just overly long. I think a displacement map section with application specific threads is just about called for. Anyway, here are my settings and the result using pixolator’s head, followed by a more complex model with some yet to be rectified problems:

my max settings for zbrush displacement.jpg

Problems can be observed in the displaced model, including odd distortion in the long thin tentacles, bumps following the mesh pattern on the claw and wing, and swelling at the edges of the wing. I think the complexity of this model must be a bit much for the displacement technique, as the same results were produced using GUV and AUV tiling.

Any comments to help guide people (me me mememe) in using Zbrush generated displacement maps in Max is welcome!

Attachments

cthulhu z.jpg

cthulhu.jpg

cthulhu displaced.jpg

Hi there and thx for sharing your settings, I tried them though and it didn’t work at all for me, did you make anything specific with the displacement tiff or with your mesh (did you change the smoothing groups??) Otherwise it might be the scale of your scene, are you working in meters ? millimeters, something else ???

I’m brand new to ZBrush and haven’t tried using thier displacement maps yet, but I’m very experienced using Max. My first guess would be that it’s an issue with the map itself. I’m guessing that the modifier is picking up the transition from light to dark at the very edge of the map. Try saving a higher res displacement map if you can, or opening the map in Photoshop and painting the edges so they extend out further past where the UV map would be. Hope that makes sense.

Ok, here are my settingsfor scanline renderer in max 6.0, with 4 meshsmooth iterations, I tweaked your parameters a bit though, but it works nice and fast :-))
Render takes about 30 sec to render on a P4 2.2G with 1G of ram.
Thx again for sharing your parameters Lovecrafty.

Sleepwalker, just out of curiosity, how long did that render take?

arrg i can’t displace>what about using the dds extention mentioned in the practical giude anyone try that method??i am trying to get my low poly cage 350 poly to diplay the hig rez mesh like in the phone tut but not having much luck any workflow tips…should i be able to get a smooth image from the low poly cage .thats what i thought the displacemnet maping was for…nice results guys but try it with the low poly one for me huh

:slight_smile:

I’m glad to see the settings were helpful sleepwalker, one person helped is still one person helped! :slight_smile: I’m at work so I would have to double check my obj2max settings later. I think I only have the scaling adjusted or something like that.

J…wood, I’ll have to try a higher displacement map resolution and see if that helps. Smearing the edges of the texture into the areas not mapped onto the object (what I think you are saying to do), I may try that as well, but seems to be too much trouble.

Steve, I think I recall the phone tutorial generates one of the RGB maps, odd shapes of pink and blue vs. the greyscale map of what I used here. That seems to fall under normal mapping, which seems to produce the same effect, I need to read up on the differences. A quick google brings up this article:

http://www.monitorstudios.com/bcloward/tutorials_normal_maps1.html

Steve, it looks like the normal mapping only provides per-pixel lighting, so your low poly cage will interact with light like the high poly model but you will still see the low poly edges of the object. So there is no actual tesselation/subdivision and a higher poly object is not rendered.

Hence people complain about the pointy head of the imp in Doom3, the imp is actually fairly low poly but does have a normal map. I think keeping things low poly in the game is important for keeping the real time shadows from slowing things down.

In 3DS Max the displacement map provides proper placement of the tesselated polygons close to that of the high poly model. And this also give resulting shadows of a high poly model. I don’t know if the displacement mapped low poly model renders any faster in max than if you just used the high poly model. But I think max chokes on a lot of polygons, maybe crashing more. And for rigging (I’m not very experienced with it) it sounds as though only the insane would try to rig a 2 million poly model, but a displacement map makes it look like a 2 million poly model.

Hm, enough rambling! I should go home and make some models that don’t suck! :wink:

I found a link about real time displacement mapping on the Geforce 6800:

http://www.neoseeker.com/Articles/Hardware/Features/geforce6800/4.html

If that is what it takes to do it in a game, don’t expect to see it in any games for a while. I don’t know if Doom 3 supports it, and I don’t think it is in the Unreal Engine 3 video that is out and about. Actually thinking back to the Unreal video they show a close up of a wall, and briefly the geometry, and it looked good, but you need to see an edge of an object to know for sure if it’s displacement mapped I think.

lovecrafty
thanks for looking around on the issue. rigging a low poly cage would be optimal.still having trouble getting my mapping channles corect can you walk me through the steps involved in chatulu? my displacement meshes go out of control with the slightes ajustments.