ZBrushCentral

How to properly export full body morphs to Poser?

This newbie has a serious problem.

I’m trying to create a full body morph and a displacement map for the Poser 4 man. All went pretty well until I tried to load the morph targets in Poser.

Here’s what I did:
In ZBrush 2 I imported the “blNudeMan_Gen.obj” file from the Poser Geometries folder. The merge points option was turned on, otherwise there would have been gaps after dividing the mesh. Creasing didn’t work well enough (sharp edges around the hip) so I had to use merging.

Then I divided the mesh 3 times, changed the geometry a lot and added fine details. It was time to go create the displacement maps and export the morphed mesh.

So I went back to sd level 1, created the displacement map and exported the level 1 mesh for use in Poser. Creating just a displacement map for the original mesh wasn’t an option because the changes in geometry were so drastic… so I had to create both a full body morph and a displacement map.

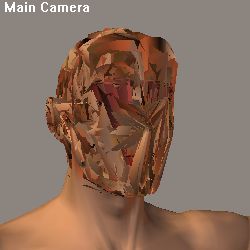
I imported the new mesh in Poser 5, spawned the props and exported them individually as morph targets. Then what do I get when I try the head morph? This:

It looks like mirroring in the Y axis but I’m not sure. Now here’s the interesting part: I tried to find out what caused this problem. So I imported the original P4 man OBJ, this time merge turned off, made some changes, exported, created the morph targets in Poser just like before… no problems. Then I tried the same thing with merge on - again the mesh goes crazy. Obviously importing with merge on was the problem.

So finally, here’s the question: if I import the mesh in Z with merge on, how do I get the morph targets to work in Poser? Can I somehow unmerge the model at sd level 1 before I export it from Z?

I hope someone can enlighten me.

Oh, here’s the image of the failed try

Attachments

headmt.jpg

Okay, first I have 1.5 so don’t know about 2. But here’s how I do full body morphs.
Load figure into Poser (in this case p4 nude man) from the figure rollout.
Export as wavefront object. in the windows that appears use single frame, check mark the parts you want to export from list, and select 1,3, & 6 in the options menu. I name it Torso_PO1.obj.
Start Zbrush import make changes then export, saving it like Torso_ZO1.obj. Start new document. Import Torso_ZO1.obj once it’s on screen export it and name it the final version name Torso.obj. Close zbrush. Start Poser, import wavefront object load the Torso.obj file in the window that appears uncheck everything. Go to group tool and spawn props. Export each body part and save as finished name plus part name. Torso_abdomen.obj, Torso_chest.obj do each individually and all should work fine. The image you show has the normals reversed. When you import to zbrush, then export this happens. So you need to import, export, import, export to correct it. There is/was a script here that would reverse the normals for you by someone else.
Hope this helps you.

ZBrush 2 is a little different. In ZB2 I don’t have to use the flip-script or export the object twice. Now simply importing the obj in ZB (from the Geometries folder or exported from Poser), making changes, and then exporting for Poser works great. The problem is that importing in ZB with “Merge Points” on apparently does something to the geometry. I don’t think it’s reversed normals, because I tried to reverse them back and it didn’t help. I also tried the X-flip script, but obviously that only makes it worse because the mesh doesn’t need flipping in X axis in ZB2.

It would be so painless if I didn’t need to use the “Merge Points” import option. Can I somehow “break” the model or something?

Okay, I tried to export a mesh from Poser instead of using the obj in the Geometries folder. I exported with the “Weld identical vertices” option checked, and imported the file in ZB. Exactly same results with an obj welded in Poser as and obj welded in ZB.

So… I shouldn’t use any welding then, or is it possible to un-merge the points?

I was at work and trying to remember the steps. Now that I am at home I can give better idea.
I load the character into PP. File - Export - Wavefront OBJ
Next window I click oK (This is the export range which is default set to 1)
Next window I check universe to de-select everything, then check only those parts that will be efffected. ie…abdomen, chest, lCollar, and rCollar. Then click OK.
Next window I name it P4NM_Torso_PO!.obj This lets me know it’s the P4 Nude Man and exported from Poser. Then click SAVE.
In the next window I check the following items…
1 - Include body part names in polygon groups
2 - Include figure names in polygion groups.
3 - As Morph Target (no world transformations)
Click OKAY and your done with Poser for now.
Where you are talking about welding identical vertices I don’t see. And I would recomend that you do not select those. But you must remember that I am using older version of ZB (1.5), and although I have Poser 5, and DAZ Studio I prefer Poser Pro Pack. I have done quite a few morphs for characters using the technique described here and earlier post with never a problem. It’s nice to know that the newest version of ZB doesn’t require the flip or double export anymore. Maybe have to add to my wish list for Christmas. I am hoping this helps a little more. If you need more help I will see what I can do. My guess is you are welding and shouldn’t be.

I just checked and Poser 5 export would be the same. So unless you are using DAZ Studio the above should work. Let me know. Please.

Hi,

instead of using merge…import into zbrush with just tri2quads between 35-45 and set weld to 0.1. You should be able to subd with no problems and all the rest as well.

Pusghetti did an excellent tutorial here on poser5 as well as in the practical guide…however the thread here is newer and he has learned a few tricks since the practical guide. Take a look at that thread or see the entire tutorial over at 3dcommune…zbrush forum…am sure he would try answer any questions you have about it as well (if he’s got the time that is…as it is with us all).

Hawktoey,
yes your technique works, but still only if I import in Z with “Merge Points” off.

Aminuts,
thanks for the tip. I tried that, didn’t get gaps when smoothing or dividing, but I can’t even try the morph targets in Poser because importing with weld at .01 results in different vertice count. For example the head part had originally 3502 vertices, but having weld at .01 made the head part’s vertice count drop to 2920. The face count didn’t change. I also tried it with the lowest possible weld value, .001. Now the vertice count was correct for the head, but unfortunately I encountered the same problem as with using “Merge Points”.

So I guess that I’m left with only the Crease method, but then I’ll get sharp edges and even gaps if I try to smooth the edges.

I’ll go read Pusghetti’s tutorial right away.