Here’s a little tutorial about making a Celtic Knotwork design with Zspheres. I’ve used a reference image I borrowed from the internet since I’m mathematically challenged. This tutorial originated from a recent post by Wannabeartist, who did his/her homework and found an intriguing thread on the forum begun by jmeyer on knotwork back in 2006.
http://www.zbrushcentral.com/showthread.php?p=745140#post745140
http://www.zbrushcentral.com/showthread.php?t=39208&page=1&pp=15
I decided to play around with zspheres to see what I could come up with and found I got reasonably good results. (Please note I’m semi-advanced-beginner at Zbrush. I’m going to assume you experienced folks know most/all of what I’m jotting down here. The basic details are for the newcomers to zbrush. (Perhaps you know a better way and will share! ) Also, my design examples could have been tweaked, and massaged for a more polished result. I didn’t have enough time for that…or am I lazy….hmmmmm…. Pictures:
-
Resize your document to 1024 x 1024 (dimensions aren’t critical. Square is good.)
-
Draw out a generous sized plane and subdivide it to at least 1 mil polys. Hit F to frame it to the full document size. Turn off Zadd and turn on RGB. Select a nice whitish material and go to Color Palette and select “Fill Object”.
-
Search for a nice reference image via Spotlight. Size it to fill your plane and paint it down (or use one of your own, upload it and skip to #5).
-
In the texture palette press “grab doc”. Export this texture as a back-up in case you crash.
-
With this grabbed texture selected in the texture palette, select “crop and fill” from the texture palette to fill your background with this reference image.
-
Select the zsphere tool from the tool palette and draw a small zsphere at your desired starting point. (Now is a good time to go into Document>Zapplink properties and press FRONT to keep the position of your design in memory in case you accidently rotate it out of position. Press this key to restore it the saved positon.)
-
Press the Edit button and with LMB held down draw another zsphere to the side and connected to the first one. As you continue to hold down the LMB and are drawing out from that second zsphere tap the CTL key twice quickly. If you do it correctly you will see a bunch of connected zspheres being drawn out in an even diameter. This zsphere “string” follows your drawing stroke (how long is this string? Hmmm, I’m not sure…let’s torment Marcus with this question!:lol: ).
You may have to practice this technique bit to get the diameter you want. It’s a bit tricky, but not too difficult. Keep practicing. Even I can do this.
-
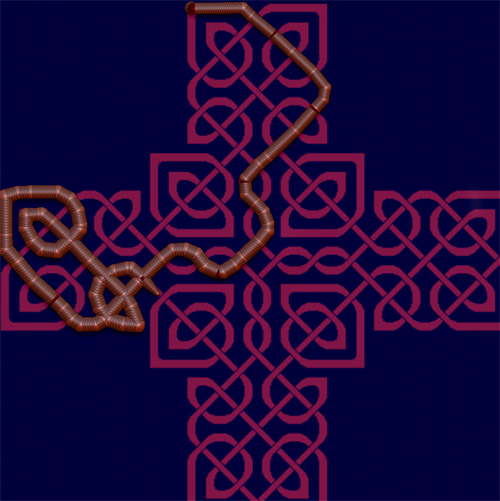
Follow your design along “drawing” with this string of Zspheres. If you hit a sharp angle be sure to hit Ctl to tack down another Zsphere to help form the angle. This method creates a lot of zspheres all by itself, but be sure add spheres at sharp angle points and at all the MANY intersections. Also its easier to just complete the design in one go, but if you need to stop and start, you can. It’s just a bit tricky to restart the string and maintain the same diameter. It may take a few tries. CTL Z is your friend here.
-
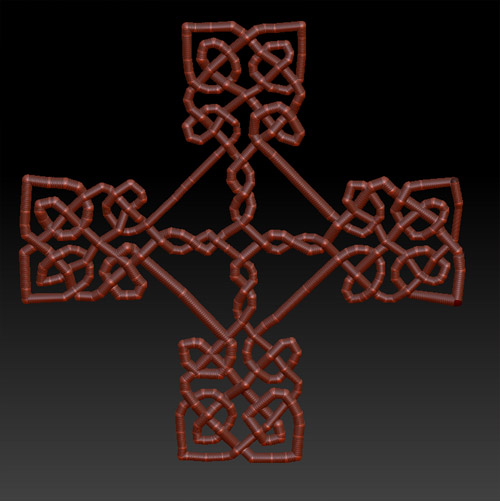
When you’ve completed your design the next step is pushing in and pulling out your intersections to create the lovely woven effect. Over under over under, etc. This is why you need zspheres at the intersections. If you’ve forgotten a few, no worries. In draw mode you can click anywhere along the “string” to add a zsphere, it’s just an easier workflow to add them while drawing out the design in the first place. Mostly you want to be in “move” at this point and returning to “draw” gets confusing.
-
If you like you can now remove your reference photo by pressing CTL N. You are going to be tilting the design a bit to work on both sides of it when pushing and pulling the zspheres so you don’t need the reference anymore.
-
You must be in Move (transpose>move shortcut key W) to manipulate the zspheres. Its critical that you lower your brush size to the smallest size so you will just influence the selected zsphere and not the surrounding area. Also take care to click RIGHT IN THE MIDDLE CIRCLE of the selected Zsphere. Otherwise you will rotate the whole design and go insane. I’m making it sound scarier than it really is, but trust me…you just want to take care and only move the zsphere. Remember CTL Z to undo is you friend…you will need it.
-
As you go along save frequently. If you need to reload your tool, don’t panic if you don’t see the zspheres. Just hit Edit and then the A key to get back to the zsphere mode.
-
At any point you can toggle the A key to see what your design will look like with Adaptive skin.
-
That’s pretty much it. I don’t think it’s more mind-numbing then retopology…actually it’s kind of fun. Like knitting or darning a fishing net. Put on some music and weave away.
-
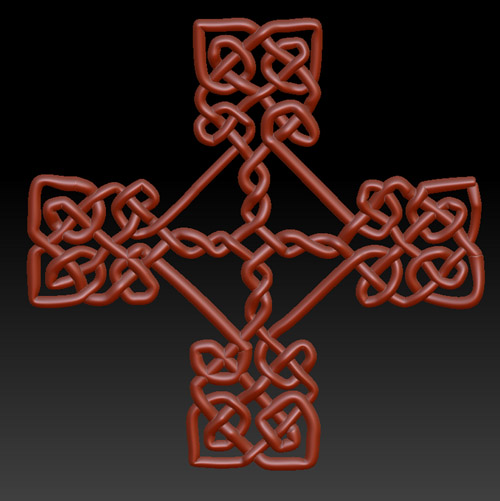
When you are done and you have tweaked your design to your satisfaction go to Tool Palette>Adaptive Skin> press Make Adaptive Skin, but first adjust your density slider to how finely divided you want your mesh. You can play around and go back and forth hitting the A key and sliding the slider to figure out what you like and you can make as many copies as you want with different settings. Your adaptive skin model(s) will be in the tool palette and will have the word SKIN in the name so you can find it.
Notes:
If you get kinks in your design you might need to add another sphere at the end of the curve or check that you don’t have two spheres ganged up.
I believe you can retopologize the ends to connect them. I have little experience with retopology and my efforts failed, but I didn’t try very hard. I just used the smooth/inflate/deflate brushes and babied them into a reasonable join.
I made an invisible connection in my design since it was formed by two matching intertwined designs. I drew the whole thing as one continuous string and then erased the connecting zsphere (draw mode/alt key). You need to select “Use Classic Skinning” in the adaptive skin palette for this hidden zsphere trick to work.
While playing around with drawing out your Zsphere design when you press A to view the adaptive skin you can actually use regular editing tools in this mode, such as the move brush or smooth brush.
For complex designs you can use zspheres as subtools. And a lot of designs have independent repeating patterns that are mirrored on one axis or the other. Make one part and copy it down, then use the mirror function in the axis required found in the deformation palette.
Attachments

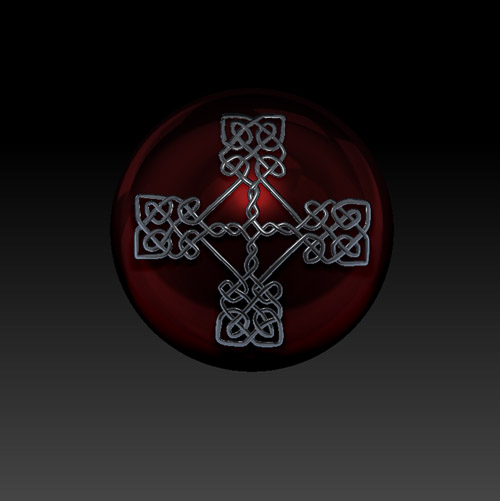


 ) With a bit of patience you can get a decent result. But mirroring is great for the parts in a design that sit independant of the main design. This was the case with this design but for speed and simplicity sake I left those parts out of the tutorial.