ZBrushCentral

a simple answer please

let me start this off by saying this forum is one of the best on the web. problem is that when u have a problem like i have here wading through everything to try and find the answer urself can be very frustrating…ecspecially when u are under deadline pressures. the example i show now has probably been asked and answered a million times on this forum but that fact doesn t matter f i can not find the info. i have searched, download pdf s and looked through for the last 2 days and while i find subjects that kind of address the problem i cannot find the solution. this is a drag. :frowning:

so here it is… i create a texture in cinema 4d on a zbrush created mesh. everything is fine. i take that to softimage xsi. everything is fine.
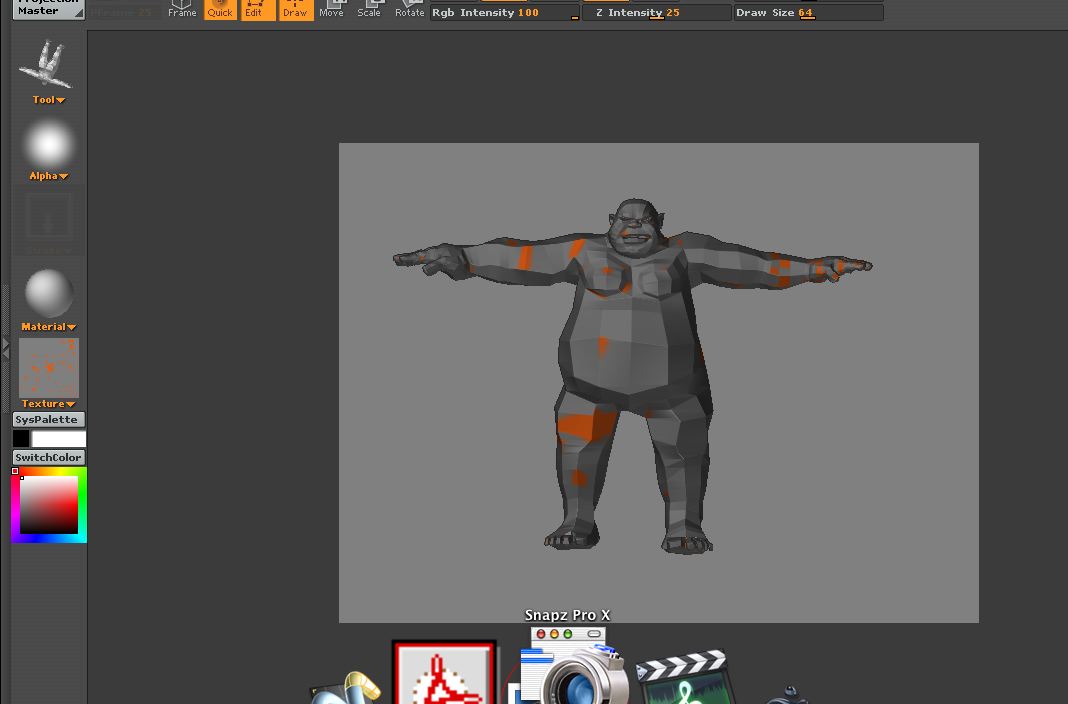
take the object back to ybrush…everything is fine. import the texture into yzbrush everything is bad. please see the example below.

while i understand because of all its cool features zbrush looks at textures a certain way i *and other new people to z2 need to understand how to get to what we do, being artists not detectives. how do i fix this. i have looked thru quick links and searched for an answer which i have not found. please let me know as i had to finish this txture job on friday past . cheers. cinema.jpg
here is the ybrush interprutation of the texture. whz can cinema 4d and softimage see the texture the same but ybrush does this? :o

Attachments

zbrush.jpg

First of all have you flipped the texture in zbrush vertically? (Texture > FlipV). You should similarly flip the texture vertically again before exporting the texture to your other application(s).

If that does not solve it the object you imported into zbrush did not have UV coordinates assigned. When no UVs exist upon importing an object, zbrush assigns its own UV coordinates. You can create a texture in zbrush that shows the current UV layout by pressing Tool > Texture > UV>Txr or UV Check.

Besides what TVeyes suggested you can go to the 3DAttack Forum CD4 they recently February published a very good tutorial between ZB and Cinema 4D displacement map, also you can ask there some suggestion about your question. You can ilustrated the setting for each workflow you have mention?

Thanks and welcome
Andreseloy

http://3dattack.net/forum/index.php?

ps: this link is related specific your question in CD4
http://3dattack.net/forum/showthread.php?t=57

thank u for the replies.

this is what is so strange about the whole thing. i generated uv coordinates with bodypaint 3d version 2. xsi sees these uv coordinates and the textures are the same in both programs. why zbrush doesn t see them the same way is the mystery. i have tried to flip in v as i found that solition in the forums. i will now try the uv check route and post a result.

cheers

i tried all of the things tveyes suggested. i get the same result. because i am underthe gun i am just doing all the texturing in bodypaint. for sucjh an inno0vative tool it really is strange that so much effort has to beput into doing something this simple.

when i click uv check and uv texture something happens and a little square goes up to the preview but then what am i suppose to do.

i will also check the cd4 links given.

thanks

Flipping the texture vertically should be all that’s necessary for the texture to display correctly on your imported model.

However, I also know that C4D does not always keep the map within the 0,0 to 1,1 UV space. From what I’ve seen, its automatic mapping tends to put the UV’s wherever its most convenient. This causes the texture to wrap correctly in ZBrush (after it’s been flipped vertically) for the coordinates in the 0,0 to 1,1 space, but it also causes parts of the texture to appear on the rest of the model as well.

Try this: Import your model and press Tool>Polygroups>Uv Groups. Draw the model on the canvas and activate the Polyframe view. Is it all one color, or are there multiple colors? If more than one color, you know that your UV’s are in multiple UV spaces.

Multiple spaces allow more than one texture to be applied to the same model without overlapping the UV coordinates. C4D, however, often places the coordinates for a single texture so that they cross multiple spaces. You would have a few options in this situation:

  1. Remap the model in ZBrush. You do this simply by creating a blank texture of the size you want and then pressing Tool>Texture> and the mapping method of your choice (probably GUVTiles). You will be able to texture to your hearts content, flip the texture vertically, and then export both it and the model to C4D where they will work perfectly together.

  2. Remap the model in C4D (or another program). Be careful to have all the UV’s in the same texture space (for example 0,0 to 1,1).

  3. Work with the model as it is, knowing that when you work in ZBrush you’ll have to texture each UV space separately. This could be difficult, though, if you only want to apply a single texture in C4D.

yes i did start from the beginning and remap in zbrush…flipped the texture vertically and then exported both to cinema 4d…this indeed did work.

for the record the mesh was one group after going to tools / uv groups.
at the end of the day it is nice to have the issue resolved. thnak u all.

for the benefit of anyone else using cinema 4d and bodypaint the tiling will go away when u render. use raycast painting if u are going to make ant painting on the textures in body paint.

with that said i will say that the solution was straght forward but a bit out of the way to figure out on my own. maybe with the next version thesee types of things will get better. it woulsd also be nice to have the ability to move ur model around in projection master.

i find it reassurring that the community and makers of this software are so eager and willing to get little things like this resolved. other software companies would not go out of their way like that.

once again thank u all.

cheers