thanks so much for taking the time!
What it looks like to me is large groups of the micromesh are pointed in one direction and other large groups pointed in other directions.
To fix that you need to work on the lowpoly mesh and using the Spin Edges button to rotate the different areas so they all face in the same direction.
This is a fun process in which you have to select all the areas going in the wrong direction and rotate them, it looks like you have quite a few.
I made a sort of tutorial on this…
Its here:
http://www.zbrushcentral.com/showthread.php?103320-Now-Im-having-fun&p=1042607&viewfull=1#post1042607
The part you want is the bit about placing the arrows as Micromesh, that will show you what the mesh is actually doing, and do it at the lowest subdivision.
Also towards the end of this is an explanation on how this process works:
http://www.pixologic.com/zclassroom/homeroom/lesson/military-assets-with-joseph-drust/#micromesh-hood-part-1
Why that didn’t turn into a link is beyond me.
Have you UV’d this thing already? that could change things as well but Im not so sure about that as I haven’t had any time to mess around with things lately…
Also for the welding part I would love to see what your mesh (the one you are using for MicroMesh) looks like since where it is working looks great!
Oh, one last thing:
Nice dress!
Oh, one other thing Danny Box, that “pivot” point is actually where it is I think because you have subtools that are hidden I think. Its not so much the pivot point as the center of the floor which moves around in accordance with the size of your objects. Even if they are hidden a larger subtool can push the floor down.
It is rare that it appears like that (the pivot point) since i take care all the “delete hidden” objects, but i will look again an see if i din’t delete something. EDIT:Yes is becaus i got the character hidden  hahaha LOL my bad on that one.
Thanks for this (and for saying my dress looks nice LOL) I appreciated your help also. By the way, how do i know the edges are moving?..when i do the spin edge?..any way on to it, thanks non the less 
UPDATE: So here it is what i tough is why I have to work around and spin those edges.
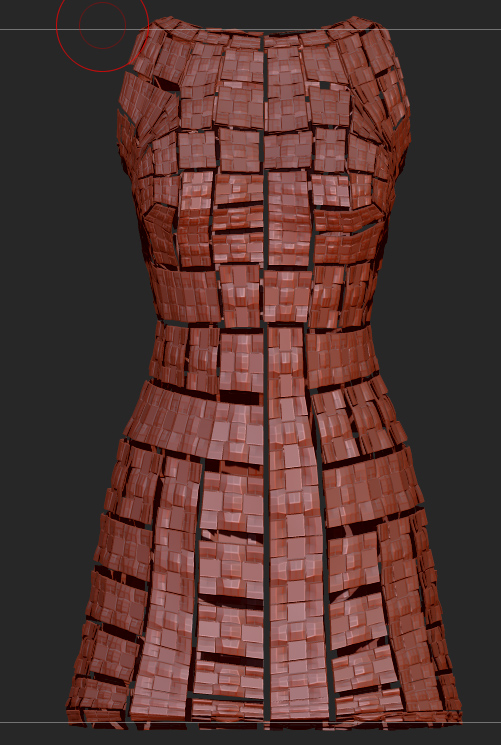
But when I do the Zremesh after doing the spin edges, those that doesn’t affect the work I did by organizing the edges?.
I’m Sorry DannyBox, I didn’t realize anyone was still talking on this Thread, didn’t get a e-mail till a few minutes ago that you guys had been chatting on here most of the day lol. Thanks MealeaYing for helping out. Use the attachment below its my latest weave and you shouldn’t have to unify it, so just apply. Also save your low poly dress and compress it in a Zip file and post it as an attachment like you would a picture on here, so MealeaYing and I can play with it on our end and see whats going on with it.
Hey gmp1933! thanks for the help. I sure fallow those instructions you guys gave me and thanks for ever and ever  It pay off, here is the photo of it. I play around with the “Spin Edge” with the duplicate “Zremesh” and get the hang of things with this topic.
P.s. Sincerely thank you both
Thats Great, its Looking Awesome now. Cant wait to see the final results. Also by the way your Welcome, Happy we could help you out. The more you learn Zbrush, the easier it is to bring your imagination to life.
Thanks buddy Is goo to know there is people willing to help, peace.
thank you so much. really helpful tips
really helpful! thanks for sharing
Your Welcome! Feel free to post your results here and any insights or Tips.
This is really a genius method!
I am very surprised to see such application of tools in zbrush…
Thanks a lot for a very useful tutorial and an inspiration!
There is a way that you could render it in another software package like 3ds max, maya or softimage, but it involves V-ray. You can export it as a obj and then use a vray program that converts the obj into a vray proxy without having to open the 3d program. Then you load the proxy in your package using V-ray and then you can render it out. I’ve seen a test done from the chaosgroup’s (V-ray creators) youtube channel.
Alembic works similar to the proxy, but don’t know if you can convert it into alembic data without importing the mesh.
Such a wonderful tutorial and thanks for that.
Question: can i import my maya obj cloth in zbrush and apply these method and then again export only normal map for maya. will that’s ok, or it doesn’t make any sense? (again newbie)
also mental ray has a proxy system but i don’t know if its like vray.
Hello people, Loved this tutorial: D
Wanted to know, how do I get the wires get bigger?
Glad you like the Tutorial
SaavedraCG .
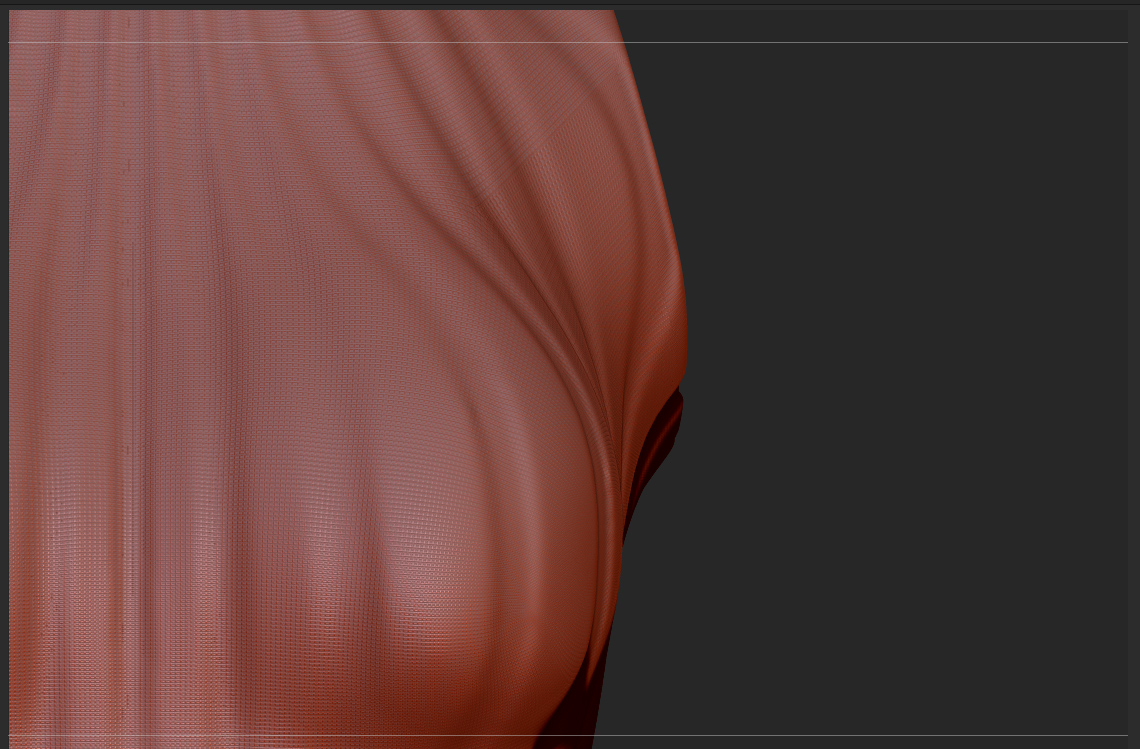
To create a thinner weave, you have to go back to the original weave mesh and modify it and then reapply it to the target mesh. I went ahead and modified one for ya, hope its the look you wanted.
Here’s what the modified mesh looks like.

Here’s what it looks like on a Plane 3D subdivided once and Tore it up a bit too.

hello gmp1993,
Thank you for your help;)
Actually, I wanted the larger wires because I found very little.
I tried the one in the base scale wires, but no avail.
Personagen’m doing this to test your technique;)
Cool Sculpt SaavedraCG.
Also to get more of a wire effect is to reduce the polygons on the target mesh by lowering your subdivision levels, if you have no lower subdivisions use ZRemesher to reduce it. Micromesh is going to produce a mesh for every polygon on your model, so if your mesh is dense your going to get a lot of micro meshes. You can see my example below shows a Plane 3D with a little sculpting on it. Each has a higher subdivision on it with the same micromesh and you can see the results. Hope this helps you out.

great job thanks for sharing:D
Got it now;)
Thank you!