Amazing job and really cool tips. Thanks for posting that!
Great job ! 
It’s so sexy. :)
This is some extra images of the model in ZBrush :

The exploded view of all the parts. It is not visible in this image, but several parts have been hollowed with the DynaMesh.

Some larger views:


The model laks of more extra details here and there, but I had very little time to produce the model. I finished applying the primer painting just 3 hours before taking the plane for Japan… 
Love that thumbnail. 
During the process, I printed several iterations of the model, just to check “in the real world” the proportions, but also preparing the future cut of the different parts (hairs, face, etc.)

Printing the model below confirmed me that I had a proportion issue with the head/body, but also which part I had to rework on the body shape.

About the first pose (visible in the video in one of my previous post), I was totally unhappy with it, but it hasn’t been the first time that I was unhappy behind my screen, but then having a different vision of my model when printing. Then I did a really quick print of the model, without preparing it, I mean, no cut, no support optimization, just a real quick print.
Then I did a print with the Form1+ at 100 micron and in just 5 hours, I had my model.

You see the result. All the marks/damage spots are the marks of the support. It doesn’t look nice, but it was enough to confirm my feeling. Then I switched to my other pose.

When the second pose was done, prepare, I started the product part (which is time consuming  by doing all the cuts and adding keys. This part isn’t complex, but you need to take care of where you want to cut, how, and where you want to have your printing support, to avoid having support marks on unwanted areas. For this model, I also tested the resin from MadeSolid (Red V2) which turn out to be a great one, associated with the Form1+ from FormLabs.

This is the result out of the printer, before sanding and stuff. This is the pre-prototype, printing at a smaller size, done to check that all the part assembly was OK, no support issue and no printing issues. Since the final model is 30cm long, I didn’t wanted to wait hours of 3D printing to discover that some

Thanks so much for all this information!
Looks excellent!
Btw. I guess one need an extra room for these printers, due to chemicals etc?
Anyway, I really enjoyed your video. A pleasure to see how precise work stands behind this figurine.
Cool!
I really like your sculpts.  There’s something about the way you create hair, especially, that appeals to me.
@totyo love your work especially the kneeling cat with the base, if you ever wanted to see it in full color just hit me up at [email protected]
Hi!
It has been a while!
I noticed that I didn’t post an old project I did for a tradeshow presentation, based on a Japanese license, Knights of Sidonia.
I did almost everything in a little bit less than a week, from sculpting to 3D printing, all done in ZBrush 4R7 + Form1+


Below are all the parts (recto / verso). No molding, I had no time for that, then it was just 3D print + sanding + primer color.

This is the reference image I used to build it.

The process is mainly ZSpheres for the body then DynaMesh and few brushes (ClayBuildup, Dam Standard and few brushes I did). I just had to take in consideration the fact that the character, Ena, was “floating”, then I decided to use the kind of tentacles (she is an alien in fact…) would be the support to make her levitating.
Then came the 3D printing part.
I mixed multiple resins. The black one is the regular resin from MadeSolid. I really like that one, but unfortunately, it’s a little bit to brittle.
For the legs and tentacles, I used the Tough resin from FormLabs, to be sure that it won’t bend over the time. The print length is 220 mm

Yes, it’s never really nice just straight out of the printer

Below the final part with a gray primer layer.

For the base, it wasn’t fitting the Form1+ build size, then I did it with the replicator 2. Because of the high risk of wrapping, I had to print it on the side and the trick worked like a charm!

The final model assembled.

When I’ll have the time, I will reprint her by increasing the quality. I had a failed print for the legs and because I was short in time, I printed her in 100 microns… and 100 microns VS 50 or 25 microns, you really see the difference!
Another quick project I did for the Japanese event, a Piggy bank!
The idea was to show how easy you can make fun and simple design with ZBrush, then convert that to a Piggybank (well, “rabbitbank”) for kids.
The process was really easy and fun to do, with just Spheres and Insert Sphere in DynaMesh, then hollowing and cutting the parts.

I created a 500 Yen coin to use it as a reference and to be sure that the slot for the coins, hidden in each ears was working fine.

I did a quick print with the Replicator 2 to see if the parts was fitting nice and of course, that the coin process was easy to use for kids (and it was!). Another reason I did the test print is the size of this piggybank. It’s really massive and it was not fitting the Form1+. The body itself was barely fitting the build volume. Then considering the cost of the resin, it was important to do a test print just to check it was working fine.

As you can see, the design is really simple, just the rough shape and some stitch details. Anyone can build that with ZBrush or ZBrushCore!

This is the final model with already a massive amount of coins inside that my younger son is using. Because I was in a hurry for the show in Japan, I didn’t painted like I wanted to do. But I’ll definitely do more like that in the future!
Still in the projects for kids, that I did during the development of ZBrushCore: a mask for my sons. Because of the lack of time, I never finished it, I mean the sanding process and painting job… but for sure I will do it!
I did a quick scan of my son, using my camera and PhotoScan. For this process, even cell phone scan applications can do the job. The only thing you need to take care is to scale properly the scan in ZBrush to fit the real life head size (thank you TransPose units :))

The sculpting process by itself is easy to do, with the skull created from a sphere in DynaMesh, then adapted to the scan size. When I was done with this part, a simple MeshExtract to create the thickness and the mask was close to be done.
I used the helix primitive to do the horns plus some sculpting and I used the “boolean style” operation with the DynaMesh to do the cut.

The print has been done on an Ultimaker 2+ Extended in low resolution. The model was juuuust fitting the bed size on the XY axis…

The horns and head have been done in two parts of course. A simple screw was enough to attach both part plus some glue.

Here is the result on my head I added extra holes to attach a cape and the elastics.
I hope to be able to post an image of the final one soon!
And the last post for today… It will be a long project, very long. Because I’m a huge Star Wars fan/lover, I always want to have my own Star Destroyer and all the model kits available are just bad, not good enough, except few resin custom made ones. Now, with 3D software and 3D printing, I think it was the time to work on such project.
Then I started to build the “Avenger”, the Imperial Star Destroyer visible in Episode V, where Han Solo glue the Millennium Falcon behind the main tower. I have been lucky enough to visit some time ago the Star Wars Identity exhibition in Paris… and how was my surprise when I saw this huge 3m long original model of the ISD Avenger! Then I took a huge amount of photos of it for references, enough to do a rough 3D scan of it!
The goal of the 3D scan was not to reuse the result, but only using it as a reference for the proportions. I only have the top part, but it was a huge help to be sure that I was respecting the original movie model. I’m planing to do a 80 cm length version which is 1/2000 scale.
So far, all the volumes have been made by using the ZSphere retopology, then after I start using the ZModeler brush to refine the model.

Next stage is the bottom part which need to have it’s cut and finishing adding the main volume before starting the long stage of fine details…
Hi,
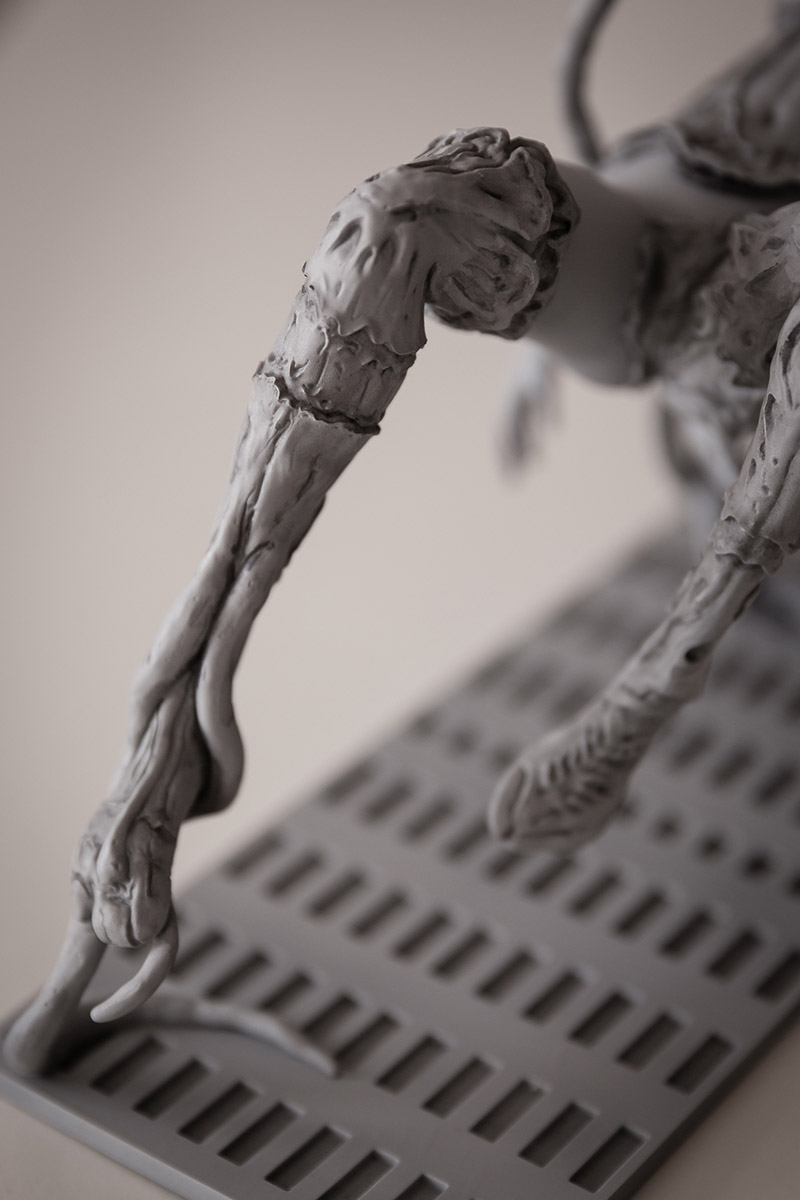
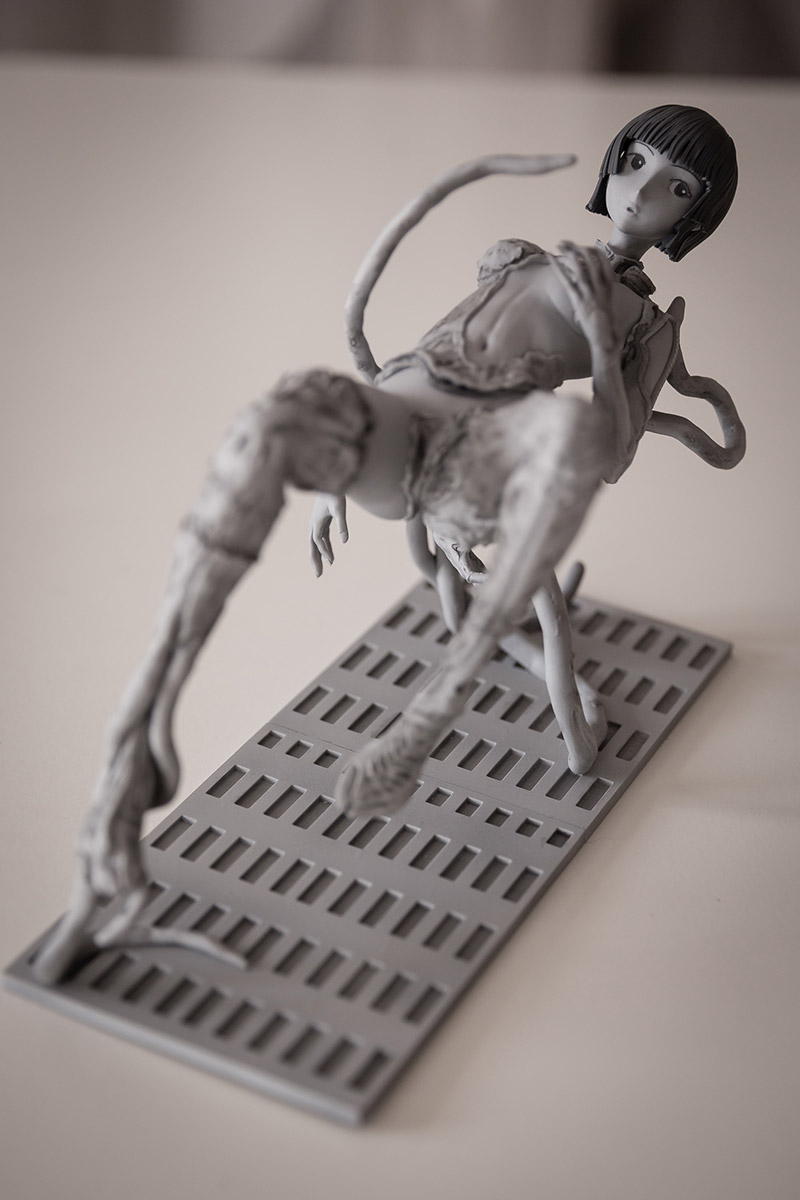
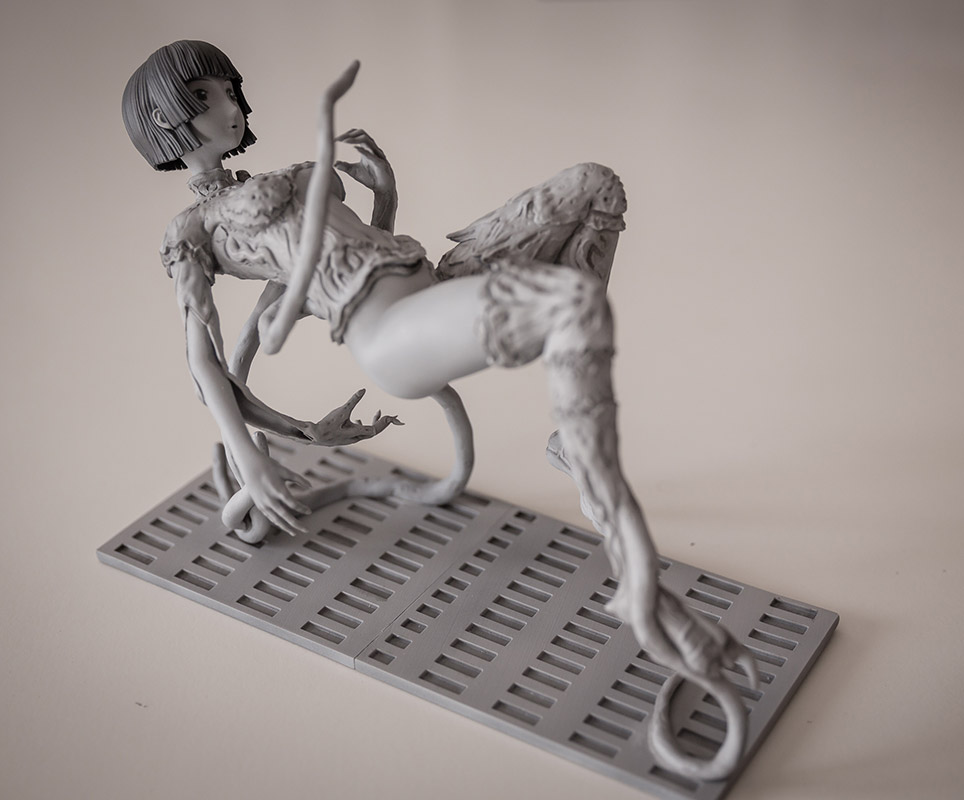
I want to share with you an update of a previous project of the Ena Hoshijiro Project I did in the past. For my last trip to Japan, I reprinted the model, but I also did some improvements and refined the sculpt. I also did the print at a larger scale. Now that I have a Form2, the printing quality drastically improved and I can go higher in details without really consider the layer visibility in the final print.
Of course, 100% done in ZBrush
Here are some parts printed, straight out of the printer without any post process/sanding:


And now some photos of the final model. I applied some shadows effect on the “Alien” parts:


And here is a summarize of my ZBrushLive project. You can watch all the videos on YouTube. Note: the first one has some french comments while everything else is in English.
Here is the last video from the playlist:
[youtubepl]PLMjnnUF3eJFee5ZOaGNusn8eyOpCswaxT&index=12[/youtubepl]
And the playlist link: https://www.youtube.com/watch?v=7_u7E3Ssm1c&index=12&list=PLMjnnUF3eJFee5ZOaGNusn8eyOpCswaxT
As a reminder, with project goal was to build a figurine to present at the Wonder Festival Japan trade show, which I did a few weeks ago. Again, for those who followed me in my figurine journey on ZBrushLive, this is a tradeshow to visit if you are a figurine lover like me!
Then before starting here is a photo of the final project. It’s 50cm tall from top to bottom, full 3D printed except the glass rod.

The I started the sculpt with my basic workflow: creating a base mesh with ZSpheres that I quickly reshape with DynaMesh and as fast as possible, I switch to Subdivision levels until I’m fine with the body. I always prefer SubD as it allows me to go up and down in resolution on the fly which is perfect for shape refinements without losing top details. As you can see below, I used background references found online, from an article about the game.

I quickly did some tests prints. I usually do that a lot at a low resolution, without any kind of 3D printing optimization like cutting or adding keys. My goal is to see with my own eyes in the “real world” the 3D model. It’s the best option I found to see what is working or not working, where I need to refine a part. It also gives you a good sense of proportions.
I did two prints, one with the Form1+ which was my main printer at the beginning of the project and a big size model with the Ultimaker 2+ Extended.


The next step was about creating the clothes. For this purpose, I used multiple techniques like using the topology brush on top of a very basic sculpted mesh (to provide me the shape) or the ZSphere retopology which I still use a lot. I also did some mesh extract, but I try to avoid it when possible because I tend to control my topology when possible as I prefer working with a low-resolution mesh to refine the global mesh, associated, again, with subdivision levels. Of course, in some scenarios, using ZRemesher after a mesh extract is a very good option as you can use the Polygroups from the extract to produce clean shapes in no time.

And again, some test prints. The following one is the perfect example of what you mustn’t do. I did it for the purpose of explaining the supports constraints during my ZBrushLive. As you can see, I didn’t split the model into multiple parts. The hairs and head are a single part. Then because of the 3D printing technics and constraints, you need to add these supports. They help parts to grow and give some strength to the building process.
Unfortunately, when you remove them, you leave multiple spots on the models that need to be sanded as a post process. Of course, this sanding can remove tiny details or sometimes, it’s difficult to access some parts to sand them or simply it’s almost impossible to remove these supports. Look under the hairs on the back of the head.


Here is another test print is done with an FDM printer (top) and SLA printer (bottom). The FDM print is not that bad, but it can’t retain little details like the panties ones like the SLA print can do it. I’m using FDM printer as a draft sometime as it’s cheap to print compare to SLA which is way more expensive. Note that the model of the hips is at the final scale (1/5th), and you can have a good evaluation of the size when doing the comparison with my fingers.


For this part, I wanted to see how the little flower will look like. It’s a tiny detail, less than 5mm width. This is where SLA printing can be strong and produce very thin details which would require great skills in traditional sculpting to do the same. Again, it’s at the final scale.

I created the Pod with the ZModeler almost everything with it. I wanted to use the Live Boolean, but at that time of my ZBrushLive, ZBrush 4R8 was still a beta, then no way to show it to the public. ZBrush 4R8 really missed me during the ZBrushLive process
For the 3D print test I did, I used the beta of ZBrush 4R8 where the booleans have been a great help to do the articulations. Of course, the large and small arms are rotating

Here is the final test print, again, at the final scale. Quite big!

And here is the almost final model with all the parts. only the rod is not at the good size, the real one is longer (250mm)

Speaking of this glass rod… One of my main concern was “how to make this model flying” and of course, I came with this glass stick… but except the balance, of the whole model around the leg, I was concerned wit hthe total weight and the gravity center of all of that model. The I decided to build a large base and hiding under the dead robots some weight (200g) and it worked perfectly!

Here is the base on top of the build platform, just at the end of the print. The radius is 180mm but the build volume of the form2 is only 145x145x175… by finding the good angle, you can print quite big models in fact. I also wanted to avoid to split that part as much as possible, to keep the strength as good as possible.

The 3D printing process was quite long at the end because I had to do multiple optimizations, checking the assembly, looking at which part I had to hollow and how to deal with the keys and much more. But again, the Live Boolean was a huge time saver and a great help for the model preparation, as you can see in this little gif.

Below some parts directly straight out of the printer, with no post process at all except the IPA cleaning. The Form2 is able to produce very high-quality prints with almost no layers visible. Another very important point is how much you need to split your model. The more you split, the more preprocess work, but the better you control the supports location and then you are able to put them in places where it will be easy to clean and sand without affecting important details.

As soon as the supports have been removed and some cleaning/post process work done, I tested the assembly. Fortunately, everything was fitting perfectly, no need to redo some parts.

The fun with the support: so many tiny supports to remove and which will go to the trash. Unfortunately, supports are totally lost, which impact the cost of the print.

Here are all the final parts of the model with a layer of primer paint applied.

Then came the painting process. Because I’m not a specialist and I was lacking time, I decided to do only 4 shades of gray. Doing more painting would have mean more shadows, highlights and stuff that i’m not mastering and it’s so easy to screw up a model with a bad painting.
I used a lot of masking tape (from Tamiya). Next time I’ll use this masking paint that I bought in Japan. It seems way easier to use!

Painting always produces a lot of mess… and of course, bad smell. I used Tamiya spray cans as well as an airbrush with the help of a painting cabin.

Then these are some extra photos of the final model. I had a good idea to make a top part falling on the table while doing the final assembly, breaking some fingers and flying hairs. I was sooo happy…


Here is a photo of the people watching my presentation in Japan. Wonder Festival is always crowded and it’s impressive to see that now how many artists are using ZBrush there to create their figurine. ZBrush is really everywhere!

We also organized our first ZBrush MErge event which was like a mini ZBrush Summit where we had several presentations by artists and studios. One of them was from PlatinumGames which did the NieR Automata game and Jin Matsudaira did a fantastic presentation about how they used ZBrush to build 2B. Note; you can watch the presentation in Japanese on our Japanese YouTube channel: https://www.youtube.com/playlist?list=PLNSVUS0ZUkGcA3qjMYJHdNY__Zb4-vf-U

I learnt after the presentation while eating some gorgeous Yakitori that Jin followed some of my ZBrushLive presentation! He enjoyed my work which made me ultra super proud Here is a photo of him holding a part of my figurine.

That’s all for now. I will do some edits on it as I want to improve some parts and reprint her in the future with I hope this time, more time to do some better painting on it. I posted some extra information and more photos on my english website: http://ultra.toys/2017/08/2b-maid-version/
Of course, comments are welcome!
Vraiment cool tout le processus!
Really nice stuff, bien joué
Nice Post, I just attempted printing this with mostly default settings from 3D printer.I must emphasize that I am a complete newb at 3D printing and have only printed a few models and am just getting around to actually learning more about calibrating the printer and trying to determine which speed(s) are best for what. I got all beginner guide for 3D printing via http://3dinsider.com/3d-printing-guide/.