ZBrushCentral

Rendering Zbrush Displacement Maps in Maya

trapdoor: comvert your tiff file to .map format

wolfbane: make sure the shader file node is pointing to the displacement map. Sometimes I have had tis problem when everything seemed fine. IOn this case I recreate the map in ZBrush and apply it to the shader network ( dont forget to convert to map)

Bloating means the remapping of displacement values is wrong because
a the map is wonky
b the alpha gain / offset is wrong (make sure the - sign is in the alpah offset)
c the wrong map is in the file node

Also make sure, as abbasi notes, to have a subdivision approximation attached to the mesh.

Hope that helps!

S

Hi,

I need some help with a displacement map I have generated. I used the md2 r32 plugin to create the dis map and conveted it to a .map file and it appears that when i render in mental ray (maya) the uv seams appear as very fine lines all over the body.

Feature displacement is Unticked, mentalray approx is set to spatial and every thing else is set to standard. Any help would be great, I have included a pic below.
Uv Seam.jpg

Sorry scotts… i did converted it to .map and have a prroximation editor and did almost every thing u mentioned but still i dunno whats wrong… by the way, mental did gave me a error like “your <filename>.map texture file is not found”, i have attached a pic, hope it helps… [attach=48932]Tauren_DispTest.jpg[/attach]

Attachments

Tauren_DispTest.jpg

HI Scott,

When I try coverting the tif to map file I am getting the same error message.

Thanks,

TD

wolfbane: It appears to me that your UV’s might be overlapping causing your model to explode!!

Jdraks: i beleive ther is an option in the MD2 Export Options which says Seamless, you just have to check it!. hope that does the trick.

one thing i would like to mention here is, i know all of you guyz have read Scott’s ZB to Maya PDF. but i would recommend reading it again!, throughly. there is literly every possible workflow regarding Maya and ZB, you just have to concentrate!.

You do this and hopefully you wont have any more problems, and if you do you will know where to track them and solve them!

Cheers!

But dude, i dont my UVs is overlapping cause i used the pelting tool plugin to unfold my UVs. and i really read he pdf a lot of times, but anyway , i will try to look for seamless button and try it out as soon as i can get to my com… but thanks abbasi

Thanks abbasi it worked:+1:, If I bump up the dis map detail I can see some fine lines but for what im using if for it looks good. I will post a pic shorlty.

Cheers

Just a reminder, if you’re using the MR approximation editor to handle the displacement, you want to make sure that the displacement settings in the object node are turned off. If you don’t, this usually ends up creating a multiple displacement on the same mesh, making it look bloated.

wolfbane - sometimes pelting tools doesn’t do a great job in unwrapping the uvs. Make sure that there are no uvs that are overlapping. And make sure the export options of your displacement are flipped on the V. Zbrush likes creating a texture map that is opposite of maya’s uv settings.

Thank you…! By offering such knowledge for free, you are helping tons of people! You rock dude…

sadfsdf

llego tarde :cry:
the link large not found:cry:

LARGE 26 MEG QT

http://206.145.80.237/zbrush/zbcfiles/tutorial_large.zip

please upload - in other server :cry:

It’s because it’s linked to a different place.

Here’s the right link.

http://www.scottspencer.com/images/video/zTutorials/tutorial_large.zip

Thanks a lot for the updated link! :+1:

digital realm ! thank you ! :wink:

by the new link :smiley:

I’m wondering if anyone can help me with this. It seems that nothing I do works. I don’t think that Maya is even recognizing the displacement map. I have followed the tutorial Scott provided in the beginning of this thread EXACTLY and my results are nothing even close to what he and others have achieved. The Approximation Editor settings seem to work because the model is subdivided and smoothed out nicely but I get no displacement occurring, not really even a little bit of definition out of it. The simple render you see below is what I get with the settings you see in the other image. The render takes about 1.5 minutes (no lights or anything else in the scene) which should not take that long on my machine. See specs below:

My computer specifications are as follows:
OS: Windows Vista 64
RAM: 8GB
Video: Nvidia GeForce 1gb
CPU: Intel 3.0 Ghz Quad Core
Maya 2008 SP1 64 bit

I am also having these issues:

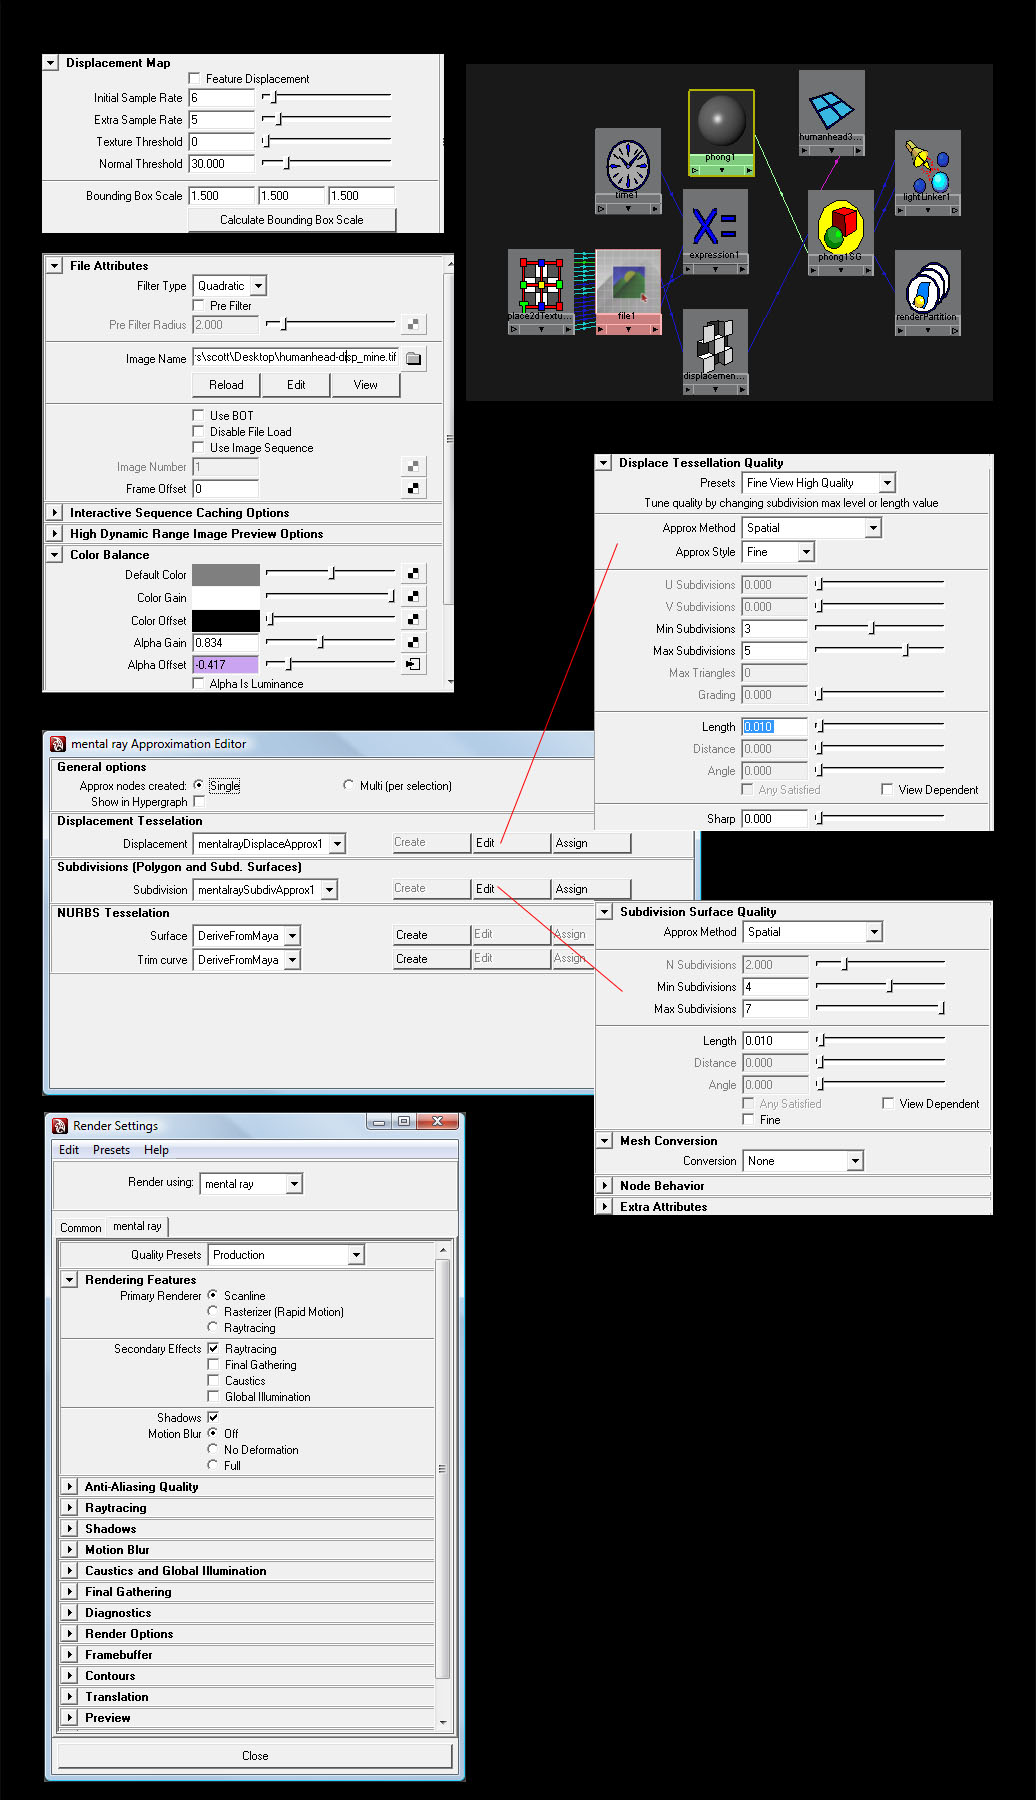
  1. whenever I click the edit button for “Displacement Tesselation” in the Approximation Editor, the “Presets” keeps defaulting back to ‘Custom’ instead of retaining ‘Fine View High Quality’.

  2. You will notice that in the images for settings below, I am using the 0.834 alpha gain provided in the other thread for displacement maps for external renderers. I tried using Scotts alpha gain of 10 and 12 but all it does is really bloat the head to an extreme amount which is why I am using the 0.834 which gives me what you see in the rendered image below. I realize I will need to play around with these numbers but nothing I enter gives any better result than what you see.

  3. I also disconnected the displacement node from the model and I get the exact same result as what you see. Which tells me Maya isn’t even pulling in the displacement in the first place or something. Am I missing a setting somewhere?

Any insight as to what could be causing this would be greatly appreciated. I am working a character and am trying to apply these methods to it which weren’t working either, which lead me to this tutorial, so I tried it and I still get the same results, NOTHING.

I’m also wondering this, I have seen a lot of tutorials using displacement and normal mapping together, however, if you can achieve this level of displacement (once I get mine working correctly) do you really need to do normal mapping as well?

Thanks!

Attachments

disp_p_1.jpg

disp_settings.jpg

really if displacement maps are confusing try a simple test.

Poly plane with a black and white image assigned to the disp node.
Add your approx node, tune settings and render

Now you should be able to get the idea behind the different settings after some play.

ZB really automates the process of generating maps.
I can’t underline enough that the alpha gain and alpha offset numbers are a RATIO.

tip: a bump node can be set to tangent normal instead of a straight bump.
also the mia material will allow for two bumps plus a displacement.

:+1:

Thanks Morph!

Shortly after posting, I got it to work. I found another thread that said to turn on the “Use Maya-style alpha detection on file textures” inside the Maya Settings and Preferences under the Rendering section. Anyway I turned it one and now I’m getting displacement. I’m still trying to fine tune though.

I noticed something else though, it seems that when I use the color map generated from zbrush, I get a lot of seems and it doesn’t seem that the texture really matches the mesh anymore. If I don’t do any approximation and simply use a normal map to generate my definition, then the color map displays as it should. Is there something else that needs to be done to the color map when using displacement?

Hope this makes sense.

Thanks!

sounds like uvs are getting smoothed.

-you might need to re-create your model with SUV checked in zb.

or

-try not using disp tess only subd approx

without seeing your scene its hard to tell

i use Zbrush 3.1 and maya 2008. i do step by step like Scott for 32bit map but at render time i have no displacement. i think something is wrong about my dis maps as they’re very washed out and low contrast almost entierly 50% gray and a very weaked fantom of grays.:cry:
thanx

Hi great tutorial. I am using the displacement to change the silhouette of my character and using a separate bump map for the wrinkles and pores of my character. I have got the displacement working great but when i attach a bump map to the bump node it doesn’t come through correctly.It looks like its kinda under the displacement map. is there anything i need to be aware of to get it working. Cheers