ZBrushCentral

Medieval Knight Helmet Visor advice needed

I’d go even lower. As low as possible so that subdivision handles the bulk of the work for you.

I started with a cube and subdivided it once to give it some instant roundness. I deleted half of it (the top, bottom, and back), keeping only the front and sides. I inserted another edgeloop or two into the sides so that I could define the borders a bit better, but otherwise stuck with this basic 20 polygon shape which made it very easy to work with.

From there there’s hundreds of ways you can approach it. Inset, creases, bevels, etc. Standard Subdivision techniques.

Here I’ve extruded some thickness into the visor, creased the polygroup that made up this thickness, and then added control edges closer to the middle so that it will maintain its sharpness while subdividing.

visor0.jpg

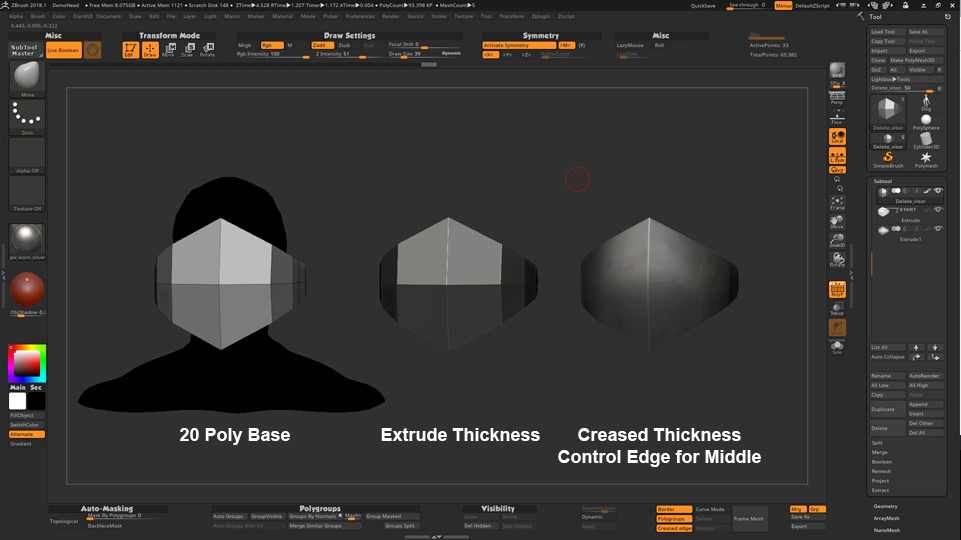
A bevel can later replace the creased thickness, but for now I’d stick with crease tags as they will let you work with fewer polygons in case you still need to make changes to the shape of the visor.

wow did you make these screenshots yourself? your are being very helpful thanks you so much :smiley:

Here is my model i made following your advice. it starting to look good the only problem i have at times is moving a whole edge-loop and that z modeller and symmetry don’t want to work together some time and it would say operation cancelled non symmetrical .attempt 06.jpgattempt 07.jpg

Attachments

attempt 06.jpg

attempt 07.jpg

Hi i am having trouble making square holes using z remesher any adviceattempt 08.jpg

Attachments

attempt 08.jpg

update: i used bridge to fill in the gaps i made when i created the holes i just to make the holes more squareattempt 09.jpg

Attachments

attempt 09.jpg

the problem with creasing is that i creates this weird look its a bit hard for me to describeattempt 10.jpg

Attachments

attempt 10.jpg

last update i promise i fixed the problems all i need to do now is making some of the edges look smoother.attempt 11.jpg

Attachments

attempt 11.jpg

It’s looking a lot better. The pinching is likely the result of a tight edge loop running across the entire surface. This is good for the holes to help control the sharpness, but not the rest of the mesh where you don’t want the sharpness to exist. And this is where classic subdivision modeling techniques really come into play.

If this were a traditional modeling program then I would suggest a different approach so you can take advantage of the program’s modeling stack, but since zbrush doesn’t have that kind of functionality (and because you might want topology that also favors sculpting / painting) I would stick to a more ‘brute force’ method that either mostly ignores topology (Live Booleans) or relies on using a lot more polygons to eventually hold the shape.

Here is an example of what I had meant earlier. You create the base shape with as few polygons as possible so that subdivision handles the heavy work of creating the real shape you want. Then you actually subdivide the model a few times and delete the lower levels so that the subdivided mesh becomes your new starting shape. You then cut your holes into this denser mesh so that the edges automatically will be tighter / sharper without destroying the smooth curve of the surface.

visor2.jpg

I really have to ask again did you make this tutorial yourself. and you are being extremely helpful:D thank you so much

Hi i have tried subdividing the base mesh a few times and then making the holes before extruding the thickness theres less pinching then before but there is one near the front of the mouth pieceattempt 12.jpgattempt 13.jpgattempt 14.jpg

Attachments

attempt 12.jpg

attempt 13.jpg

attempt 14.jpg

Yup, I’ve been creating those images.

Personally I’d subdivide at least once more before you start making the holes.

thank you very much for the images there are really helpful because i think i learn better visually if you know what i am talking about. i will try and subdivide another time but i think i might a problem select all the poly faces for cutting out the hole if i subdivide it again. how did you select of the poly faces is there a method you are doing or does it take a bit of patience?

Today i extruded the thickness and then creating the holes a better result but there seems to be a bit of pinching in the top left corner of the holes in the backattempt 16.jpgattempt 15.jpg

Attachments

attempt 15.jpg

attempt 16.jpg

i think one of things i am struggling is making the basic shape like you did. how you make move the points around? did you use z-zremesher or the move because i cant seem to move a whole edge loop around or moving it but moving other edges aswell. here is the 20 poly shape i start with using your instructions.attempt 17.jpg

Attachments

attempt 17.jpg

ignore my last post i think i got itattempt 18.jpg

Attachments

attempt 18.jpg

i think i have actually done it.
the mask looks very good and i cant thank you enough for your help i think one of the mistakes i was mistaking was using dynamic subdivision a lot for the process instead of subdividing it normally. after that i used the smooth deformer in the deformation tab to get rid of some of the pinching.

thank you very much for your help i probably wouldn’t have known what to do without your help and you think theres anything else i can do to improve it just let me knowattempt 19.jpg

Attachments

attempt 19.jpg

one last question: would my current model be considered low poly and if not want can i do to get a nice low poly for something like a video game? just wonderingattempt 20.jpg

Attachments

attempt 20.jpg

That would be too high for a game model. It’s hard to pinpoint what a target polygon count should be when there are so many factors involved (the hardware the game runs on, the type of game, how far away the camera will be, how many characters are supposed to be on screen at once, the art style, etc)… a character could be 500 polygons on the low end to 150,000ish.

It might be better to think of a specific game you’re aiming for. Skyrim? For Honor? Kingdom Come: Deliverance? From there you can try to get a good look at what their average wireframes are like based on what goals those games are trying to accomplish across all the different variables. Once you have that target number in mind you can then start to consider your model more.

For example: if you are making a hero character and decide to aim for somewhere between 100-150k polygons for the model, is it then wise to use 20% of that amount purely on the visor alone?

For game model topology, the two things you normally want to consider most are deformation and silhouette. The helmet is a solid piece of metal that moves on a hinge, so you won’t have to worry about deformation. So focus more on just capturing its silhouette for the distance the model will be normally viewed from. If need be, normal maps and the like will be able to help make the game model look like it has more polygons than it does.

i see what you mean any tips or methods for retopologizing it when i use z remesher sometimes the mesh does not look as clean. Im at very good with reptopologizing things right now sorry.attempt 21.jpgattempt 22.jpg

Attachments

attempt 21.jpg

attempt 22.jpg

i think i have managed to make one with a nice low poly count basically what i did was follow your instructions but don’t sub divide it.

re topology is probably one of my weaknesses in z brush especially when i tried to sculpt human female characters and get i nice low poly count while keeps certain things such as the shape of the lips. but a problem for another thread i might post .:smiley:attempt 23.jpg

Attachments

attempt 23.jpg