yeah, ZBrush does everything via CPU, including all real-time rendering… so it’s very CPU intensive. My macbook pro gets up to 83 Celsius sometimes–that’s almost boiling point at 181.4 Fahrenheit (boiling is 212F)!!! You can see this using the utilities iStat Menus or iStatPro downloadable @ islayer.com.
Hello,
When I create an alpha why does it come into zbrush with a radial fade? I see (under the alpha palette) there is a radial fade slider, but why is my alpha automatically being given a fade that is out of my control? And by the way, the radial fade slider can’t turn this auto-radial fade off … it should be able to.
OH YEAH, its my focal shift that is causing the fade, sorry to bother everyone please delete this useless post thank you
Hi there,
unexpectedly, I was reached by the update yesterday, installation was quick and without failure. (Mac Pro Eight Core, 8GB, OSX 10.5.6 and Mac Book 2,4 GHz Duo, OSX 10.5.5)
After a first look everything seems fine, displacement works now without tiles.
After all the trouble of the last weeks a good result.
Thanks!
Stephan
P.S.: The ZBrush-Icon on the Mac Pro does not appear in the right way in my dock…
Displacement Exporter for 3.12 OSX (copied from questions and troubleshooting)
The Online documentation instructs you to use displacement Exporter to export a displacement map but on another thread I read that displacemnet exporter is not available for 3.12 OSX. IS this correct? And if it is, how am I ever going to get a working displacement map out of Zbrush and into Maya?
I did it through the alpha but it really didn’t work at all.
Any suggestions? Thanks.
The 3.12B version has features directly in the Tool>Displacement Map menu for creating 32-bit maps. DE is no longer needed for this. Elsewhere in this thread, I have given step by step instructions for creating and exporting displacement and normal maps.
Also, be sure to read the 3.12 PDF (it’s in the Download Center – see my signature). This coveres the differences between 3.12 and 3.1. We are currently updating it for 3.12B.
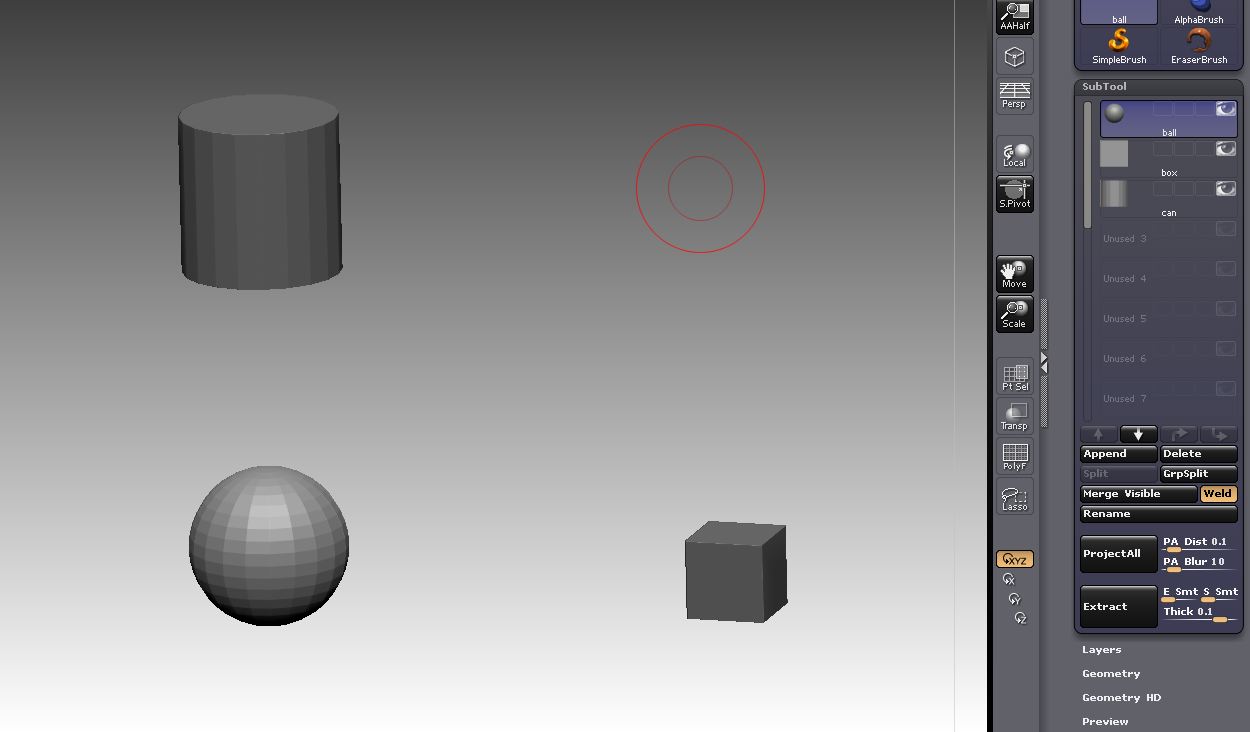
I have been having trouble understanding pivot points so here is what I did:
I created three primitives in Maya: a ball, a box, and a can (edit: I moved the meshes away from each other before exporting). I exported them one at a time. I imported them one at a time into zbrush 3.12b. I selected the ‘ball’ and appended the box and can as subtools. Because the ball was first on the subtool list, the pivot point is at its center. With ‘local’ off I rotate around the ball, everything seems fine. I select the box subtool, I hit ‘f’ to frame it, I hide all other subtools. Then when I try to rotate around it the mesh swings out of the canvas. This is because it is rotating around the pivot point of the ball.
-BUT- in zbrush 3.1 on a pc machine, my friend never has this happen. He follows these same steps. When he rotates around the box (with all other subtools hidden) the box rotates around its own center mass - allowing him to work on it. If there is more than one visible subtool a ‘center point’ is shared for rotating/navigating.
We can’t figure out why this is happening. In the past what I do to avoid this problem is I simply turn ‘local’ on so I rotate around the last edited area on a 3d mesh.
Hello
I just installed ZBrush 3.12B - everything sems to work fine so far, except that I can’t use the Help menu. I get this message :
Attachments
The help system is not available in 3.12B. Please see the online documentation (link in my signature) for 3.1 docs and tutorials. For documentation on the changes from 3.1 to 3.12 see the downloadable PDF from the Download Center (also in my signature). We’re currently updating it for 3.12B.
First off, thanks for the update to ZBrush 3.12B. Hasn’t crashed on me … yet.
I would like to have the “Activate Symmetry” and the X, Y, Z and M buttons on the top shelf (where the Edit, Draw buttons are now) and I’ve followed (to the best of my ability) the instructions on the Wiki to do so (prefs->customize, turn customize on and Control-drag the interface element to where I want it to be, turn off customize and go to the Config sub-palette and click on the Store Config button). It works for most other sub-palettes as I have a Load Tool and a Save Tool As button on the top shelf, but no go on the Symmetry buttons. I’ve found out that the Symmetry sub-palette doesn’t appear in the Modify palette until there’s a tool present.
Other than this one little nit (and it’s not too much to just go to the Modify palette and activate symmetry there), I have nothing but smoothness with ZBrush on my Mac.
I’ve experienced this with the first 3.12 update also. Is this a known issue or is there a twist to the instructions that I’m not getting?
I’m using a Quad core intel Mac Pro 3Ghz, 2Gb ram with Mac OS 10.5.6. ATI Video card w/ 512 Vram (that came with this mac).
thanks!
Hi Mike,
I have got the same problem, it would be fine to have the symmetry-buttons on the first shelf. I solved it for me, that, after loading a tool (or creating a new one) I go to preferences=>config=>restore custom UI, then the symmetry buttons keep on staying (that requires, that you once have stored a new custom User Interface for yourself).
Not an elegant, but working solution.
Greez,
Stephan
Thanks Stephan! It works!
Not exactly an intuitive solution, but one that makes sense once it’s thought about.
Now if only ZappLink for the Mac was released…(sigh)
Hi everyone,
I am working on a project and have encountered something I’m not sure how to fix or readjust and hope someone can help me?
Problem: When I turn on symmetry now and move one brush cursor to the tool I’m working on the other symmetry cursor is way off the tool to one side? This is probably something simple but I can’t get it fixed. I’ve tried scaling up the tool and moving it to the center of the two cursors but it just movies out on me again. Is there a way to reset the center pivot point on my object/tool so it will again be symmetrical between those two cursors? I’ve re-initialized Zbrush and reloaded the tool several times. This seems to be doing it to test objects/tools as well. It’s kind of frustrating as I’m having to sculpt freehand on both sides of my tool and am loosing that perfect symmetry I was after. I am using a Wacom Tablet as well.
Hope someone can help me out?
Thanx in Advance
Ange
ange321q,
What I do is click on ‘set pivot point’ button, under transform. This seems to place the mesh at the world center, then x, y and z axis points will work. But I have a routine. I bring in my mesh (head, body, or a hard surface mesh I want to use the deformations on), set pivot point, then mask half of my mesh (making sure the mask rectangle does not go over the center edges of the mesh) and then under tool, deformations, I select 'smart resymmetry. A message should tell you that ‘full symmetry was found’. THEN I begin dividing and sculpting.
Another thing you can try is clicking on local symmetry under transform. If I rotate a head at the neck this often works to allow me to continue sculpting the face symmetrically even though it is turned to the side.
But I must warn you. Miguel Ortega and Zack Petroc have warned against hitting the set pivot button. I can only assume this is because they are working within a pipeline with other applications. I hit it all the time to get my symmetry working correctly.
As far as I know, there is no fix. The fix is turn on symmetry and never turn it off until you are sure you never need it again. This, usually, is during the “sculpture” phase of modeling.
neilford
The only reason I can think of for warning against using the S.Pivot button is if you forget to use the C.Pivot button later. The beauty of S.Pivot is that it’s a temporary change. But if you export the model without having used C.Pivot to clear the pivot point, then the new pivot point is what’s used and that would of course mess up a pipeline.
Moral of the story: Don’t be afraid to use S.Pivot if you need to. It’s a very handy feature. Just always remember to use C.Pivot before exporting!
Earlier in this thread I showed a human with subtools (male). When using transpose master the subtools would end up shrinking and inflating. I’ve experimented and found out why this has happened.
It has to do with the pivot point I believe (using my gut feeling after reading Aurick’s post about the clear pivot).
I’ve fixed this mesh for use in a pipeline here is what I did.
I merged all the subtools at their lowest subdivision level (getting rid of the higher levels). I exported as an .obj. I opened this is in Maya, where it came in TINY. I set the maya pref/settings to feet. I scaled my meshes to a six foot tall male. I exported this to my desktop. I restarted zbrush and imported this mesh. In tool, polygroup, a auto-grouped. Then I split the polygroups into subtools. Then I divided the subtools to different various levels.
Now I used transpose master and everything worked out fine.
Now that I have this generic male mesh ‘clean’ in the sense it does not have size issues when going back and forth from zbrush to maya (or inflating issues) I can use it in a pipeline more readily. I think the old ztool had a bit of ‘residue’ for a lack of a better word, when it came to me using the set pivot point. Just a gut feeling.
Anyway, this was my goal anyway, now I can use transpose master with more confidence.
[edit 1] I projected my higher division details onto this new ztool. Then I used transpose master and I am back to the same problem, the figure shrinks, inflats and looks horrible.
[edit 2] I eventually got transpose to work. By importing the highest subd. level .obj onto my multiple subd. level subtools (subtools had been scaled larger in zbrush, and I am leaving out a few steps).
I have a head mesh.
I export it to my desktop.
Then I import this mesh into Zbrush.
In my tray I select the original ztool. I select append and add the newly imported head.
It lays correctly on top of the original mesh.
Now I activate transpose move and as I slide the new head mesh downward it pops to a very large size.
My work around is to save the ztool before I use transpose in any way. Restart zbrush 3.12b, load the ztool. Now I can use transpose without the mesh snapping to a large size.
Every dock icon within OSX has the option to right click, quit.
Zbrush 3.12b can not.
On my Mac (OS X 10.5.7) I get the “standard” dock menu when rt clicking or just click and hold. However, when the Quit menu item is clicked, nothing happens.
Thanx for the tip. It worked as a temporary solution to keeping the Symmetry lined up on the tool I’m working on but I still have an issue of newly created tools being offset to center-line and therefore not being symmetrical when created. There needs to be either a recenter object option or zbrush needs to snap new tools to the 0,0,0 coordinate. Again thanks for the tip.